


-

Simple and Practical: Easily uninstall unwanted software.
-
Thorough Cleanup: Completely remove residual files.
-
Blacklist Protection: Identify and block malware and adware.
How to Delete Programs on Windows 10 | A Complete Guide
Many of us have deleted programs and apps to keep our computers running quicker and with fewer problems. Freeing up disk space helps improve system speed, and the Windows built-in standard uninstall tools work seamlessly for this. However, the problem comes with stubborn programs that spread their residue files throughout the system. This is when some of us question how to delete programs on Windows 10 that won’t uninstall otherwise.
But no worries. Here are 12 proven methods to remove a program on Windows 10, depending on the underlying issue. So, dive right in.
3 Quick Methods on How to Delete a Program on Windows 10
Windows 10 has a few built-in options to delete unwanted programs on Windows 10. Let’s discuss them in detail.
Method 1: Uninstall Apps Using the Start Menu
Deleting programs from the Start menu is the easiest method for Windows 10, as you do not have to open any additional windows. However, doing so will not remove all associated files from the registry. Here is how it goes.
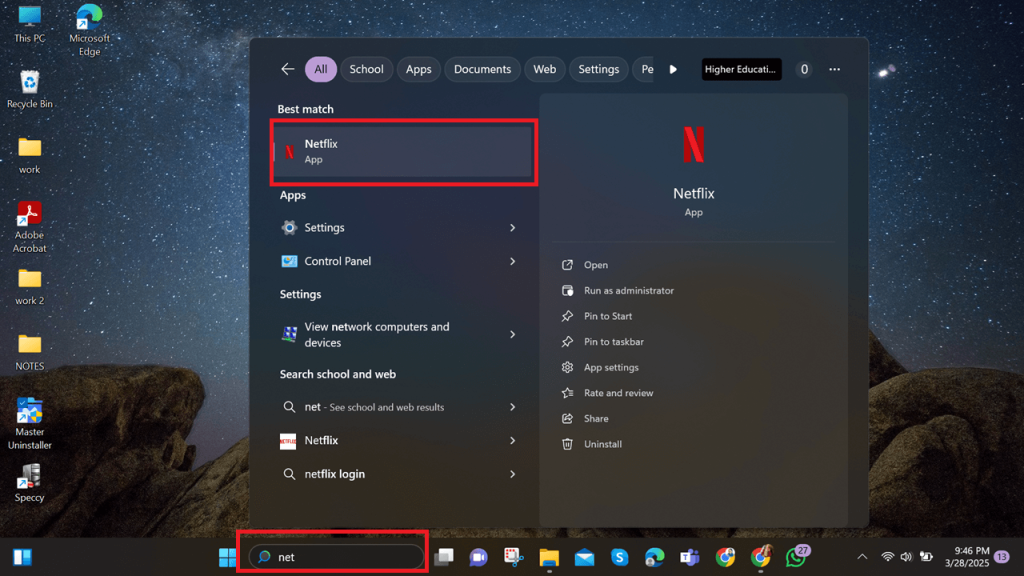
Step 1: Locate the Program
- Open the Start menu, type the Program you wish to remove in the search box, and select Uninstall from the right-side menu.
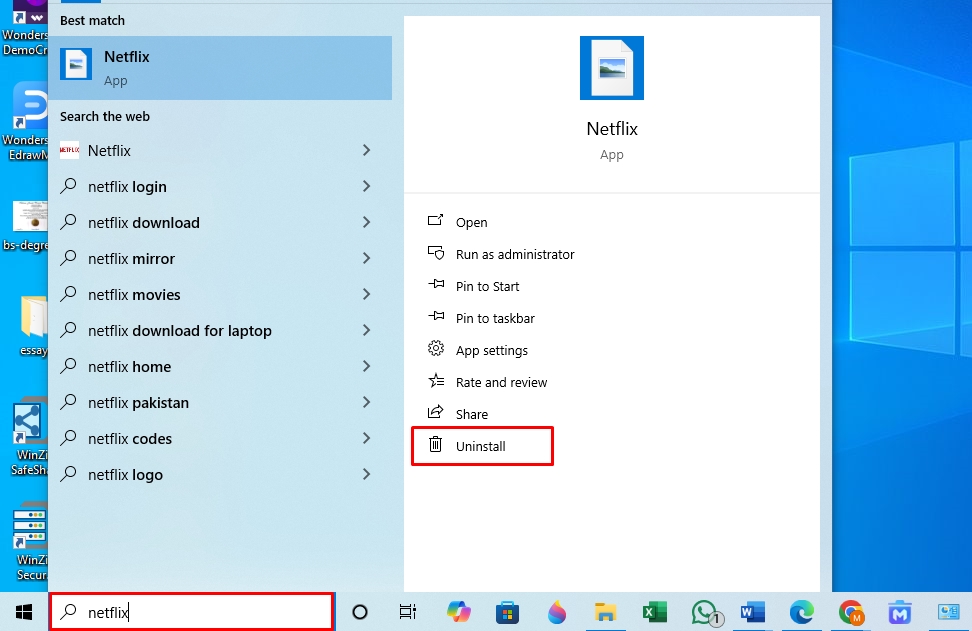
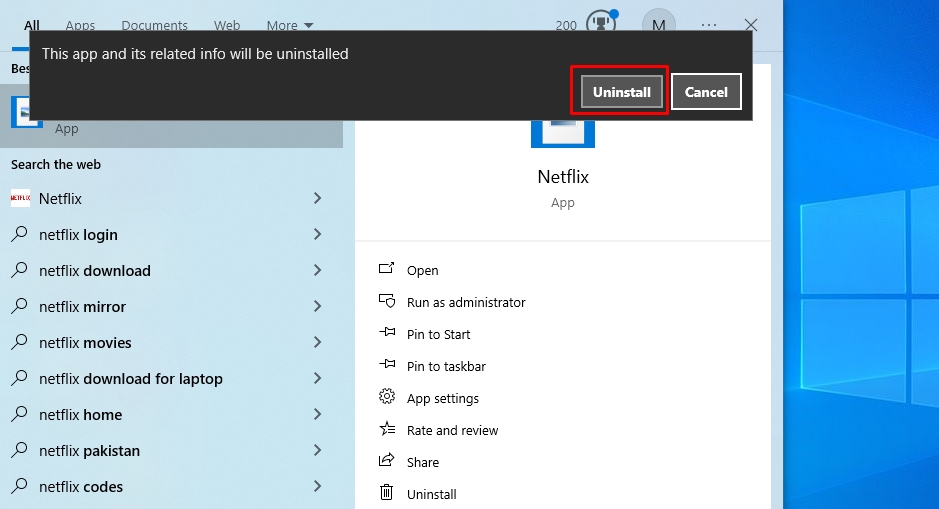
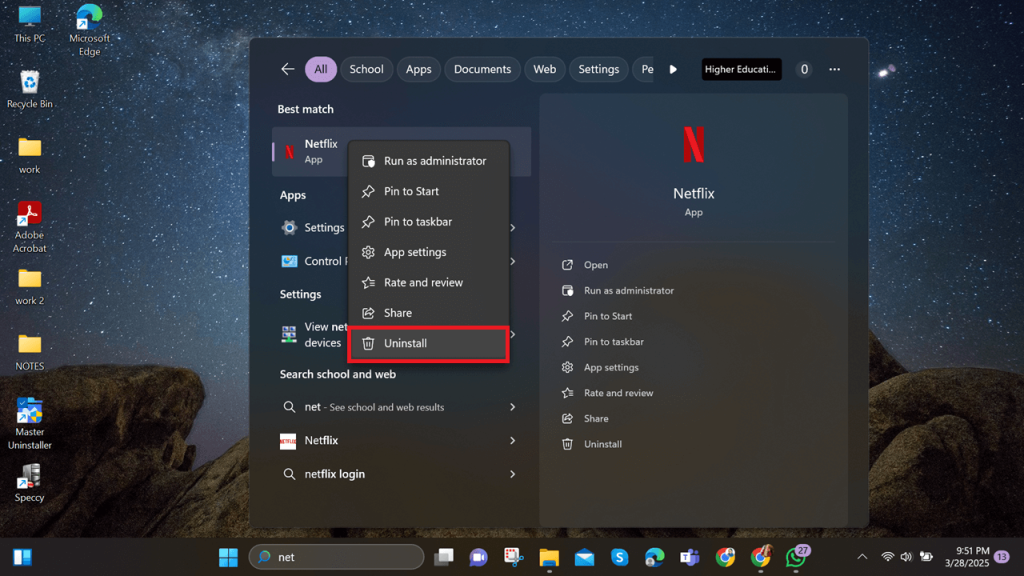
Step 2: Uninstall the Program from the Start Menu
- Again, click Uninstall from the pop-up menu to confirm deletion.
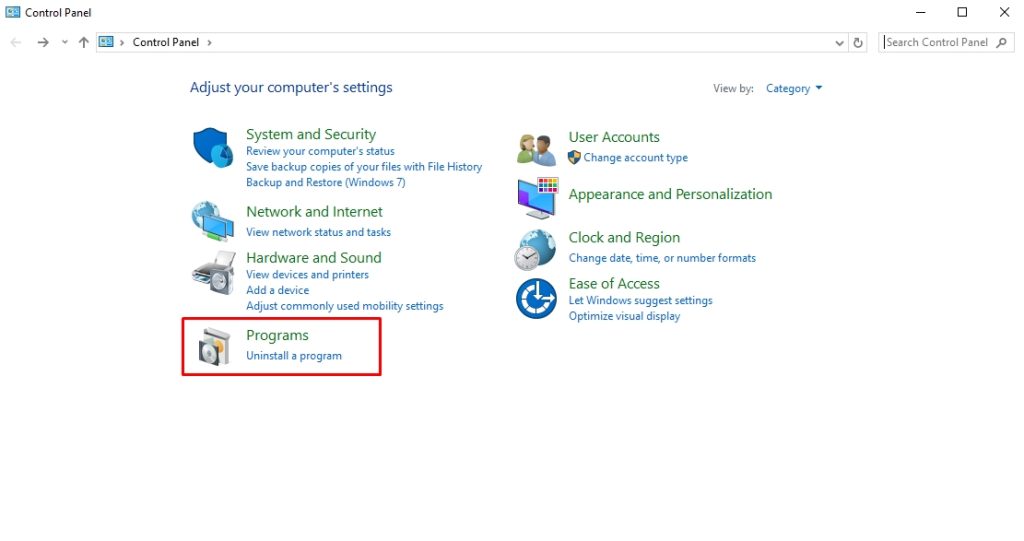
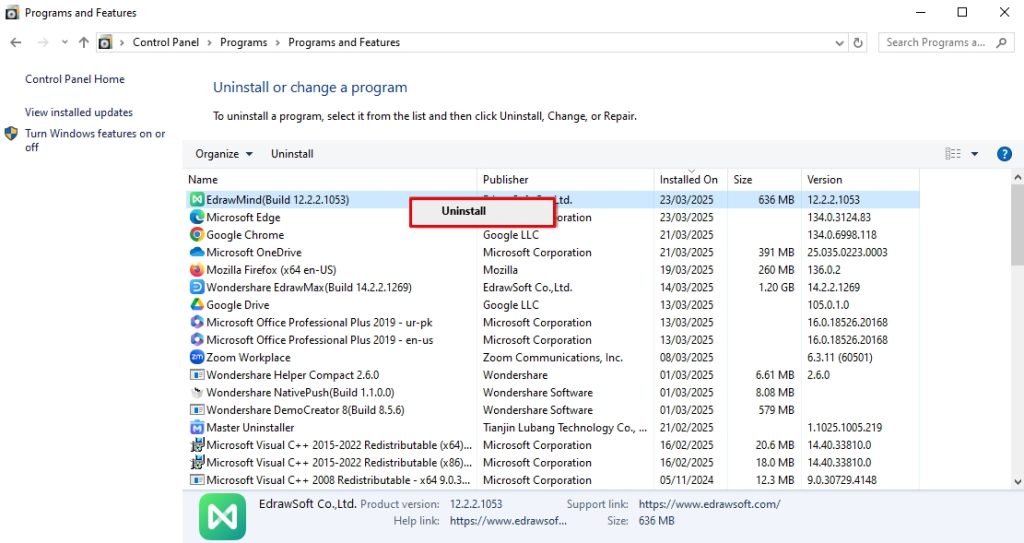
Method 2: Delete Programs Using Control Panel
Using the control panel is yet another straightforward method to delete programs on Windows 10. However, it does not show Windows universal apps and leaves traces in the system. Follow these simple steps to use this system utility and delete installed programs on Windows 10.
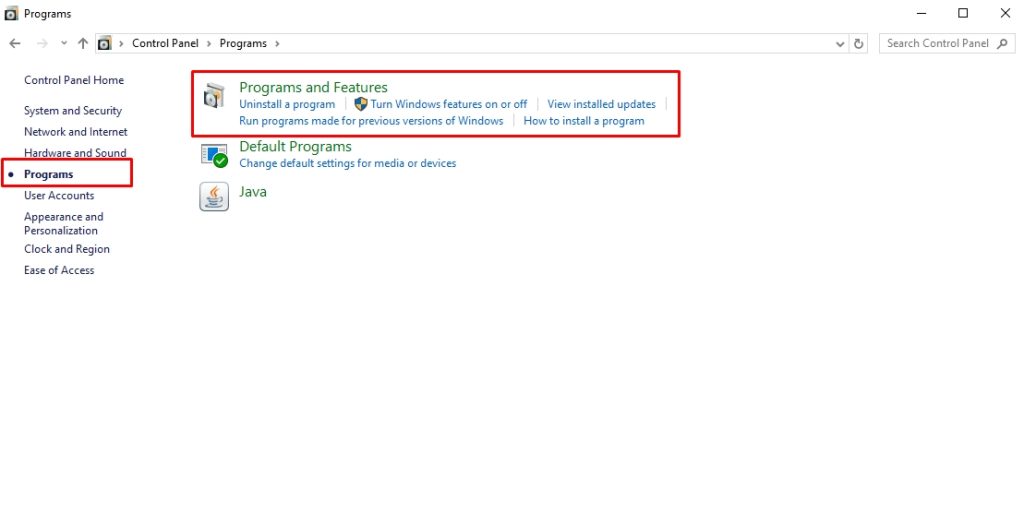
Step 1: Access the Control Panel
- Visit the Start menu to open the Control Panel and select the Programs tab.
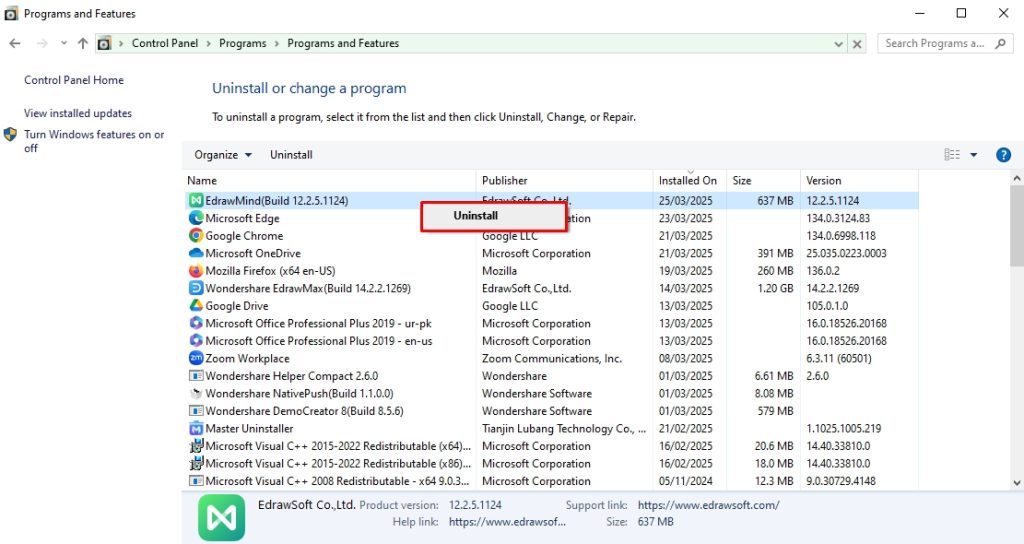
Step 2: Uninstall Programs from the Control Panel
- From here, click Programs and Features > Uninstall Programs.
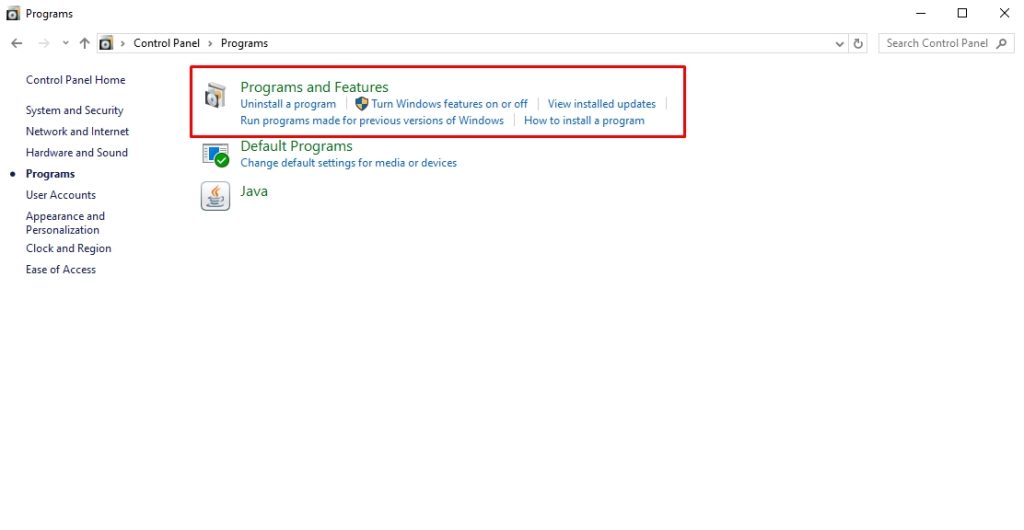
- Right-click the program you want to delete and click Uninstall. Click OK from the pop-up menu to confirm; it should be deleted now.
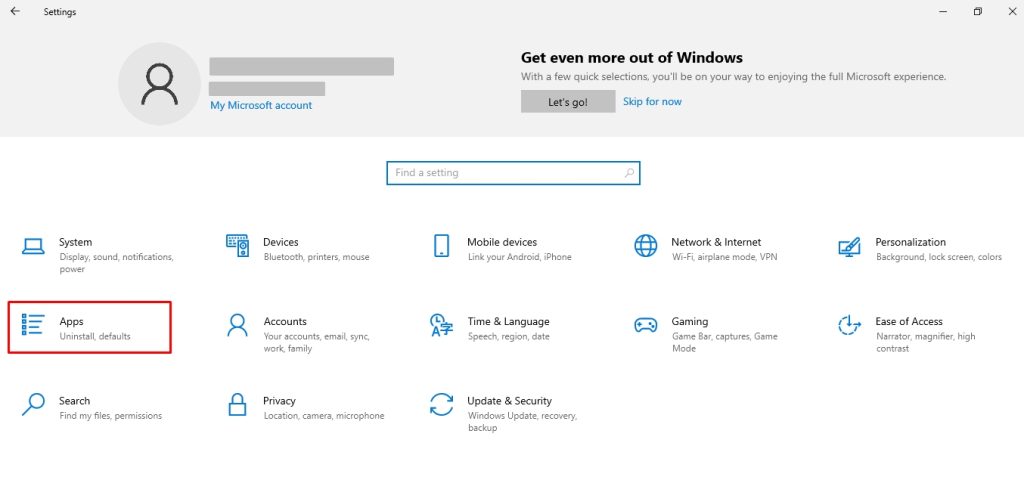
Method 3: Uninstall Programs Using Windows Settings
Windows Settings offers an organized space for users to view all installed apps. So, you can easily remove apps that weren’t present in the control panel. However, though better than the previous two methods, it also leaves residue in the computer and does not completely delete a program from Windows.
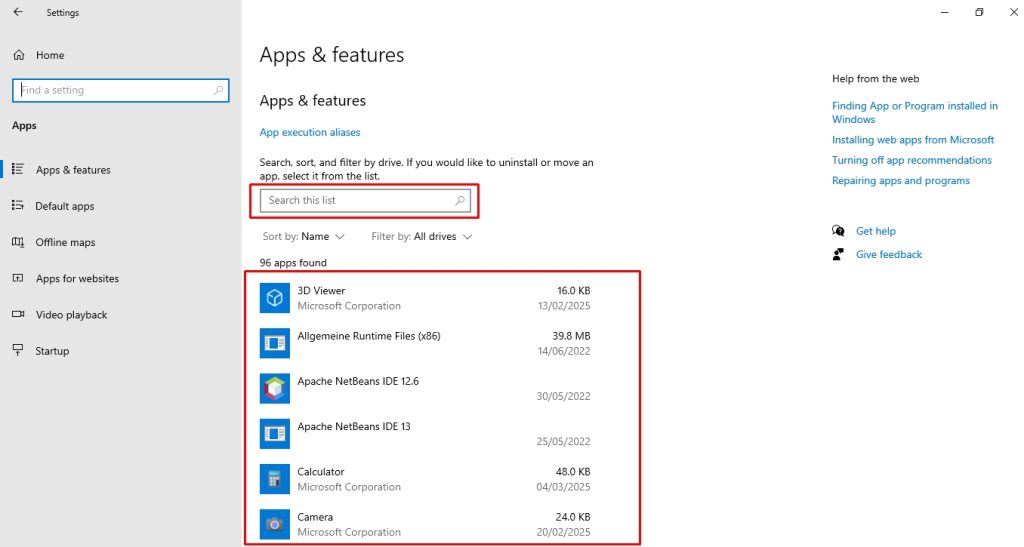
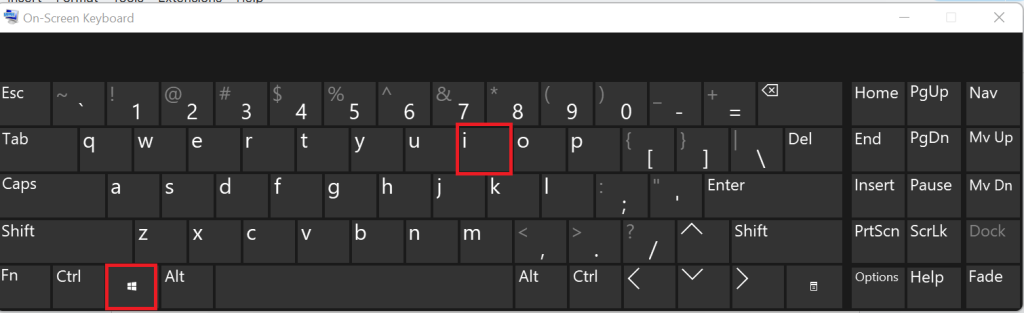
Step 1: Locate Apps from Windows Settings
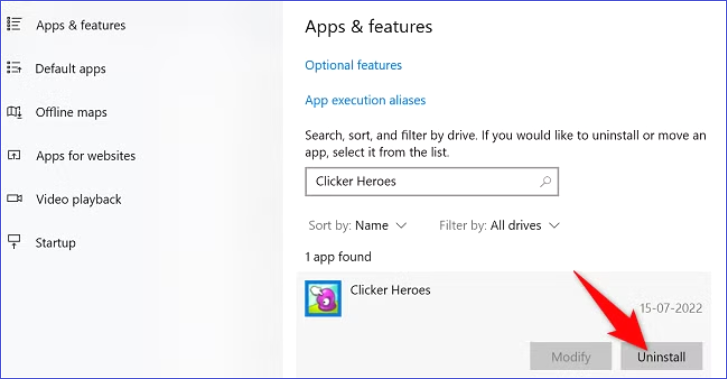
- Press Windows + I to open Windows Settings and visit the Apps tab.
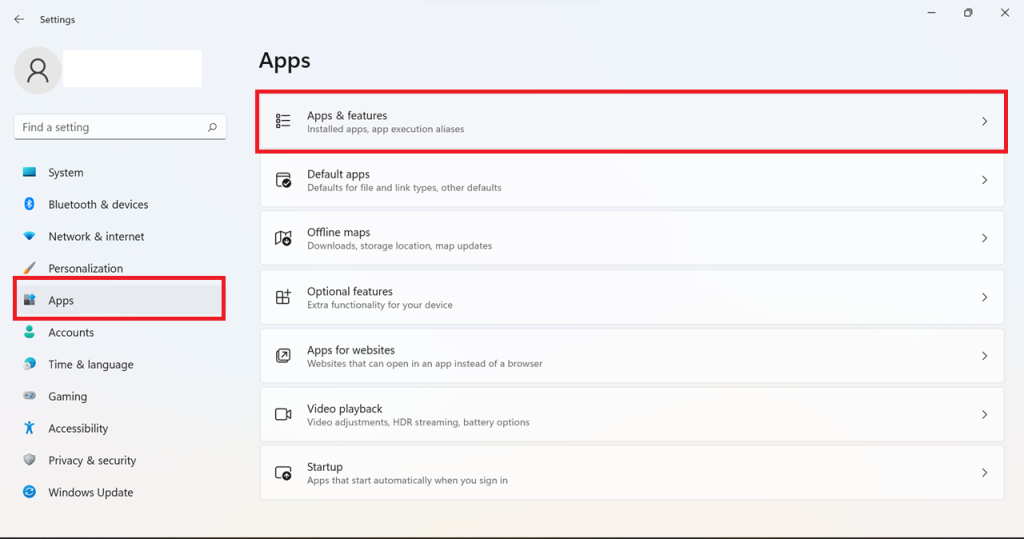
- Locate the program to be deleted under the Apps and Features tab, or use the search box to find it from the list.
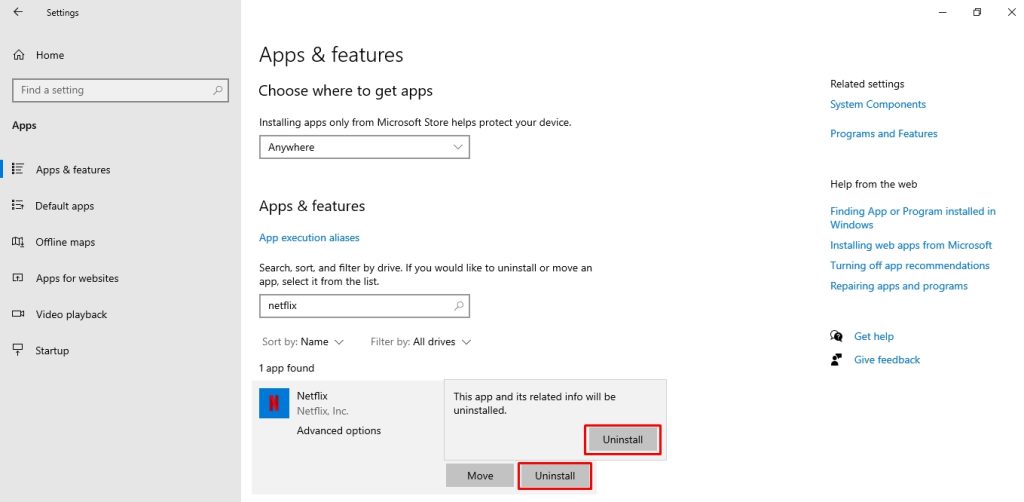
Step 2: Uninstall Apps from Windows Settings
- Finally, click Uninstall > Uninstall, and you have successfully removed it from the PC.
How to Remove a Program from Windows 10 That Won’t Uninstall: 9 Tried-and-Tested Methods
When you install an app or a program, it makes some changes to your system. Sometimes, the files are stored in a specific folder within the Program Files utility, while other times, they create duplicate shared libraries called common files. Stubborn programs even get copied into the System32 and ProgramData directories. What’s worse is that Windows hides these files by default, so users remain unaware.
Hence, understanding these changes in the system registries can help you identify what is causing problems during uninstallation. Here are some popular reasons preventing such programs from being removed.
- Running background processes
- Admin authorization/ permission issues
- Issues with the Windows Installer services
- Corrupted registry entries
- Unfinished previous uninstallation.
- Anti-virus program interference.
Fortunately, you can treat these issues to successfully delete stubborn programs from Windows 10. Let’s discuss 10 tried-and-tested methods to delete all programs on Windows 10.
Method 1: Use Master Uninstaller
Where every method fails, third-party uninstaller apps are the way to go and delete programs on Windows 10. These programs are designed to pull all the program’s system traces and associated files to perform a successful uninstallation.
One such solution is Master Uninstaller. It works by repairing the damaged files of the program to be uninstalled and then deleting it from all the registries accordingly with zero input. Here is how you can use it to remove stubborn applications from your Windows 10.
Step 1: Register Your Email on Master Uninstaller
- Download and install the Master Uninstaller app from here and register your email.
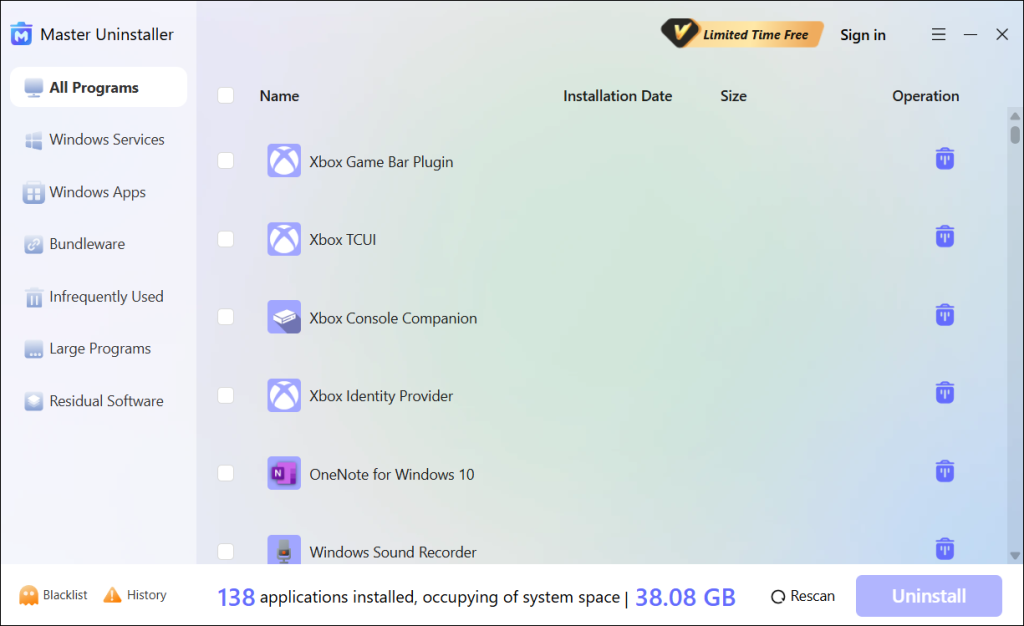
Step 2: Uninstall Programs
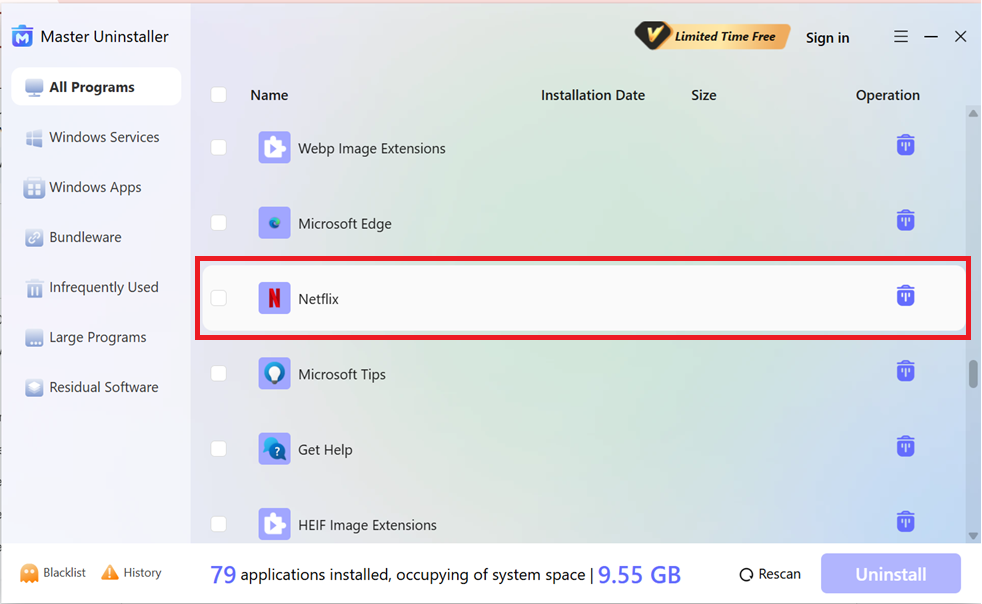
- Now, visit the All Programs section from the dashboard. Locate a program you want to delete and click Uninstall from the bottom-right corner.
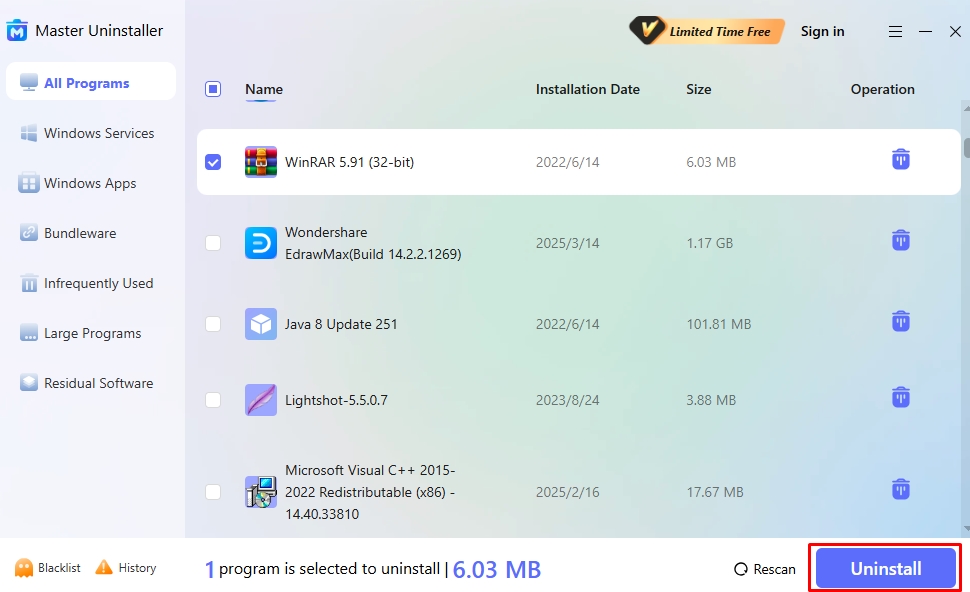
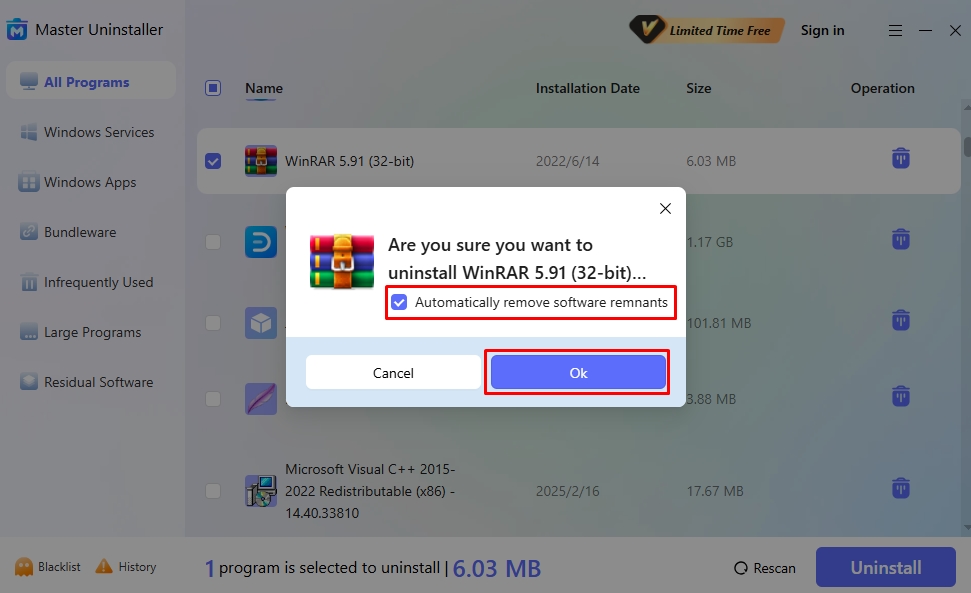
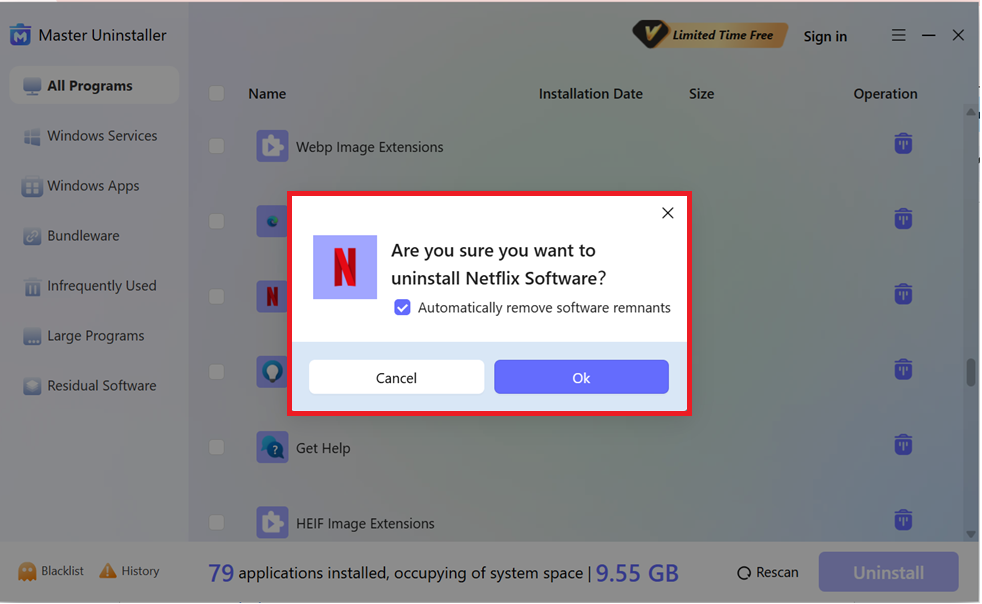
- Click Automatically Remove Software Remnants > OK. Congratulations, you’ve successfully deleted the program.
Master Uninstaller | A Smart Solution to Completely Uninstall Programs
Often, your system struggles to completely delete programs that intentionally resist the uninstall process. This is because these programs spread their associated files throughout the PC, corrupt the Windows Installer, and populate the registry, making it complicated to delete them using standard methods.
Hence, people prefer using a third-party uninstaller to remove all residues from the system. Master Uninstaller is an advanced solution that repairs the damaged files first, making it easier to access residues from the system. Here is what makes it better than other options in the market.
- Complete Program Deletion: Master Uninstaller deletes all program-associated files from your PC during deletion. It offers post-uninstallation cleaning to remove residues and traces from the system.
- Intuitive Interface: This uninstaller tool has an easy-to-use interface with clearly defined sections. This lets users quickly access and delete their desired program in one click, without technical expertise.
- Fast Operations: Master Uninstaller takes a few seconds to uninstall a program, regardless of size. For instance, deleting stubborn apps like Adobe CC with gigabytes of storage takes hardly any toll on the uninstaller.
- Blacklisting Function: Master Uninstaller has a blacklisting function that blocks stubborn programs from reinstalling repeatedly. After enabling this, the uninstaller will always ask for your permission before initiating installation.
- Bundleware Uninstallation: Some harmful software downloads additional apps without your notice when you install them. Master Uninstaller detects these apps and deletes them to keep your device clutter-free.
Method 2: End Background Processes Via Task Manager
Some programs encounter uninstallation problems, especially when running in the background. Using the task manager to end the background tasks might help. However, it does not actually uninstall apps but rather ends tasks, and then you can follow up by deleting programs using any other standard method.
Here is how you can do it.
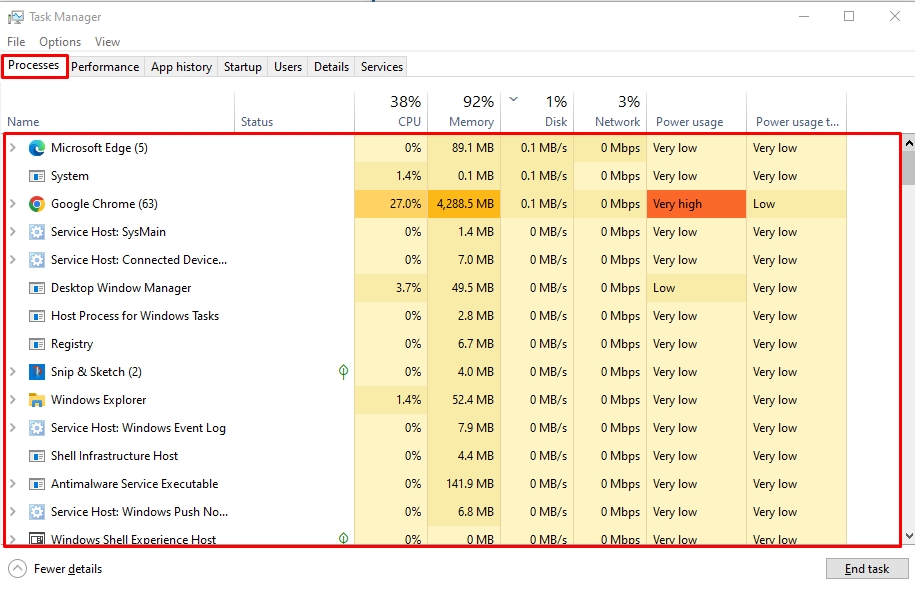
Step 1: Locate Processes from the Task Manager
- Press Ctrl + Shift + Esc to open Windows Task Manager. Visit the Processes tab and select the program you wish to uninstall.
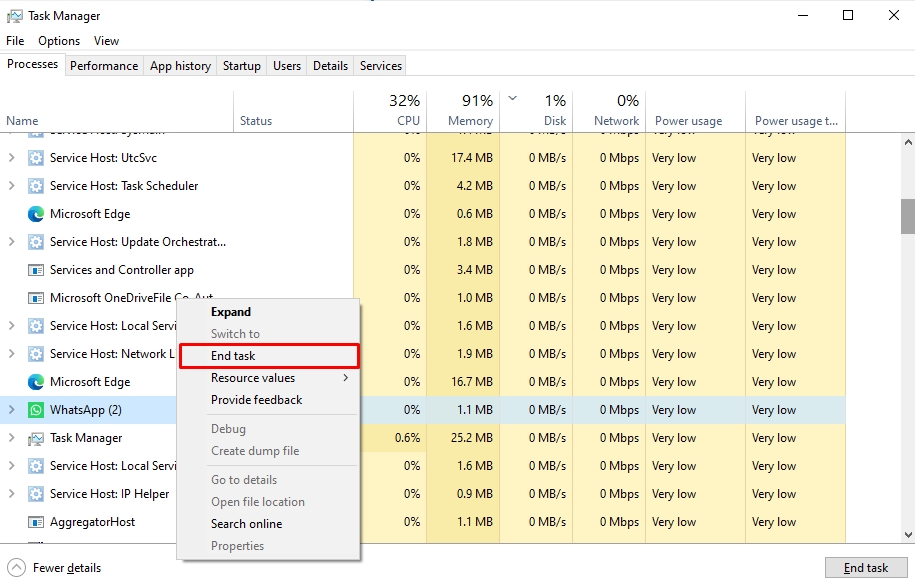
Step 2: End Background Processes
- Right-click this program and choose End Task. It will close all background processes of this program or app.
- Now, try uninstalling the program or app from the Start menu, Windows Settings, or Control Panel, however you like.
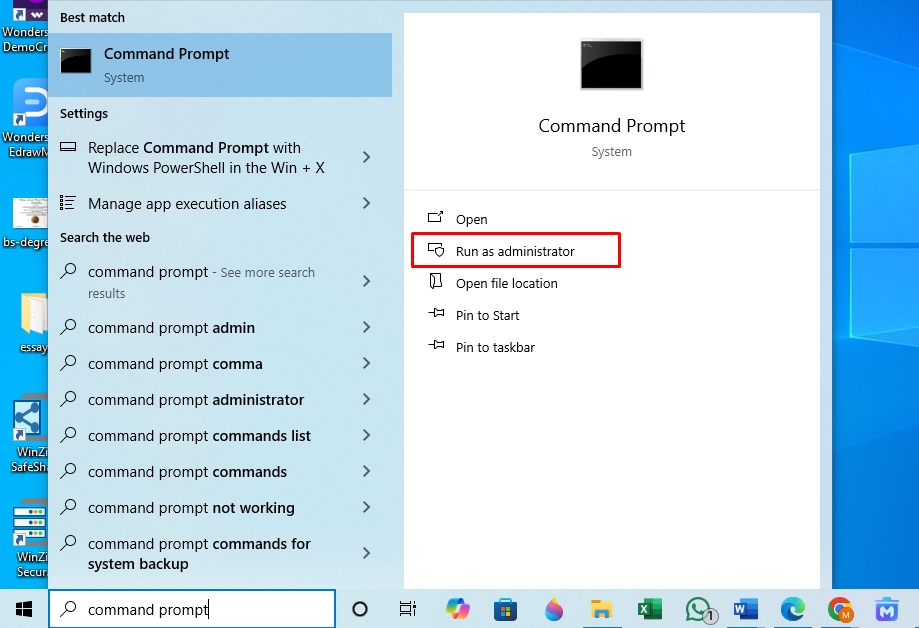
Method 3: Delete Programs Using Command Prompt
The command prompt helps delete programs with damaged files, but using it risks permanently removing other programs from your device. Here is a quick guide to using it to uninstall programs from Windows 10.
Step 1: Run CMD as Administrator
- Open the Command Prompt from the Start menu and run it as an administrator.
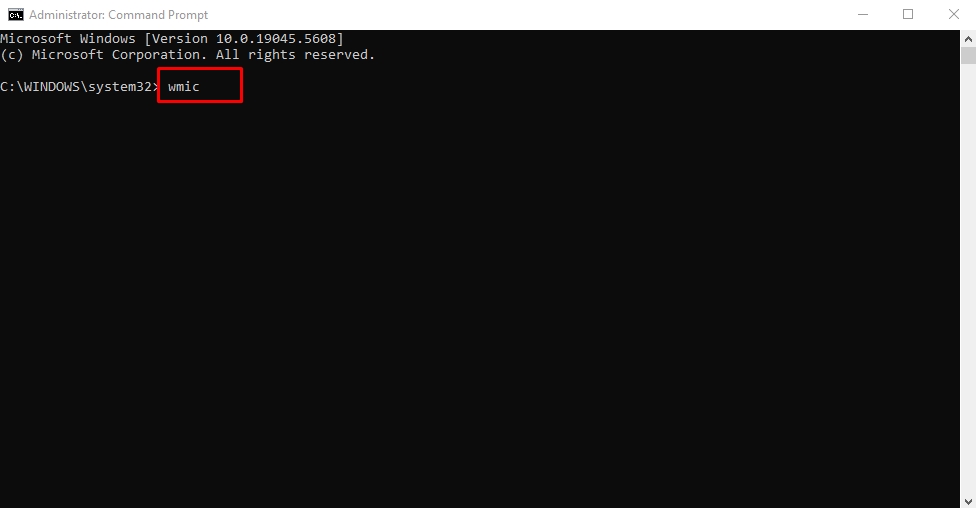
Step 2: Run the Uninstallation Command
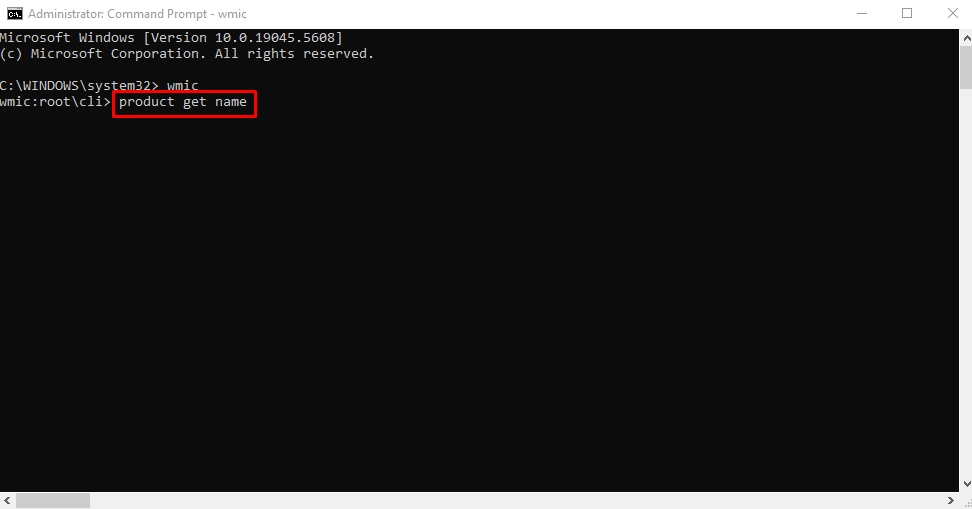
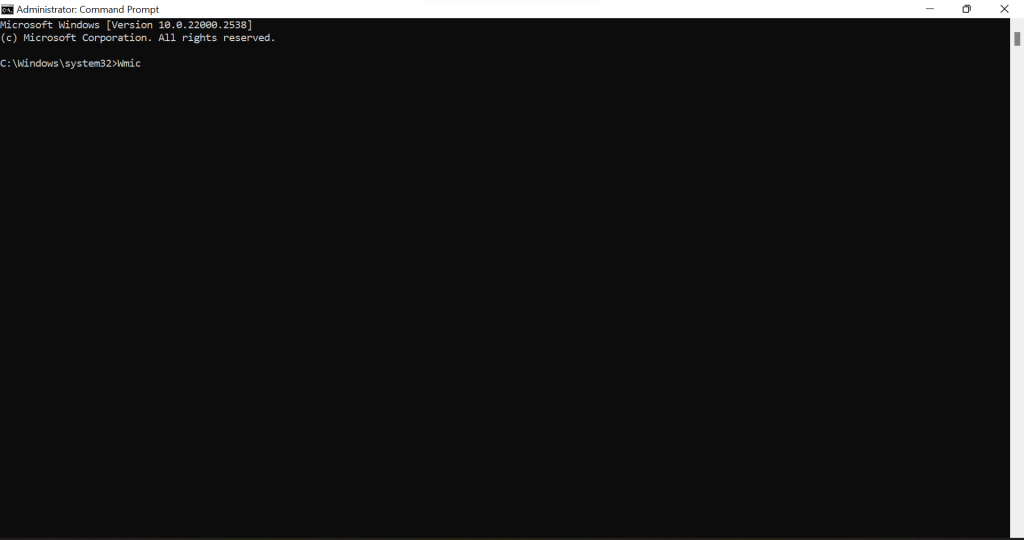
- Once the CMD windows open, type wmic and press Enter.
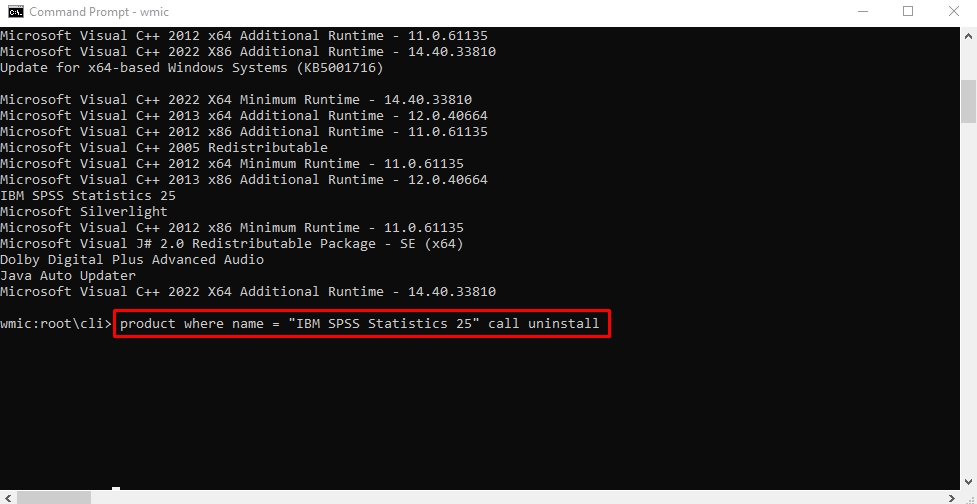
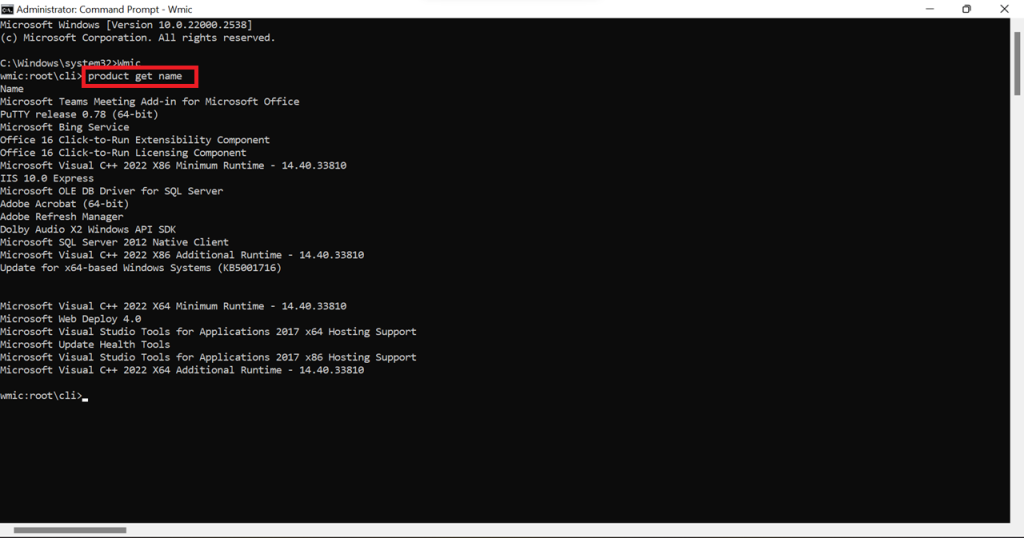
- Now, again run the command product get name and press Enter. It will display a list of installed programs (with accurate titles) on your PC.
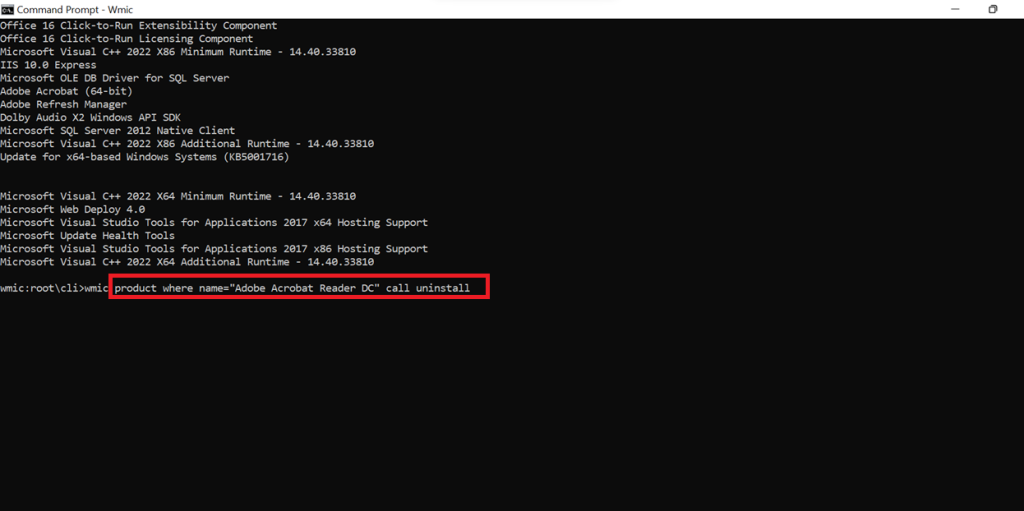
- Locate the desired program and run the following command to uninstall it;
product where name = product name call uninstall.
Change the program name to the name of the program to be deleted. For instance, the command to uninstall IBM SPSS Statistics would be: product where name = “IBM SPSS Statistics 25” call uninstall.
- Next, type Y to complete the uninstallation. Once the program is deleted, you will receive the confirmation Method Execution Successful.
Method 4: Force Uninstall Apps Using Registry Editor
Registry Editor is a utility of Windows 10 that stores changes and preferences made by installed programs. You may use it to edit settings and delete stubborn programs, but it can be tricky. Incorrect registry editing can cause system errors or crashes. So, be extra mindful while following these steps to manually remove a program from Windows 10.
Step 1: Open the System Registry
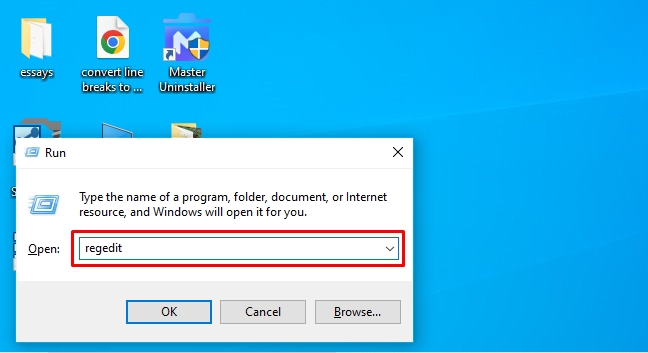
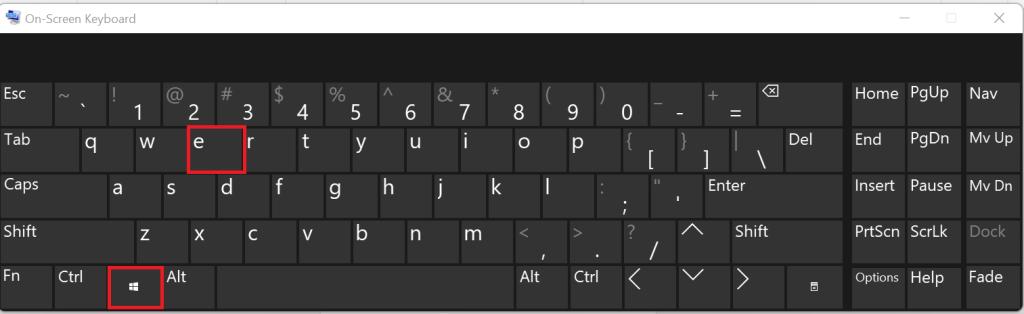
- Press Windows + R to open Run. Type regedit in the search box and press Enter.
Step 2: Locate Programs from the Registry
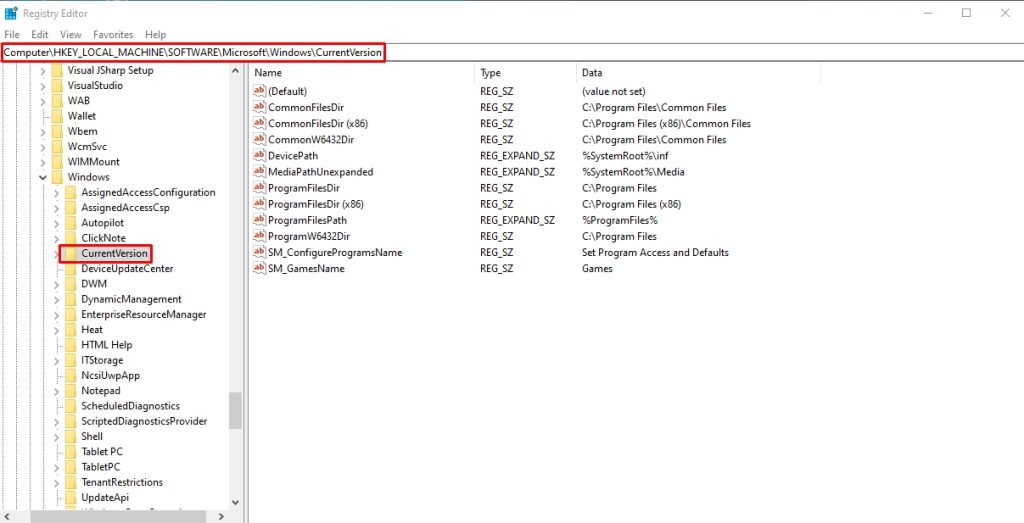
- Under the HKEY_Local_Machine, select Software > Microsoft > Windows > CurrentVersion.
Step 3: Uninstall Programs
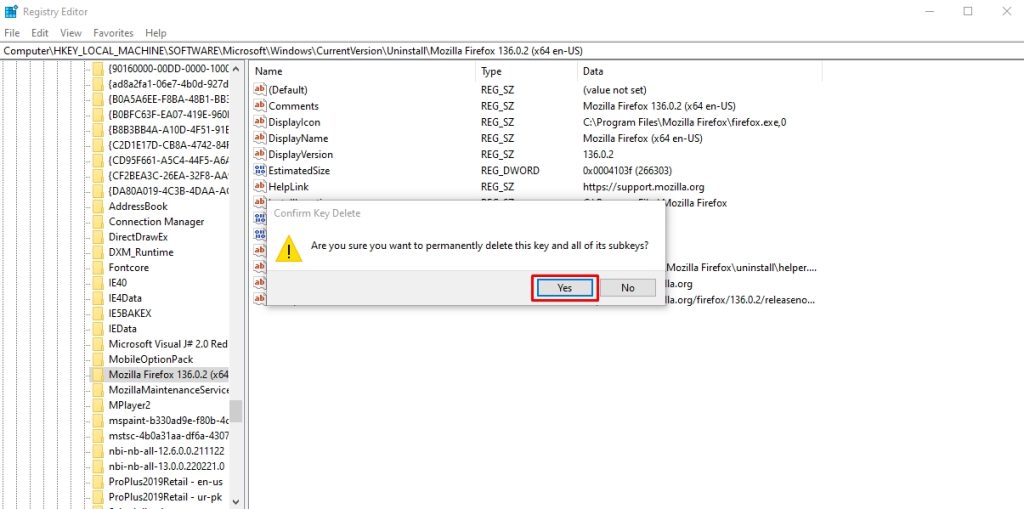
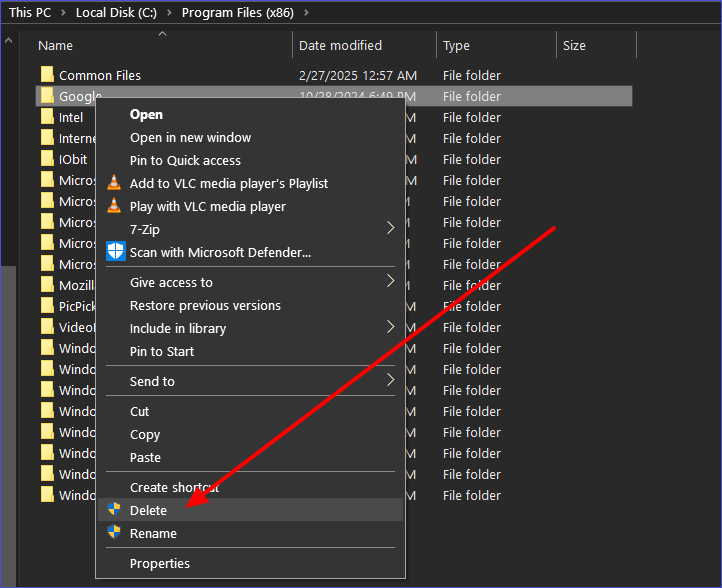
- Select Uninstall and find the program you want to remove under this tab. Right-click this program and click Delete.
- Click Yes to confirm, and that’s it. Restart your computer, and you’ve successfully uninstalled this program.
While deleting a program via the registry editor, you must also delete its associated keys. Typically, these registry keys are automatically removed. But if this is not the case, you can do it manually.
Step 1: Locate the Uninstall Tab
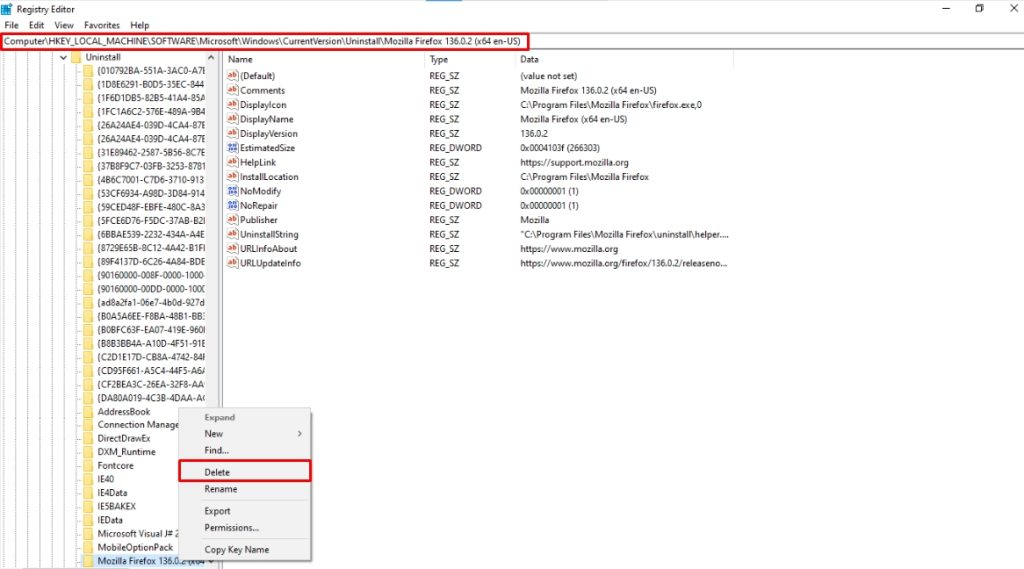
- While you are present on the registry editor, click HKEY_Local_Machine > Software > Microsoft > Windows > CurrentVersion > Uninstall.
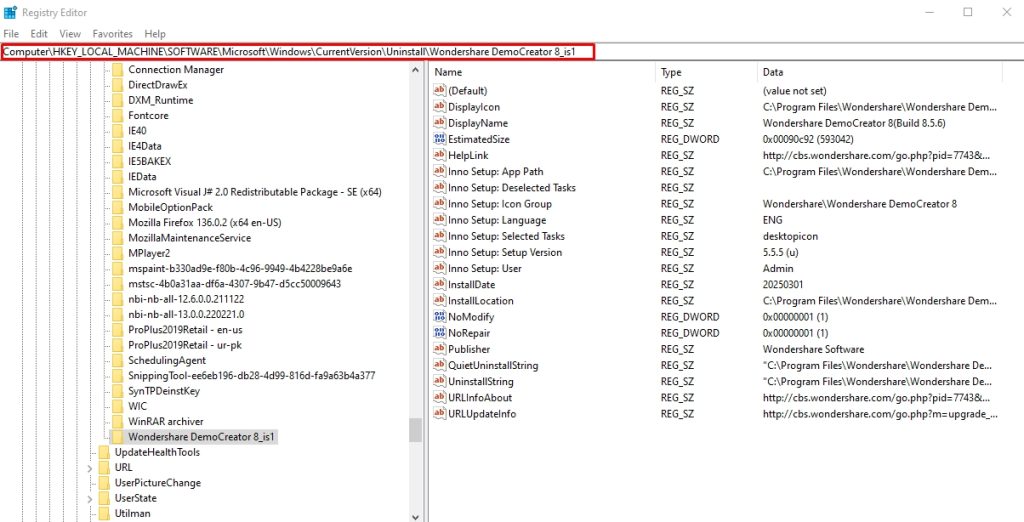
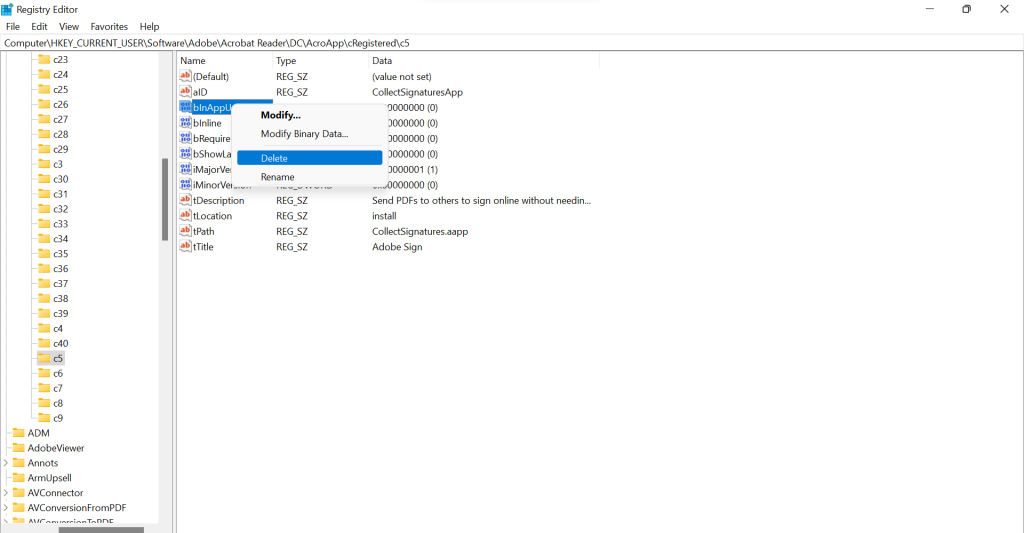
Step 2: Delete Program’s Registry Keys
- Locate the keys associated with the program you wish to remove. Right-click it and select Delete.

Method 5: Uninstall the Programs in Safe Mode
Sometimes, the uninstalling process of a program interferes with third-party processes, causing it to fail. The solution to this problem is to delete this program while the system is booted into Safe Mode.
Step 1: Enter Safe Mode
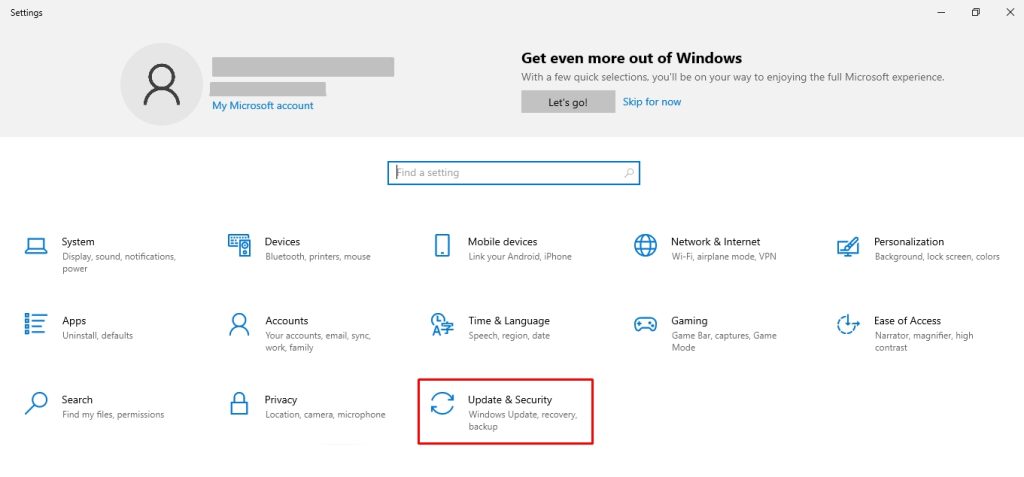
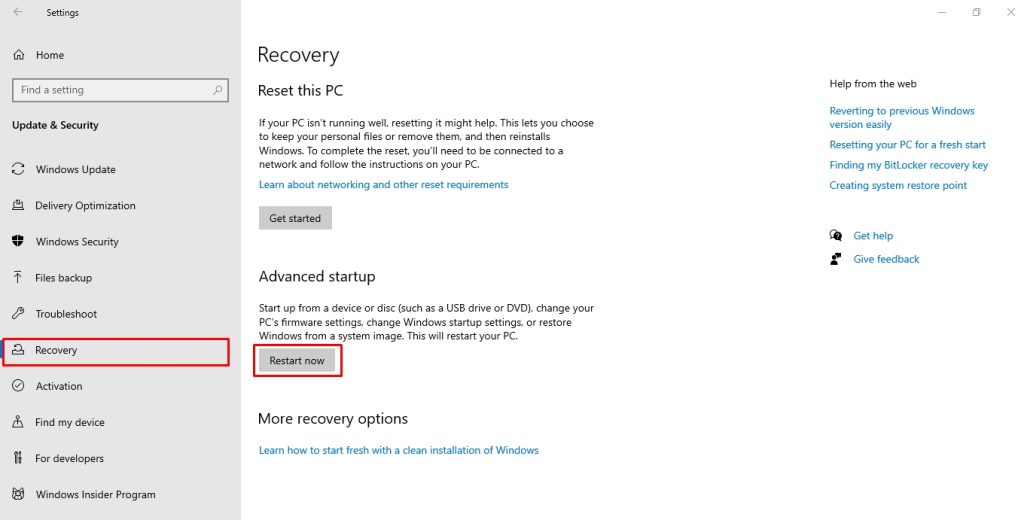
- Open Windows Settings by pressing Windows + I, and navigate to the Update and Security tab. Alternatively, go to the Start menu to access the Power options, hold Shift, and click Restart simultaneously to enter Safe Mode.
- Visit the Recovery menu from the left side and click Restart Now under the Advanced Startup section.
Step 2: Restart PC in Safe Mode
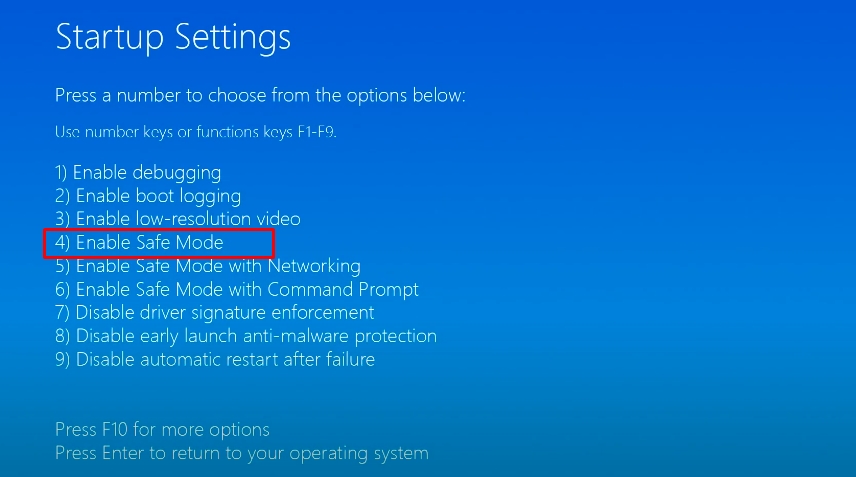
- Once the computer has initiated Safe Mode, click Troubleshoot > Advanced Options > Startup Settings > Restart. This will restart your PC in safe mode.
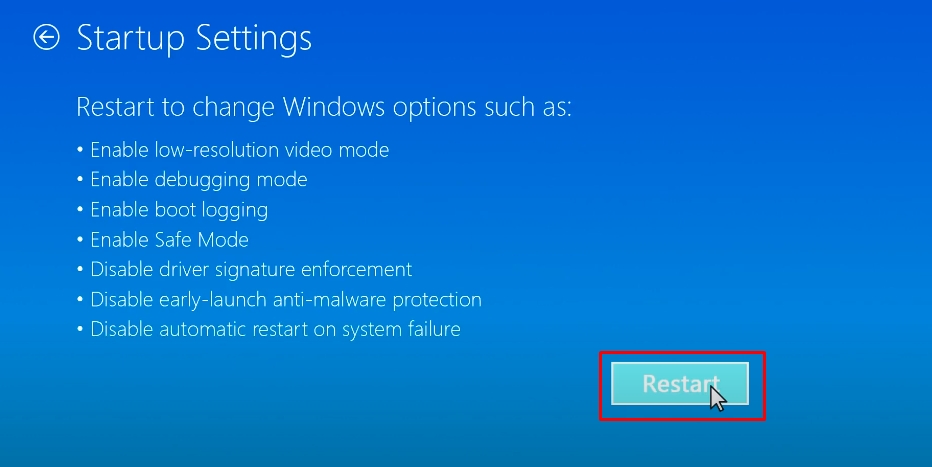
- From the Startup Setting menu, press 4.
Step 3: Uninstall Programs from the Control Panel
- Once you have booted into safe mode, open the Control Panel from the Start button. Access the Programs tab and click Programs and Features.
- Right-click the program you wish to delete and click Uninstall. Confirm the deletion, and you are done.
Method 6: Use the Manufacturer’s Uninstaller Tool
Most software you install on your PC comes with its uninstaller file. You can easily access this file from the application root folder. Follow these simple steps to access the software uninstaller and delete programs on Windows 10.
Step 1: Locate Program Files
- Navigate to the PC directory where the program is installed. You can usually find it in the program files. Open File Explorer > This PC > Local Disk > Program Files to access this.
Step 2: Search for the Manufacturer’s Uninstaller File
- Review the contents of the application folder and locate the uninstaller.exe file.
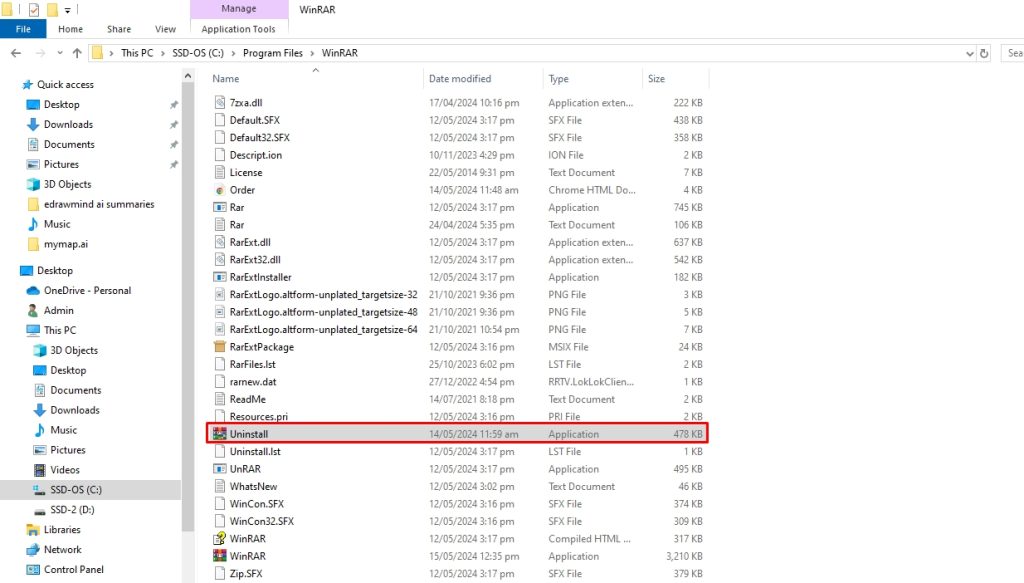
- Double-click this uninstaller and launch it. Follow the instructions to complete the process.
Method 7: Set Up a System Restore Point
Restoring your Windows 10 PC to a previous state would automatically undo recent changes, such as installing a program. However, it may risk losing personal data, so you must back up all important data before setting up a system restore. Here is how it goes.
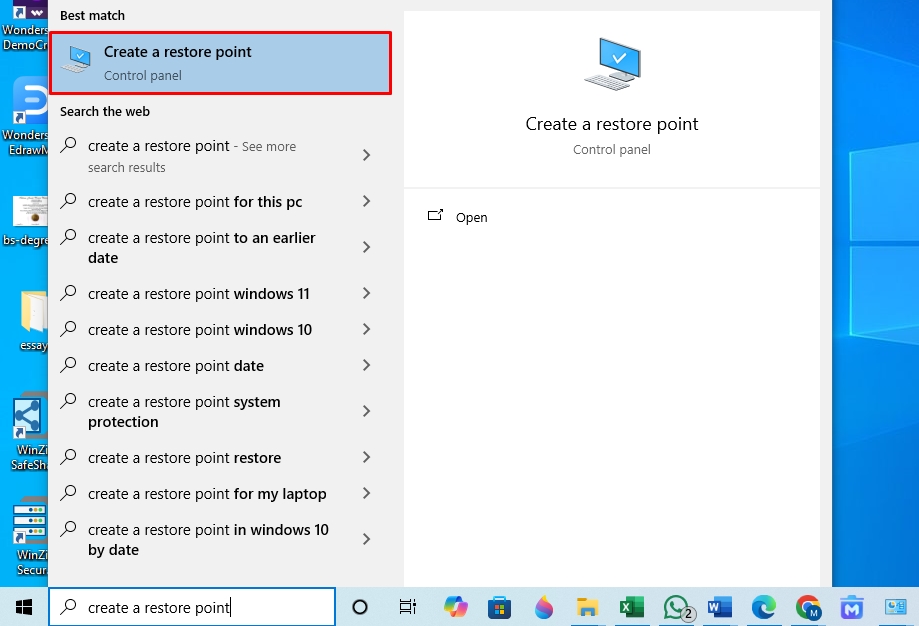
Step 1: Create a Restore Point for Your System
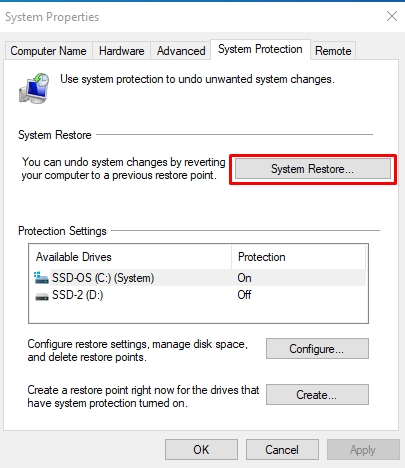
- To enable the restore point, search for Create a Restore Point from the Start menu.
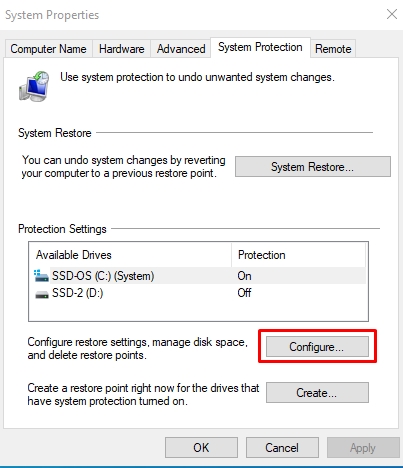
- Click Configure under the Protection Settings in the System Properties window.
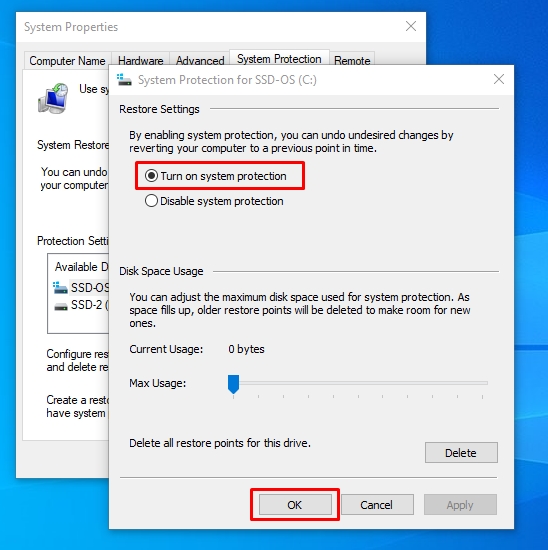
- Select Turn on System Protection from the Restore Settings and click Apply.
Step 2: Activate System Restore
- Now, you can quickly reverse the changes made to the PC, such as installing a new app or program. To do this, open the Restore Point menu and click System Restore under the System Protection tab.
- Follow the instruction prompt to complete the recovery.
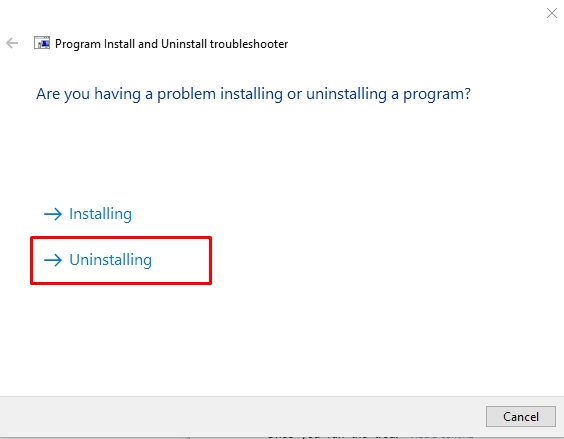
Method 8: Use Microsoft Install/ Uninstall Troubleshooter
Microsoft has its dedicated uninstaller and installer troubleshooter to resolve issues relevant to overwriting or changes made by programs into the system. You can use it to delete hard-to-remove programs. Follow these simple steps to do this.
Step 1: Download the Microsoft Install/ Uninstall Troubleshooter
- Download the Microsoft Program Installation and Uninstallation Troubleshooter from here.
Step 2: Uninstall Programs Using Troubleshooter
- Once you run the troubleshooter, it will ask if you have problems installing or uninstalling a program. To do so, click Uninstalling.
- It will display a list of installed programs on your computer. Select the program you want to delete and click Next.
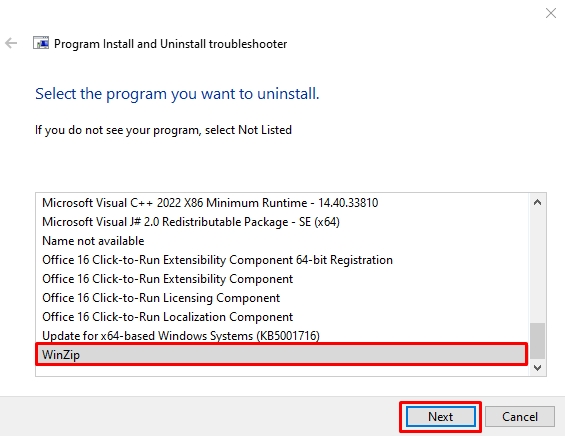
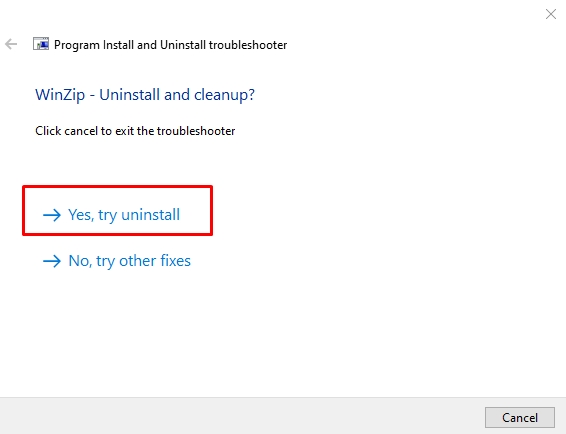
- Click Yes, and try Uninstall from the pop-up menu. That’s it. The program has been deleted.
Method 9: Restart the Windows Installer
Windows Installer is your system’s crucial utility for installing and uninstalling programs. So, if it is disabled, even accidentally, you will face issues deleting a program. Hence, you must restart or re-register the Windows installer to resolve the issue.
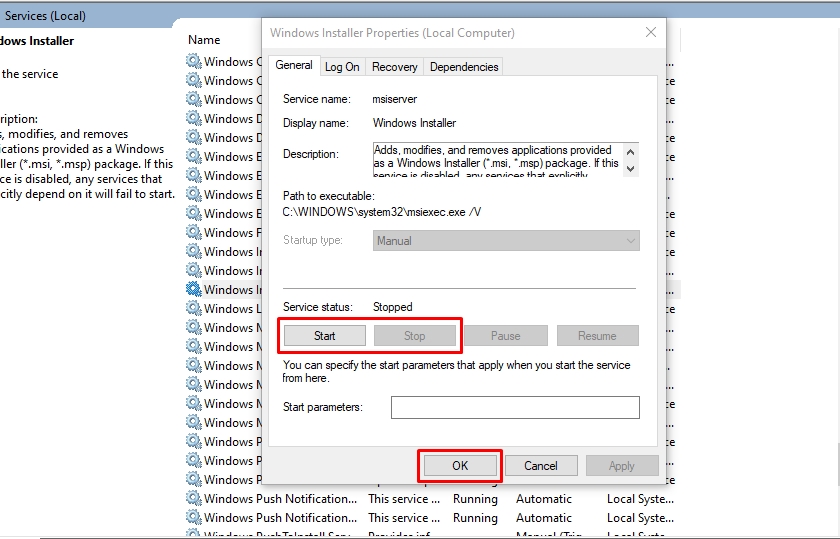
Step 1: Restart the Windows Installer
- Press Windows + R to open Run. Type services.msc in the search box and press Enter.
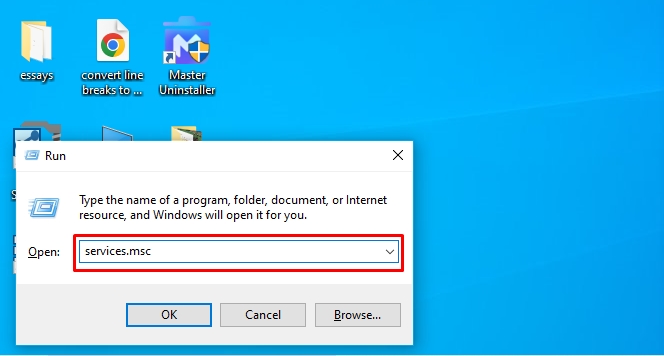
- Right-click the Windows Installer service from the pop-up menu and click Properties.

- Now, click Stop and then Start. Apply the changes by clicking Yes.
Now, the program should be uninstalled as usual. However, re-register the Windows Installer service if it has not been deleted. Here is how it goes.
Step 2: Re-register the Windows Installer
- Run the Command Prompt as an Administrator from the Start menu. Once opened, type msiexec /unreg, and press Enter.
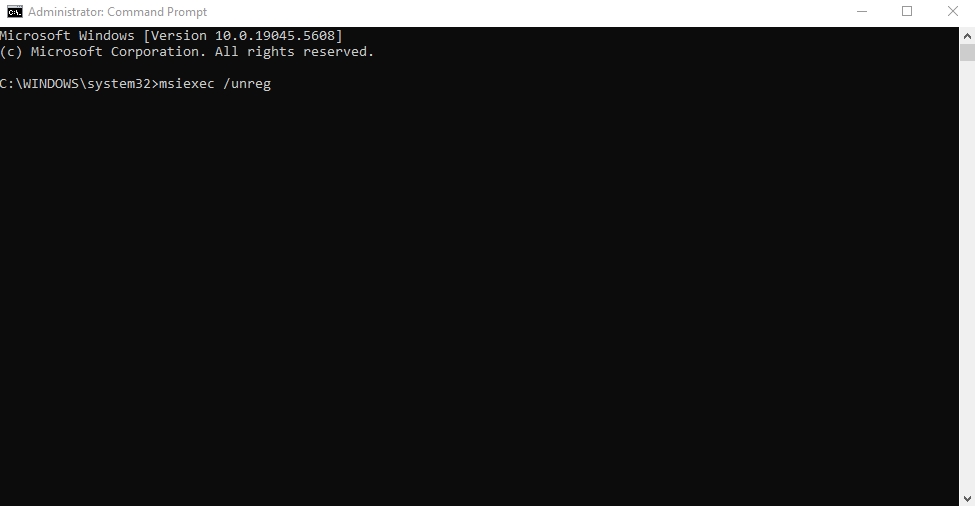
- Next, type msiexec/ regserver and press Enter.
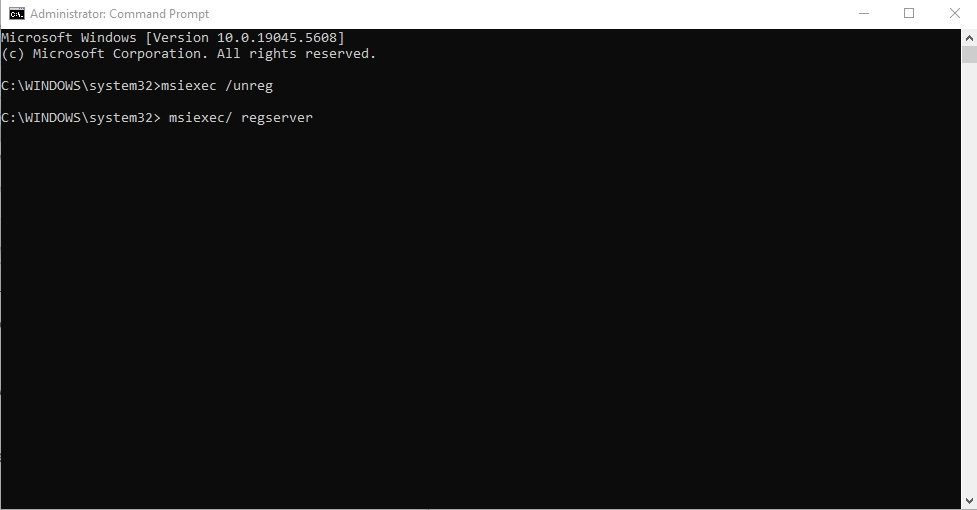
- You will be able to uninstall the program now.
FAQs
Q:
How Do I Uninstall a Program on Windows 10?
To uninstall a program on Windows 10, search for Control Panel in the Start menu and open it. Visit the Programs tab and choose Programs and Features. Locate and right-click the program you want to delete, and click Uninstall.
Q:
Why Can’t I Delete Apps on Windows 10?
There are various reasons why you can’t delete apps on Windows 10, including;
1. The uninstall process interferes with third-party processes.
2. The program has processes running in the background.
3. You do not have admin access to uninstall the specific program.
4. The Windows Installer or system registry is corrupted.
1. The uninstall process interferes with third-party processes.
2. The program has processes running in the background.
3. You do not have admin access to uninstall the specific program.
4. The Windows Installer or system registry is corrupted.
Q:
How to Remove a Program from the Startup in Windows 10?
To remove unwanted startup programs in Windows 10, open the Settings panel by pressing Windows + I, and visit the Apps tab. Go to the Startup section and locate the program to be deleted. Select this program from the list and click Uninstall > Uninstall.
Q:
How to Fully Remove a Program from Windows 10?
You must use a third-party uninstaller like Master Uninstaller to completely remove a program from Windows 10. It works by repairing the damaged files of a program to be deleted, making it easier for the system to pull residues and associated files. Simply visit its dashboard, select All Programs, and click the Delete icon next to the app you want to uninstall.
Q:
How Do I Remove All Programs from the Start Menu in Windows 10?
To delete programs on Windows 10 using the Start menu, visit the Start button and type the program’s name to be deleted in the search box. Click Uninstall from the right-side menu and confirm it.
Final Thoughts
Imagine this: You’ve installed a new app and have been using it for quite some time. You decide to uninstall it, only to find out that it refuses to delete with the standard Windows method.
Now, you may be wondering how to delete programs on Windows 10 that won’t uninstall otherwise. While there are many ways to do so, the best possible method is using a third-party uninstaller like Master Uninstaller. It requires zero effort and removes all the program-associated files, system traces, and residues from the PC within seconds.
So, give it a try and see how it works for you.

Master Uninstaller
How to Completely Delete an App from PC | Say Goodbye to Leftover Files
You uninstall an app, thinking it’s gone, but is it really? Many apps leave behind hidden files, cached data, and background processes that continue to run without your knowledge. Over time, these leftovers clog up your storage, slow down your device, and even pose security risks. If you want to erase an app without a trace, a simple uninstall won’t cut it.
Some apps sync data to cloud services, bury files deep within system folders, or modify registry settings that linger long after deletion. This means even if the app icon disappears, its footprints remain, affecting performance and privacy. Without a proper cleanup, your device becomes a digital junkyard filled with unnecessary remnants.
So, how to completely delete an app and ensure nothing is left behind? This guide walks you through the exact steps to wipe out apps entirely, leaving your system as good as new. Let’s get started.
4 Easiest Ways to Completely Delete an App on Windows 10 & 11 PC
Uninstalling Windows 10 and 11 apps is simple for Microsoft Store apps and lightweight programs, as they can be removed via the Start Menu or Settings. However, traditional desktop programs installed through .exe files may require the Control Panel for proper removal. Some apps may leave leftover files, needing additional cleanup. Below are step-by-step guides for each method.
Method 01: Completely Delete an App Via Master Uninstaller ( Best for Complete Clean-up)
Step 1: Access Master Uninstaller
- Launch Master Uninstaller from your desktop or Start menu.
Step 2: Find Wuthering Waves in the List
- After launching, scroll down to the app you are willing to delete. Click the Bin icon or select Uninstall to begin.
Step 3: Uninstall the Program
- Once you hit uninstall, an on-screen prompt for confirmation will appear. To complete the cleanup, check the box to automatically remove software remnants. Then, hit OK to proceed.
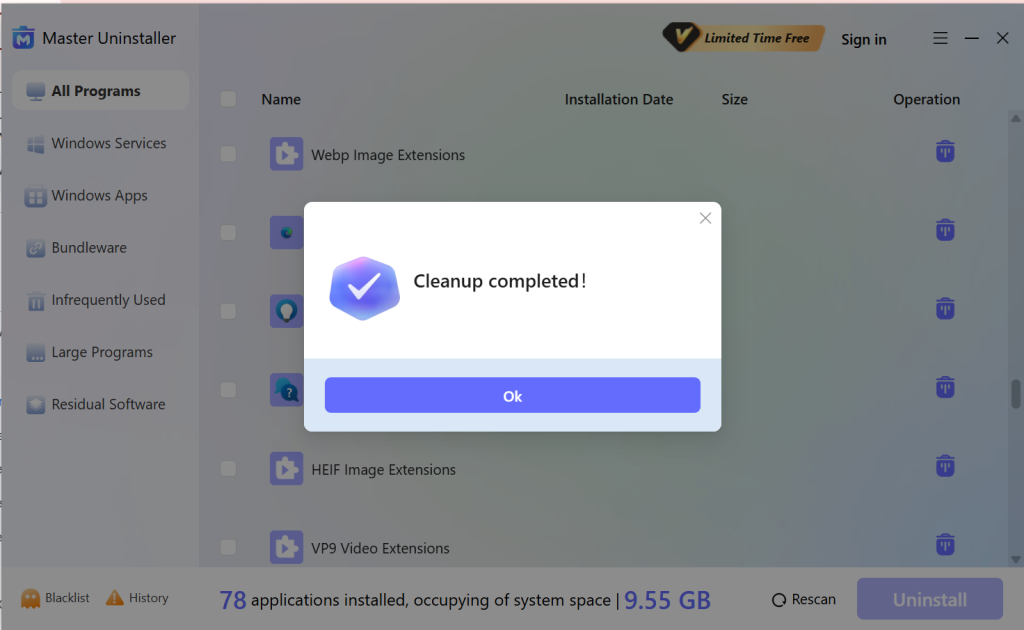
And tada, just link that by the help of Master Uninstaller, you can completely remove and block the app from your PC with no residual file leftovers.
Method 02: Completely Delete an App Via Start Menu (Quick but Leaves Leftovers)
This method is the fastest way to remove an app, especially for apps installed from the Microsoft Store. However, you have to manually delete the leftover files.
Step 1: Open the Start Menu
- Click on the Start button or press the Windows key on your keyboard.
Step 2: Find the App
- Scroll through the list of installed apps or type the app’s name in the search bar.
Step 3: Uninstall the App
- Right-click on the app and select Uninstall. Follow the on-screen instructions if prompted.
Method 03: Completely Delete an App via Settings App (Best for Windows 10 & 11)
This method is ideal for managing both Microsoft Store apps and traditional software while ensuring a cleaner removal process.
Step 1: Open Settings
- Press Windows + I to open the Settings app.
Step 2: Navigate to Apps
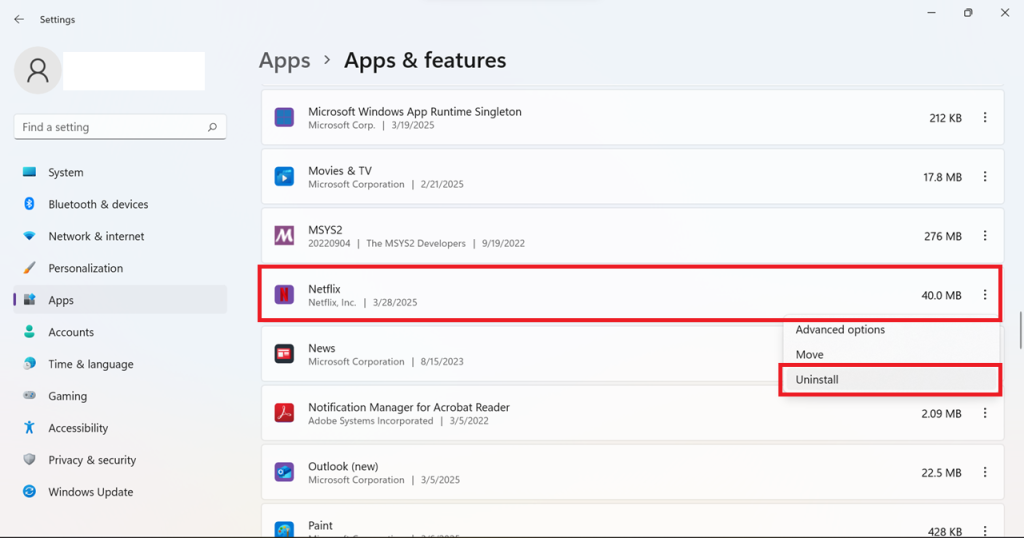
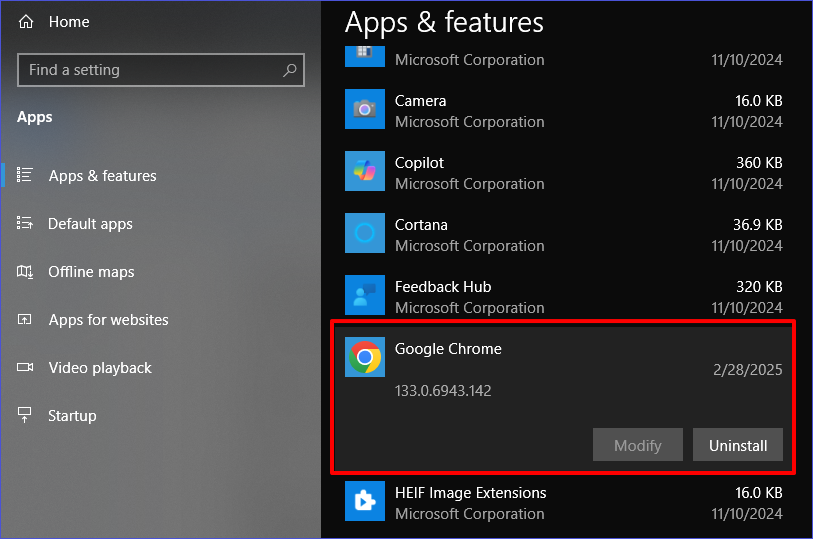
- Go to Apps > Installed apps (Windows 11) or Apps & features (Windows 10).
Step 3: Uninstall the App
- Find the app you want to remove, click on it, and select Uninstall. Confirm when prompted.
Method 04: Completely Delete an App via Control Panel (For Traditional Desktop Programs)
Use this method to uninstall older desktop applications, especially those installed via .exe or .msi files.
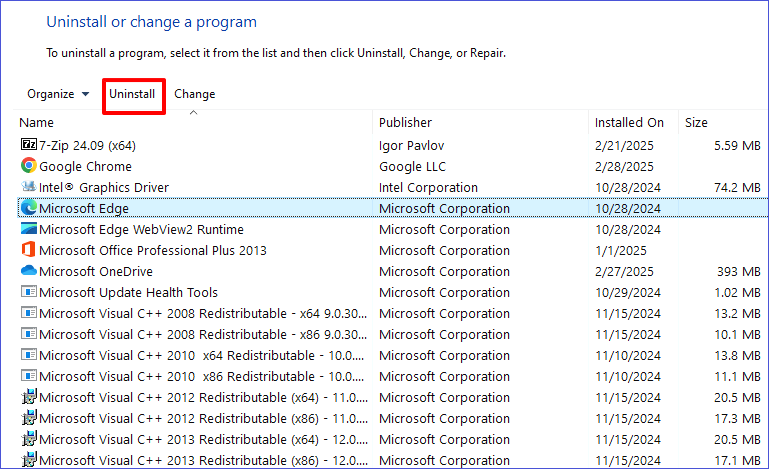
Step 1: Open Control Panel
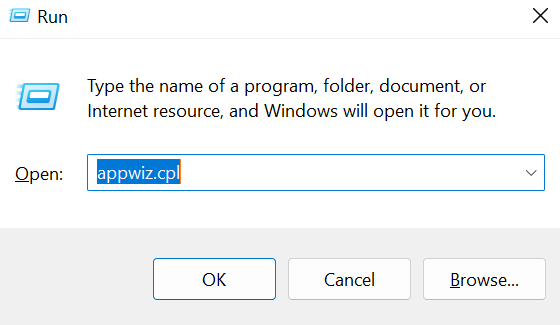
- Press Windows + R, type appwiz.cpl, and hit Enter.
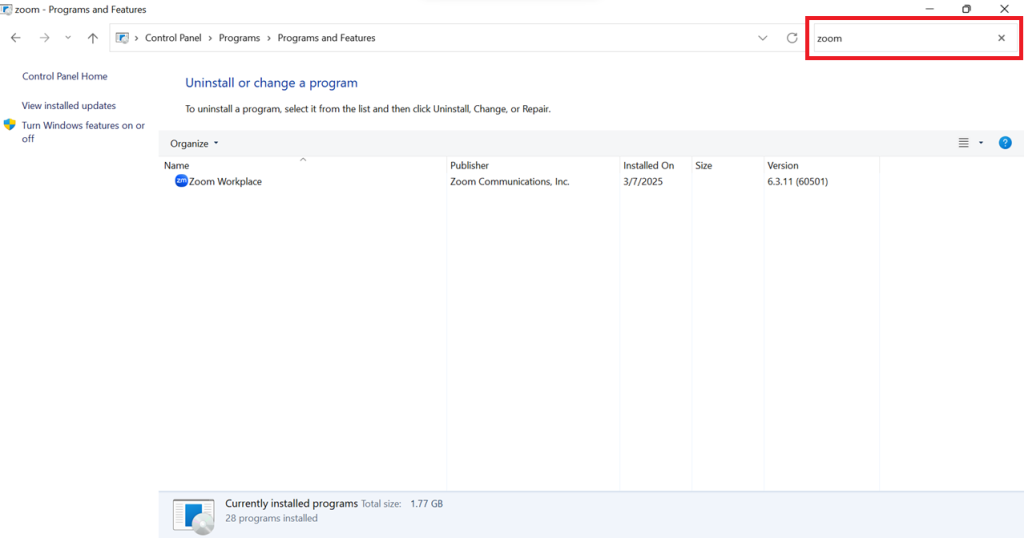
Step 2: Find the Program
- Scroll through the list of installed programs or use the search bar to find the one you want to uninstall.
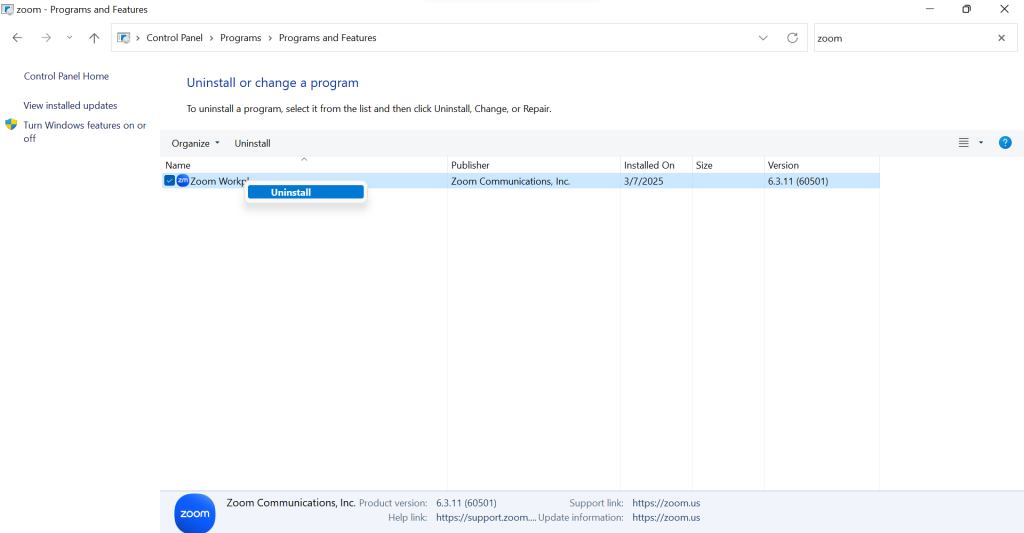
Step 3: Uninstall the Program
- Click on the program, then select Uninstall and follow the instructions.
Methods of Removing Leftover Files & Registry Entries
Uninstalling an app doesn’t permanently erase everything. Hidden leftover files and registry entries can clutter your system and cause issues. Here’s how to remove them manually and ensure a clean slate.
Method 01: Delete Residual Files
Now that we’ve covered the easier ways to uninstall apps, it’s time to remove leftover files that could still be lurking in your system. These files take up unnecessary space and may even cause conflicts when reinstalling the app. To ensure a complete removal, follow these steps:
Step 1: Open File Explorer
- Press Windows + E to launch File Explorer and access your system files.
Step 2: Locate Hidden App Data Folders
- In the address bar, type: %appdata% and press Enter.
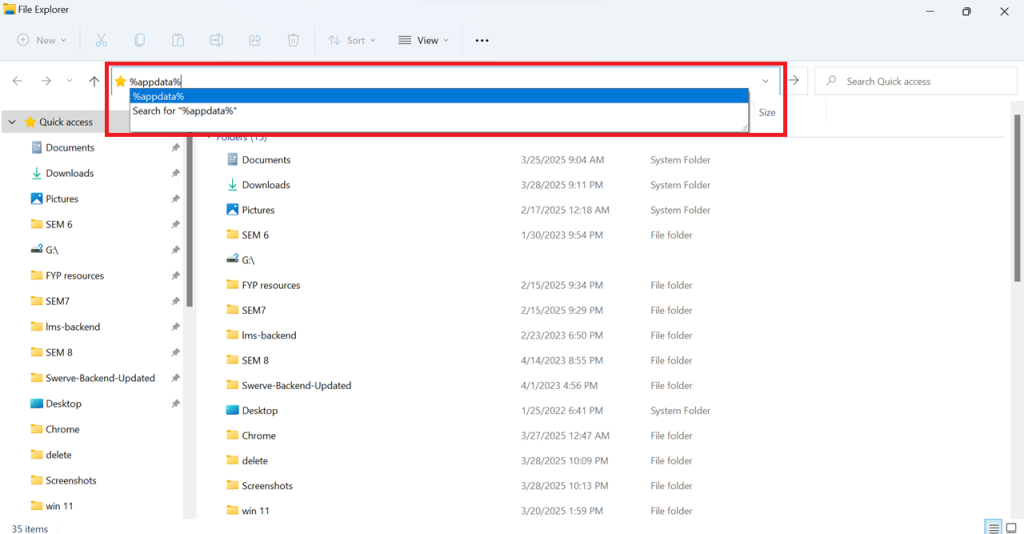
- Now, look for the app’s folder and delete it.
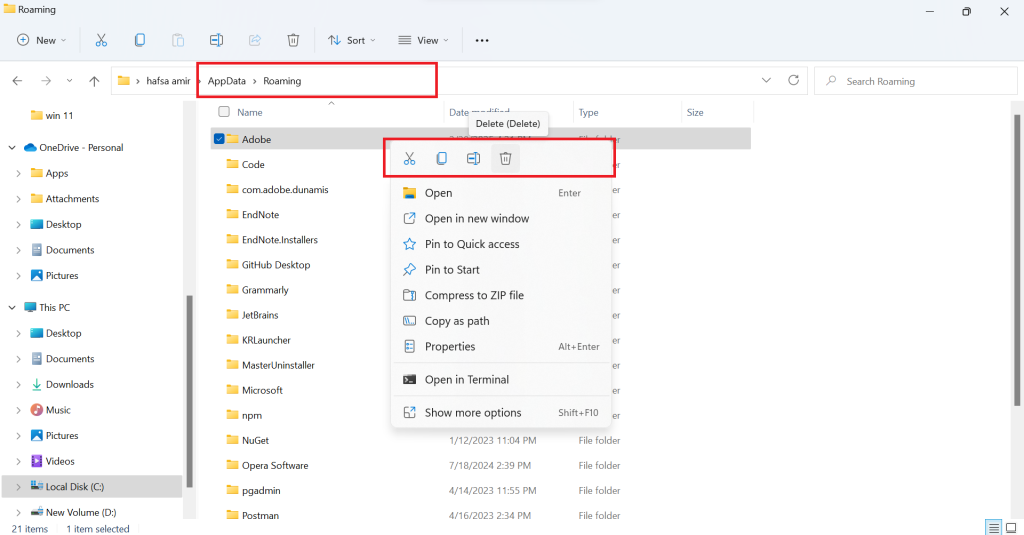
Note: Repeat the same for %localappdata% and %programdata%.
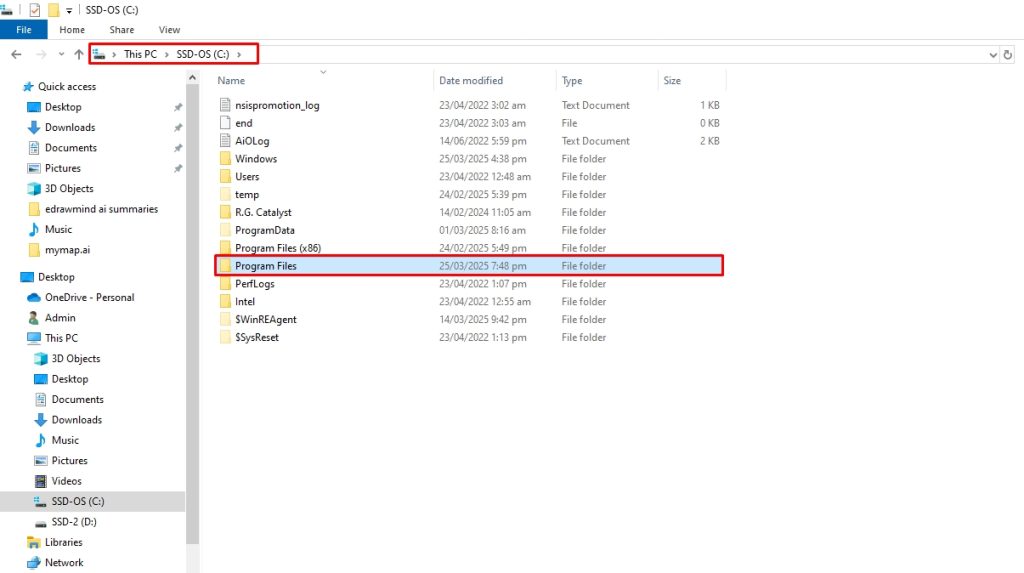
Step 3: Check the Program Files Folder
- Now, navigate to C:\Program Files and C:\Program Files (x86) to remove any remaining folders related to the uninstalled app.

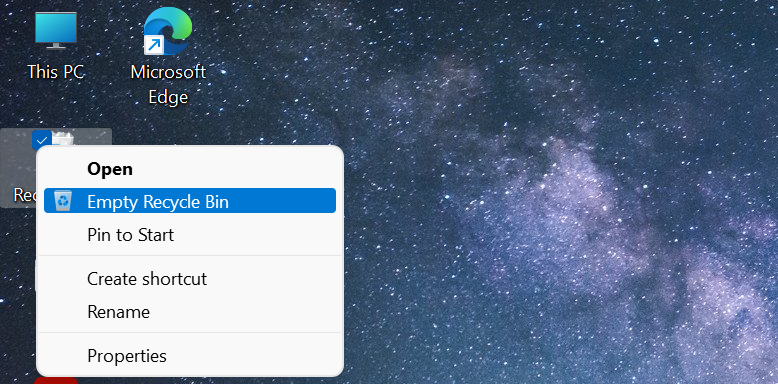
Step 4: Empty the Recycle Bin
Right-click on Recycle Bin > Empty Recycle Bin to permanently erase deleted files.
Method 02: Clean Registry Entries
Even after manually deleting leftover files, registry entries linked to the uninstalled app can still remain, potentially cluttering your system or causing conflicts. Cleaning them ensures a truly complete removal of the app. Follow these steps carefully, as editing the registry incorrectly can impact your system.
Step 1: Open the Registry Editor
- Press Windows + R, type regedit, and hit Enter to open the Registry Editor.

Step 2: Back Up the Registry
- Before making changes, create a backup:
Click File, select Export.

- Choose All under export range and save the backup to a secure location.
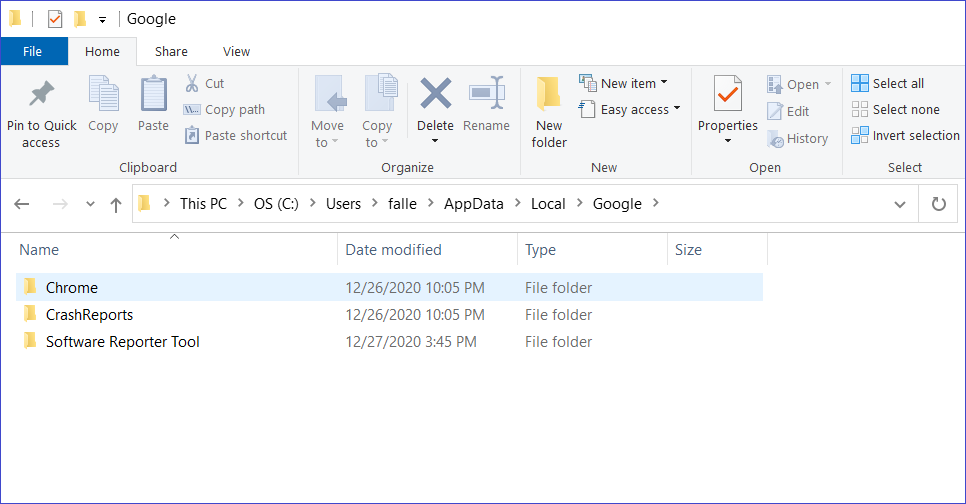
Img: save-registry-backup.jpg

Step 3: Find Residual Registry Keys
- Press Ctrl + F, type the app name, and hit Enter. And right-click on any related keys and select Delete.
Step 4: Close & Restart Your PC
- Once all traces are removed, close the Registry Editor and restart your computer to apply changes.
How to Uninstall the Stubborn or Broken Apps from your PC
Some apps refuse to uninstall, crash during removal, or leave behind broken files. If you’re stuck with a stubborn app, here are the most effective ways to forcefully remove it from your PC.
Method 01: By Using Command Prompt (WMIC)
Some stubborn apps refuse to uninstall through standard methods, but you can force their removal using the Windows Management Instrumentation Command-line (WMIC). This built-in tool lets you delete programs that don’t appear in Settings or Control Panel. Follow these steps carefully:
Step 1: Open Command Prompt as Administrator
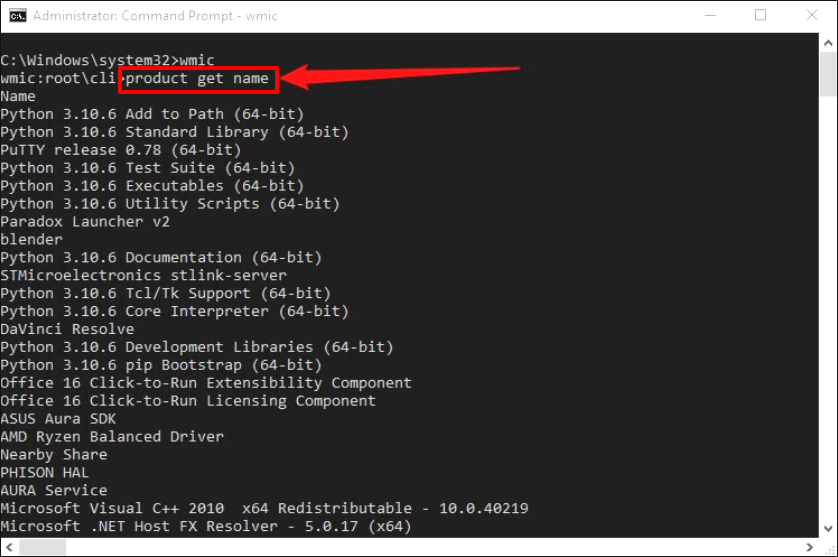
- Press Windows + S, type CMD, and select Run as Administrator to ensure you have full control over system functions.

Step 2: Access WMIC
- Now, type the following command and press Enter: Wmic
This enables Windows Management Instrumentation, allowing you to execute system commands.
Step 3: List Installed Programs
- Now, enter this command to view all installed programs: product get name
A list of installed software will appear. Locate the name of the stubborn app you want to remove.
Step 4: Uninstall the App
- Run the following command, replacing “App Name” with the actual program name:
product where name =”App Name” call uninstall
You can replace “App Name” with any installed program you want to uninstall. Here’s an example with Adobe Acrobat Reader DC: wmic product where name=”Adobe Acrobat Reader DC” call uninstall.
Press Enter, then type Y when prompted to confirm. The app will now be uninstalled.
Step 5: Verify Removal
- To ensure the app is completely removed, run the product get name command again. If it no longer appears, the uninstallation was successful.
Method 02: By Using PowerShell
For apps that refuse to uninstall through standard methods, PowerShell provides an advanced solution. This method works best for pre-installed system apps and stubborn third-party programs. Here’s how to force the removal of an application using PowerShell:
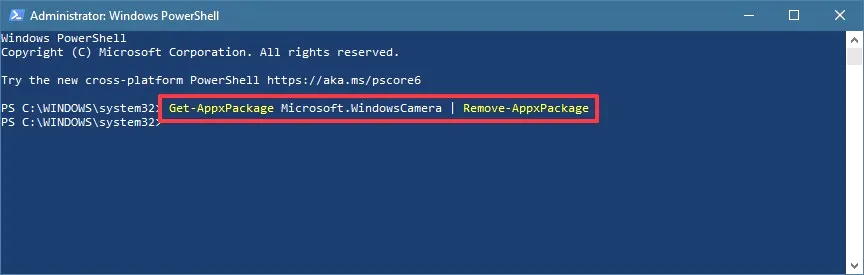
Step 1: Open PowerShell as Administrator
- Press Windows + S, type PowerShell, right-click on it, and select Run as Administrator to gain full control.

Step 2: Get a List of Installed Apps
- To view all installed applications, enter the following command and press Enter:
Get-AppxPackage | Select Name, PackageFullName
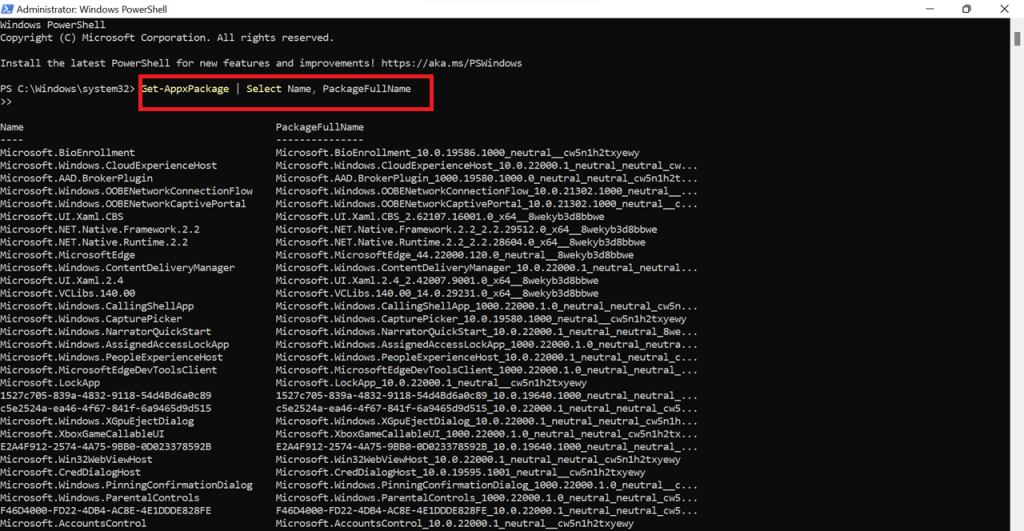
This will display a list of installed apps along with their package names.
Step 3: Identify the App to Remove
- Find the program you want to delete in the list. Note down its PackageFullName.
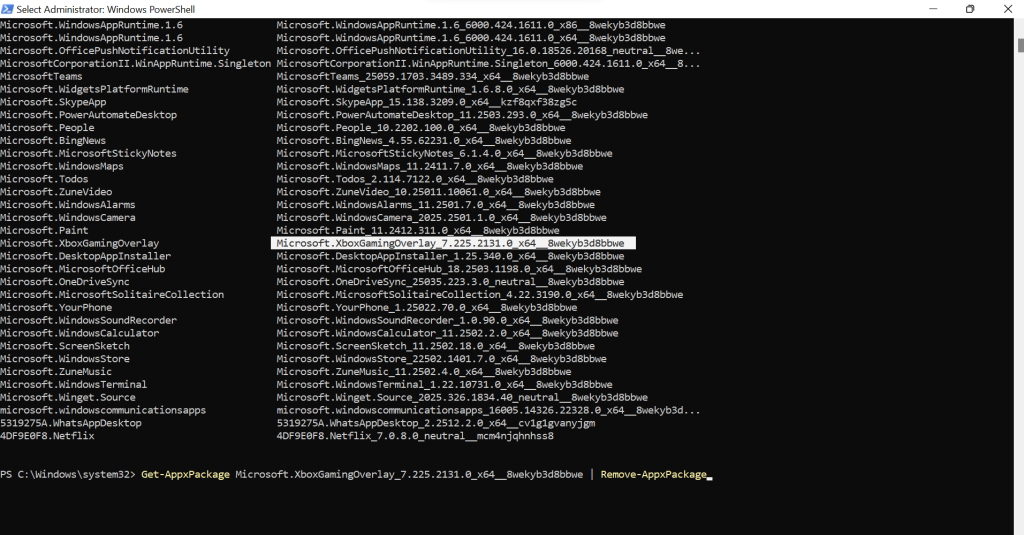
Step 4: Uninstall the App
- Run the following command, replacing AppPackageName with the actual PackageFullName:
Get-AppxPackage *AppPackageName* | Remove-AppxPackage
For example
Get-AppxPackage Microsoft.XboxGamingOverlay_7.225.2131.0_x64__8wekyb3d8bbwe | Remove-AppxPackage
- Lastly, press Enter, and PowerShell will force-remove the app.
Step 5: Verify the Uninstallation
- To check if the app is completely gone, rerun the Get-AppxPackage command. If the app no longer appears in the list, it has been successfully uninstalled.
Method 03: By Using Safe Mode Uninstallation
If an app refuses to uninstall due to system restrictions or background processes, Safe Mode provides a clean environment where only essential system functions run. This makes it easier to remove stubborn software.
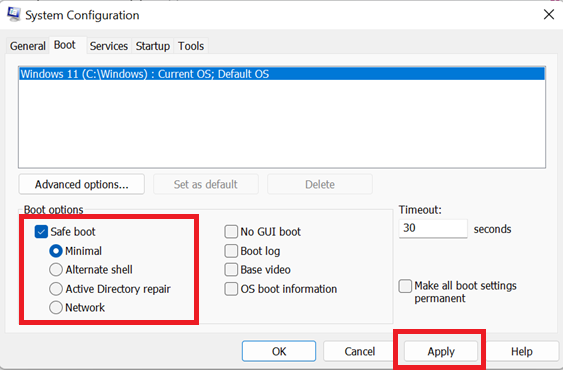
Step 01: Boot Into Safe Mode
- Press Windows + R, type msconfig, and hit Enter.

- In the System Configuration window, go to the Boot tab. Check Safe boot, select Minimal, then click Apply → OK and restart your PC.
Step 02: Uninstall the App
- Follow the standard uninstallation methods (via Settings or Control Panel).
Step 03: Restart to Exit Safe Mode
- Open Run (Windows + R), type msconfig, and press Enter. Go to the Boot tab and uncheck Safe boot. Click Apply and then OK.
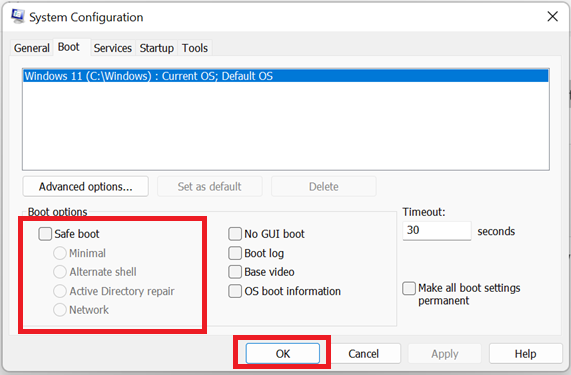
Then restart your PC to return to normal mode.
FAQs
Q:
Why do some apps leave leftover files even after uninstalling?
Most apps store additional files in hidden system folders, the Windows Registry, or AppData. Uninstalling an app through Settings or Control Panel may not completely remove these. To fully delete an app, you may need to manually remove residual files or use an uninstaller tool.
Q:
How do I completely delete an app that won’t uninstall?
If an app refuses to uninstall, you can try:
1. Using Safe Mode to prevent background processes from blocking the removal.
2. Uninstalling via Command Prompt (WMIC) or PowerShell.
3. Using a third-party uninstaller like Revo Uninstaller or IObit Uninstaller.示例答案 2
1. Using Safe Mode to prevent background processes from blocking the removal.
2. Uninstalling via Command Prompt (WMIC) or PowerShell.
3. Using a third-party uninstaller like Revo Uninstaller or IObit Uninstaller.示例答案 2
Q:
Does uninstalling an app remove all personal data?
No, uninstalling an app does not always remove saved data, especially if the app syncs with cloud services. Check for leftover files in AppData, Program Files, and the Registry, and manually delete them if necessary.
Q:
Can I reinstall an app after completely deleting it?
Yes. Once an app is deleted, you can reinstall it anytime by downloading it from the official website, Microsoft Store, or other sources. However, if you used a blocking feature (e.g., Master Uninstaller’s blacklist), you may need to unblock it first.
Q:
How do I check if an app has been completely removed from my PC?
To verify complete removal:
1. Search for the app in Start Menu and File Explorer.
2. Open Task Manager and check if any related processes are running.
3. Use Registry Editor (regedit) to look for leftover registry entries.
4. Run PowerShell: Get-AppxPackage | Select Name to confirm it’s no longer listed.
1. Search for the app in Start Menu and File Explorer.
2. Open Task Manager and check if any related processes are running.
3. Use Registry Editor (regedit) to look for leftover registry entries.
4. Run PowerShell: Get-AppxPackage | Select Name to confirm it’s no longer listed.
Q:
Is Master Uninstaller safe to use for removing apps?
Yes, Master Uninstaller is designed to safely and thoroughly remove apps without leaving residual files. It scans for leftover data, including hidden system files and registry entries, ensuring a complete cleanup. Additionally, it offers a blacklist feature to prevent accidental reinstalls. Always download Master Uninstaller from its official website to avoid fake or harmful versions.
Final Words
Now that you’ve seen how to completely delete an app, it’s clear that a simple uninstall isn’t enough. Leftover files, registry entries, and hidden data can clutter your system and impact performance. Whether you use built-in tools or a dedicated uninstaller, a thorough cleanup ensures your PC stays optimized. Take charge of your system, remove apps the right way, and keep your device running at its best.
For a complete removal, Master Uninstaller does the heavy lifting. It scans for hidden leftovers, wipes registry traces, and blocks unwanted reinstalls, all with a single click. If you want effortless app deletion, this is the tool to rely on.
Master Uninstaller
-
Simple and Practical: Easily uninstall unwanted software.
-
Thorough Cleanup: Completely remove residual files.
-
Blacklist Protection: Identify and block malware and adware.
How Do I Uninstall a Chrome Extension on My Computer?
Google Chrome extensions are installed on your browser to help improve the overall web surfing experience. With time, however, you may discover that you no longer need some extensions or that they consume significant resources. How do I uninstall a Chrome extension?
This tutorial provides a detailed guide on uninstalling different extensions on your Chrome browser. We’ll introduce each method in detail and then describe the steps you can apply. One of the best methods entails using a third-party uninstaller. How do you uninstall Chrome extensions using such tools? Keep reading to learn more.
How to Uninstall a Chrome Extension [5 Ways]
Removing a browser extension isn’t difficult as long as you apply the right methods. This section is going to discuss five easy ways to do that, including the use of:
- Third-Party Uninstaller.
- Chrome Extensions page.
- Chrome Web Store.
- Chrome Toolbar.
- Chrome Profile Folder.
Do you want to learn how to delete extensions in Google Chrome using these methods? Read on.
#1. Uninstall Chrome Extension via Third-Party Uninstaller
You can use an effective third-party tool like Master Uninstaller to delete any Chrome extension on your PC. The tool scans for all the extensions installed on your browser and displays them in a list format, including the space they occupy. It allows you to click on a specific extension and click on the “uninstall” button to remove it.
If you wish to remove multiple extensions, Master Uninstaller allows you to batch-select them and perform a one-time removal. This significantly saves time that would have been spent deleting each extension separately. This uninstaller also removes any residual files to ensure all the data related to the uninstalled program is removed.
Key Feature of Master Uninstaller
- Remove several Chrome extensions at once.
- Remove residual files related to the uninstalled extensions.
- Conducts a deep scan to locate even hidden extensions.
- Offers faster uninstall speeds.
- Minimize the chances of accidental deletions experienced using the manual method.
- Detecting and deleting malware.
Download Master Uninstaller today to manage all the Chrome extensions installed on your device. The application is lightweight and very easy to use.
Steps for Using Master Uninstaller
Step 1. Visit the Master Uninstaller website and download a free software version to your device.
Step 2. Next, install and launch the uninstaller. Click “All Programs” to find the Chrome extension you want to remove.
Step 3. Tick the checkbox next to the extension and select the “Uninstall’ button. When a popup message displays, check the button for “Automatically remove software remnants” and click “Ok” to initiate the uninstallation process. This will completely remove the selected extension from your device.

#2. Uninstall Chrome Extension via the Extensions’ Page
Google Chrome has a dedicated page that allows you to view all the extensions installed on your browser. It then allows you to remove/manage the extensions to your preference. How do I uninstall a Chrome extension via the Extensions page? Check these steps:
Step 1. Click on the three-dot menu on the Chrome homepage.
Step 2. Scroll downwards and hover your mouse over “Extensions.” Next, click on the “Manage extensions” option.
Step 3. Go to the extension you want to remove and select the “Remove” button. You can then follow the onscreen guide.
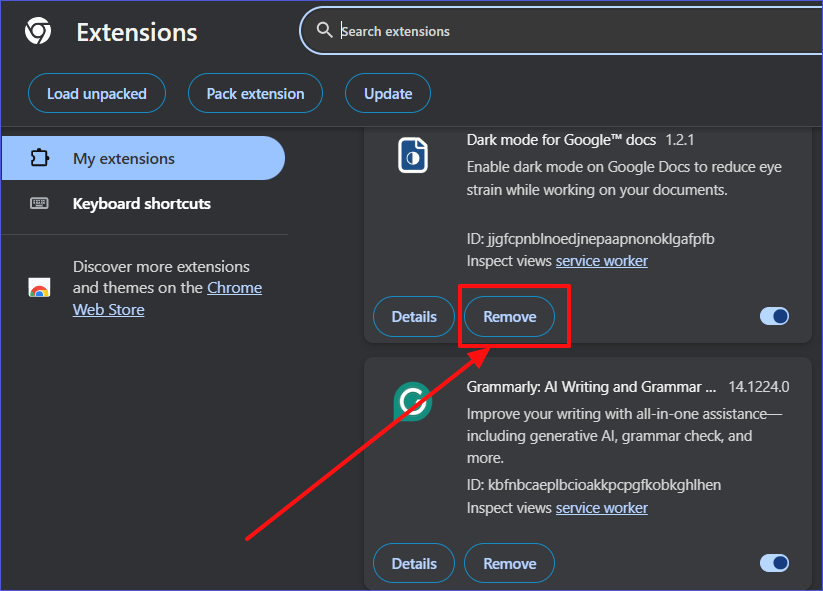
Step 4. Once the above process is complete, the extension will no longer exist in your browser.
#3. Uninstall Chrome Extension via Chrome Web Store
The Chrome Web Store also allows you to manage all the extensions installed on your browser. You can use it to remove a stubborn Chrome extension via the following steps:
Step 1. Search for the “Chrome Web Store” in the search bar and select the first result.
Step 2. Next, click on the “Extensions” tab.
Step 3. Navigate to the three-dot icon at the top right. Click on “My extensions & themes.”

Step 4. Find the extension you want to uninstall. Next, click the “Remove” option. Follow the next instructions to finish this process.
Tip: If an extension keeps reinstalling after removing it, you need to check the associated programs using it.
#4. Uninstall Chrome Extension via Chrome Toolbar
The Chrome Toolbar also gives you direct access to all the extensions available on your device. It displays them in the form of icons. You can select these icons and use the “Remove from Chrome” option to uninstall the selected extension. How do I uninstall a Chrome extension via the Chrome Toolbar? Follow these steps:
Step 1. Choose the extensions icon at the top-right section of your browser. A list of the available extensions will then show up.
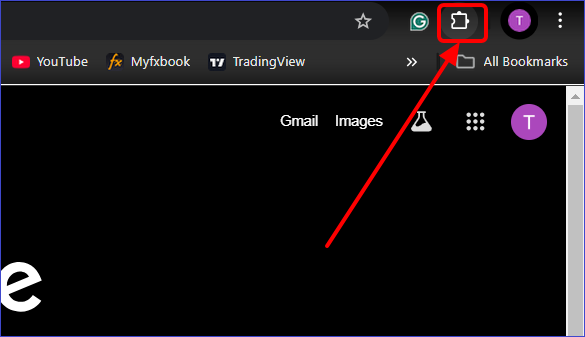
Step 2. Check out the extension you want to delete and click the three-dot icon.
Step 3. Click the “Remove from Chrome” option to uninstall the selected extensions.
#5. Uninstall Chrome Extension Manually via Chrome Profile Folder
Sometimes, you may fail to locate an extension on the Extensions page or the Chrome Web Store. The alternative option is to access the extension’s folder using File Explorer. You can then delete the extension from there. Check these steps to remove extension from Chrome via this method:
Step 1. Hit Win + E to open the File Explorer.
Step 2. Go to: C:\Users\YourUserName\AppData\Local\Google\Chrome\UserData\Default\Extensions
Step 3. Locate the extension folder you want to remove. Right-click on this folder, then select “Delete” and follow the next instructions to finish the process.
Note: Back up your Chrome Profile Folder to safeguard against accidental deletions.
Bonus Tip: Efficiently Manage Chrome Extensions
Although Chrome extensions help to improve your overall browsing experience, not managing them as expected could lead to dire consequences. Here are tips to efficiently manage all the extensions installed on your device:
- Review your list of installed extensions regularly to determine and remove those that aren’t necessary.
- Switch to developer mode to efficiently remove stubborn Chrome extensions.
- Try resetting your browser in situations where extensions keep reinstalling.
- Press Shift + Esc to access your Chrome Task Manager and identify those extensions that consume more resources and slow down your browser.
FAQs About Uninstalling Chrome Extensions
The common FAQs include:
1. Will Uninstalling an Extension Delete My Data?
The answer is YES. Removing an extension will clear all your data. Therefore, it’s important to create backups.
2. Can I Temporarily Disable a Chrome Extension Instead of Removing It?
Follow these steps:
Step 1. Go to your Chrome extensions page.
Step 2. Locate the extension you want to disable and toggle off the button next to it. This will deactivate the extension, but you can install it on your system.
3. How to Uninstall Chrome Extension That Won’t Remove?
You can apply the following fixes:
- Disable the extension first before removing it.
- Try removing the extension manually in the File Explorer, as explained in Method 5 above.
- Reset your Chrome settings to their defaults.
4. How to Uninstall Chrome Plugins?
The process of uninstalling plugins is different from that of managing extensions. You can disable Chrome plugins using the following steps:
Step 1. Open a new Chrome tab and search for the following: chrome://settings/content
Step 2. When the search results display, find the plugin you want to disable and toggle off the button next to it.
To Sum Up
This article has covered everything you need to know about “How do I uninstall a Chrome extension?” You can use a third-party uninstaller, Chrome Extensions page, Chrome Web Store, Chrome Toolbar, or Chrome Profile Folder to delete any extensions. The most recommended approach is using third-party uninstaller software like Master Uninstaller.
This tool lets you easily find and delete any extension installed on your browser. Also, it lets you delete all the residual files to ensure everything about the deleted application is cleared. Ensure you download this software today to manage all your Chrome extensions efficiently.
Master Uninstaller
-
Simple and Practical: Easily uninstall unwanted software.
-
Thorough Cleanup: Completely remove residual files.
-
Blacklist Protection: Identify and block malware and adware.
How to Uninstall a PC Game Effectively Using Different Methods
IntYou may want to uninstall a PC game to enhance the performance of your device or free up some space. Though it may seem simple, removing some games on your device isn’t a walk in the park. This tutorial seeks to cover everything you need to know about how to uninstall a PC game.
In total, we’ll discuss five methods that you can apply to address this issue. Each method offers detailed steps for how to delete game on PC. One of the most recommended options entails using a third-party uninstaller. Want to know which uninstaller it is and how to use it? Keep reading and stay informed.
How to Uninstall a PC Game Effectively in 5 Methods
Uninstalling a PC game effectively means you can eliminate everything related to the game and free up as much space as possible. When choosing an approach to use, it’s vital to consider its effectiveness. This section seeks to discuss five methods to uninstall a PC game, including:
- Using Third-Party Uninstaller.
- Via the Game Launcher.
- Using Built-in Uninstaller.
- Via Settings App.
- Using the Control Panel.
The detailed steps for each method are presented as follows:
Method 1. Uninstall PC Game Using Third-Party Uninstaller
The best approach for removing any game installed on your PC is via an uninstaller software. One such tool that you should try out today is Master Uninstaller. This tool allows you to uninstall any game, even the most stubborn ones. Once you’ve launched the uninstaller on your PC, it will display a list of all the installed games.
You can select the games you no longer need, and the software will automatically remove them from your computer. This uninstaller allows you to delete multiple programs simultaneously, saving you time. It also supports the deletion of large files within a very short time.
Apart from just deleting a game, Master Unsintaller removes its residual files and registry entries. This helps in optimizing your overall storage.
Key Features of Master Uninstaller
- Batch delete programs and save on time.
- Delete games alongside their residual files.
- Access a list of all the installed PC games seamlessly.
- Detect even the most deeply hidden files.
- Remove bundleware or malware from your system.
- Easy to install and run.
Do you want an uninstaller that effectively manages all your PC games? Ensure you download Master Uninstaller today.
Steps for Using Master Uninstaller
Step 1. Visit the Master Uninstaller website and download a free version of the software to your device.
Step 2. Next, install and launch the uninstaller. Click “All Programs” to find the PC game you want to uninstall.
Step 3. Tick the checkbox next to the PC game and select the “Uninstall’ button. When a popup message displays, check the button for “Automatically remove software remnants” and click “Ok” to initiate the uninstallation process. This will completely remove the selected game from your PC.
Method 2. Uninstall PC Game via Game Launcher
Using the launcher is another effective way to remove a game from your PC if you don’t want to use a third-party uninstaller. Most games are installed through their respective launchers (i.e., Epic Games, Steam, or Xbox Game Pass). You can use this approach to uninstall the game as well.
Doing this allows you to successfully uninstall one game without affecting the others. Below are the steps for uninstalling PC games using different launchers:
#1. Uninstalling Using Epic Games Launcher
Step 1. Go to the Epic Games Launcher.
Step 2. Navigate to “Library” and locate the game you want to uninstall.

Step 3. Click on the three-dot icon near the selected game and choose “Uninstall.” Confirm the process to initiate the game’s uninstallation.
#2. Uninstalling Using Steam Launcher
Step 1. Start the Steam Launcher on your PC.
Step 2. Navigate to the “Library” section.

Step 3. Right-click on the game you want removed and select “Manage” then “Uninstall.” This will initiate the entire uninstall process.
#3. Uninstalling Using Xbox Game Pass
Step 1. Launch the Xbox app and locate the PC game you want to remove.
Step 2. Click on the game and select “Uninstall.” The Xbox app will then remove the selected game from your PC.

Method 3. Uninstall PC Game Using Its Built-in Uninstaller
Most games, just like other PC apps, also come with their uninstaller utilities. Each game’s uninstaller file is in its main folder on the C drive. Double-clicking on that file initiates the program’s uninstallation process. Want to learn how to delete games from a computer using this method? Check these steps:
Step 1. Open the “Program Files” or “Program Files (x86)” directory in your C drive.
Step 2. Go to the folder name of the game you want to uninstall and open it.
Step 3. Find the “uninstall.exe” file and double-click on it. This will launch the app’s uninstallation process.
Step 4. Follow the onscreen steps to finish removing the game from your PC using this method.
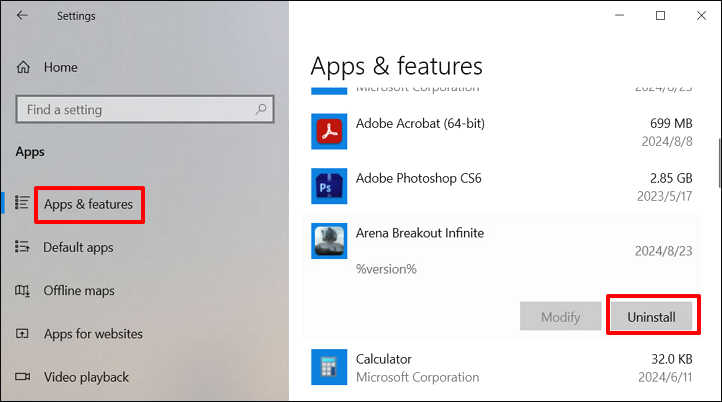
Method 4. Uninstall PC Game via the Settings App
Another common approach for removing a game is via Windows Settings. Though it may leave behind some residual files, this method is quick and effective in removing most PC games. Follow the steps below to uninstall a PC game using the Settings app:
Step 1. Click on the Start menu and select the gear icon to access your Windows Settings.
Step 2. When the Settings window opens, click on the “Apps” tab.
Step 3. In the next window, click “App & Features” or “Installed Apps.”
Step 4. You can then find the app you want to uninstall, click on it, and select the “Uninstall” option. Follow the next instructions to finish removing the selected app using Windows Settings.
Method 5. Uninstall PC Game Using the Control Panel
This method is mostly applicable if the game you want to uninstall wasn’t detected by the Settings app. It’s a traditional way of removing most old apps on your PC, including games. You can access the Control Panel and uninstall a game using the following steps:
Step 1. Type “Control Panel” in the search bar and hit Enter to open it.
Step 2. Next, click on “Programs and Features.”
Step 3. Find the game app you want to uninstall and click on it. Next, select the “Uninstall” option.
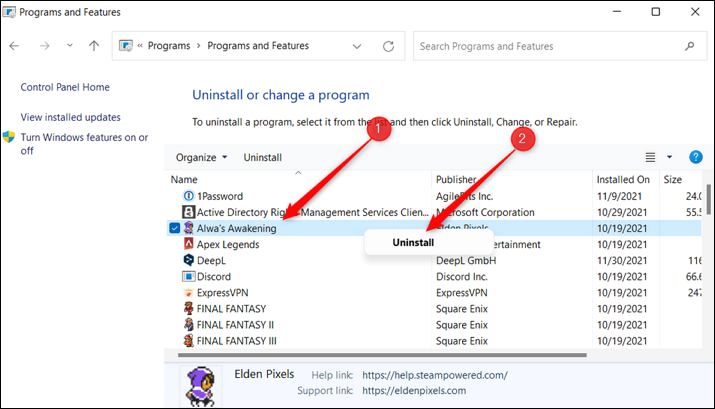
Step 4. The Control Panel will then ask you to confirm that you want to uninstall the selected program. Click “Yes” and follow the next instructions to remove the selected game app from your PC.
Bonus Tip: Backup Your Save Files Before Uninstalling PC Game
Save files contain information about your game progress. Though they may not necessarily be deleted after uninstalling the game, it’s important to create a backup to access them easily whenever you reinstall the game. You can backup the game saves to an external hard drive or the cloud.
You can also use backup software to store these files securely. If you want to store your game progress online, ensure you sync your data to Steam or Epic Games before initiating the uninstallation process.
FAQs About How to Uninstall a PC Game
Q:
Why Can’t I Uninstall a PC Game?
Check if the game is still running in the background. It’s a requirement to end all background processes before uninstalling any program on Windows. You can also confirm if there are any restrictions set against uninstalling the PC. Otherwise, you can force uninstall the game using a third-party uninstaller or by entering Safe Mode.
Q:
Why Is Free Space Not Increasing After Deleting a PC Game?
This could be due to the residual files left after deleting the game. To get rid of the leftovers, delete all the folders related to the game on the C drive. You can also delete the game’s registry entries from the Registry Editor.
Q:
How to Uninstall Games on PC Quickly?
We recommend using a third-party uninstaller software. This tool lets you delete any program on your PC and all its related files in just a few clicks. You can also batch-delete several programs by selecting them at the same time.
Q:
Will Uninstalling a Game Delete My Saved Progress?
It depends on where your game progress is saved. If you save the progress to the cloud/online using platforms like Steam or Epic Games, you’ll retain access to your game progress even after uninstalling it on your PC. However, if you’ve not saved the progress to a backup location, uninstalling the game on your PC will also delete your progress.
Final Thoughts
Learning how to uninstall a PC game isn’t a difficult thing. This tutorial has outlined five ways to do this, including using a third-party uninstaller, the Game launcher, a built-in uninstaller, the Settings app, and the Control Panel. When looking for an efficient PC game uninstall method, choose the one that removes leftover files.
A third-party uninstaller like Master Uninstaller gets the job done quickly. It allows you to detect and remove any PC game without much hassle. The uninstaller helps to optimize your device’s storage by removing even the most deeply hidden files. Download this uninstaller now to efficiently manage all your PC games.
Master Uninstaller
-
Simple and Practical: Easily uninstall unwanted software.
-
Thorough Cleanup: Completely remove residual files.
-
Blacklist Protection: Identify and block malware and adware.
How to Uninstall an App in Windows 10 in Different Ways
Uninstalling an app on your computer isn’t difficult. However, as simple as it may seem, it’s important to learn how to uninstall an app in Windows 10 correctly. The uninstall method you choose should be straightforward and allow you to remove all the selected files from your computer.
This tutorial outlines six methods to successfully uninstall or delete app Windows 10. It’s vital to learn different methods so that when one doesn’t work, you try the other. Among the methods discussed is the use of an efficient third-party tool. Do you want to know which tool it is? Please read on.
How to Uninstall an App in Windows 10 [6 Ways]
Are you struggling to find the best way to remove an app on Windows 10? In this section, we seek to analyze six proven ways to uninstall apps/programs. The six methods that we’ll discuss entail using:
- Third-Party Uninstaller.
- Start Menu.
- Settings in Windows.
- Control Panel.
- PowerShell.
- Command Prompt.
Want to get the detailed steps for each method? Keep reading.
Way 1. Uninstall an App via Third-Party Uninstaller
The most convenient way to remove any app on your Windows PC is via third-party uninstaller software. Which uninstaller is the best at the moment? Try out Master Uninstaller today to efficiently manage all the apps installed on your device. This uninstall tool allows you to view all the programs installed on your device and the space they consume. It allows you to select any app and remove it alongside its residual files.
Master Uninstaller offers a reliable approach for removing apps since it allows you to bypass any restricted apps. This means that you can even delete Windows built-in apps, unlike other uninstall methods. What more? This powerful uninstaller allows you to detect and delete bundleware (software that tends to install other programs).
Key Features of Master Uninstaller
- Manage all the programs installed on your PC.
- Batch delete apps to save time.
- Remove leftover files when deleting apps.
- Detecting and deleting bundleware.
- Displays a list of the least used apps for easier deletion.
- Disable unnecessary Windows services to enhance performance.
Download a free version of the Master Uninstaller today to get started.
Steps for Using Master Uninstaller
Step 1. Visit the Master Uninstaller website and download a free version of the software to your device.
Step 2. Next, install and launch the uninstaller. Click “All Programs” to find the apps you want to uninstall.
Step 3. Tick the checkbox next to the app (s) and select the “Uninstall’ button. When a popup message displays, check the button for “Automatically remove software remnants” and click “Ok” to initiate the uninstallation process. This will completely remove the selected app from your PC.
Way 2. Uninstall an App via the Start Menu
This method is one of the simplest alternatives to delete app Windows 10 if you don’t want to use a third-party uninstaller. It’s the best approach for uninstalling programs obtained from the Microsoft Store. Follow the steps below to use it:
Step 1. Navigate to the Start Menu and click on it. You’ll see a list of apps installed on your system.
Step 2. Scroll through the listed apps to find the one you want to uninstall. Next, right-click on that app, then select the “Uninstall” option.
Step 3. The system will then ask you to confirm whether you want to remove the selected app. Confirm your selection and follow the instructions displayed to finish the process.
Way 3. Uninstall an App via Settings on Windows
The Settings app is a built-in Windows utility that allows you to manage installed programs. You can also use it to delete apps that you no longer need. Below are the detailed steps on how to remove an app windows 10 using this method:
Step 1. Hit Win + I to access your Windows Settings.
Step 2. Select the “Apps” option to access all the installed apps on your system.
Step 3. Next, click “Apps & Features” and browse the list of apps displayed.
Step 4. To uninstall an app, click on it and select the “Uninstall” option. You’ll then have to confirm your selection before the uninstall process starts. Follow the onscreen guide to complete it and exit the Settings window.
Way 4. Uninstall an App via the Control Panel
The Control Panel is the default location for managing different tasks on your computer. It has a “programs” tab that allows you to manage all the programs installed in your system. You can use it to uninstall a program that you no longer need via the following steps:
Step 1. Navigate to the search bar and type “Control Panel”. Next, select the “Run as administrator” option to launch the program.
Step 2. Once the Control Panel window opens, navigate to the “Programs” section and select “Uninstall a program.”
Step 3. The next window will then display all the programs installed on your PC. Select the one you want to remove and click the “Uninstall” button at the top. You can then stay patient and wait for the system to remove the selected program.
Tip: Try running a program’s uninstaller manually if it fails to uninstall via the Control Panel.
Way 5. Uninstall and App via PowerShell
As stated earlier, PowerShell provides another easier approach to remove built-in apps if you fail to remove them via the Settings apps. Through this method, you can run some advanced scripts to remove the selected program completely from your system. Check these steps:
Step 1. Navigate to the Start Menu and right-click on it. Next, scroll and select “Windows PowerShell (Admin)” to open it.
Step 2. Once the PowerShell window opens, type the following command and hit Enter to check all the installed apps:
Get-AppxPackage | Select Name, PackageFullName
Step 3. Confirm if the app you want to remove is listed and type the following command to remove it (ensure you replace “AppName” with the correct name of the program you want to remove):
Get-AppxPackage “AppName” | Remove-AppxPackage
Step 4. Stay patient for the removal process to complete. You can also restart your PC thereafter.
Note: Users must exercise caution when removing apps using this approach to avoid accidentally deleting other important apps.
Way 6. Uninstall an App via the Command Prompt
The last method we’ll discuss today entails keying specific commands in the CMD window to remove unwanted programs. Just like PowerShell, this is another powerful approach for removing Windows programs. You’ll need to have administrator privileges on your computer to effectively delete an app using this method:
Step 1. Type “CMD” in the search bar and select “Run as administrator” to launch the utility.
Step 2. Paste the following command and hit Enter to get a list of programs installed on your device:
wmic product get name
Step 3. Next, select the app you want to uninstall by typing the following command (please replace “AppName” with the exact name of the app you want to uninstall):
wmic product where name=”AppName” call uninstall
Step 4. You can then adhere to the next instructions to finish the uninstallation process.
Bonus Tip: Remove Old Program Data Windows 10
Uninstalling an app isn’t just enough. You need to remove its leftover files as well. This ensures that you free up enough space on your computer and prevent other programs from malfunctioning. You can remove old program data via the following steps:
Step 1. Open your C drive and click on “Program Files” or “Program Files (x86)” depending on your computer. Right-click on the folder belonging to the app you’ve just uninstalled and select the “Delete” option to remove it.
Step 2. Next, open your Registry Editor window and go to HKEY_LOCAL_MACHINE\SOFTWARE, and delete all the folders related to the program you’ve just installed. You can also find other related folders under HKEY_CURENT_USER\SOFTWARE.
Step 3. Lastly, go to the Recycle Bin and delete all the folders related to the program you uninstalled. This helps to free up more space.
FAQs About How to Uninstall an App in Windows 10
Q:
Does Uninstalling an App Get Rid Of All Associated Files?
You might remain with residual files even after successfully uninstalling an app on your PC. Such files could be in the form of registry entries or program-related folders within the C drive. You’ll need to navigate to these locations to ensure all the files related to the program are also deleted.
Q:
How Do I Reinstall a Deleted App?
You’ll need to browse the app’s official website and re-download it. Then, you can click on the downloaded file and follow the instructions to reinstall it on your system. If you downloaded the app from the Microsoft Store, you’ll need to visit this location to reinstall it.
Q:
Why Can’t I Uninstall Some Apps in Windows 10?
This could occur if the app is a built-in utility or has some administrator restrictions on it. It’s not usually possible to delete a Windows built-in utility because this may affect how other programs run on your device. The only reliable option to delete such apps is to uninstall them via third-party uninstallers.
Q:
How to Force Uninstall an App in Windows 10?
A force uninstall is usually applied to those programs that are stubborn to uninstall via the standard methods. You can force uninstall an app using Windows PowerShell or by entering Safe Mode. However, the simplest approach is to use a third-party uninstaller software to remove the stubborn program.
To Sum Up
Learning how to uninstall an app in Windows 10 helps free up some extra space on your device and eliminates unnecessary programs. This guide has outlined six methods to remove an app on your PC. The methods entail using a third-party uninstaller, the Start Menu, Windows Settings, Control Panel, PowerShell, and Command Prompt.
Among these methods, the best one is to use Master Uninstaller. This is because it lets you delete an app within the shortest time. You can also locate and delete the most hidden files in the form of malware. Unlike built-in tools, Master Uninstaller allows you to remove several apps in one go. Ensure you download this software today to uninstall any app on your PC quickly.
Master Uninstaller
-
Simple and Practical: Easily uninstall unwanted software.
-
Thorough Cleanup: Completely remove residual files.
-
Blacklist Protection: Identify and block malware and adware.
How to Uninstall an Old Program Without the Uninstall Tool
Learning how to uninstall an old program without the uninstall tool is an essential skill. Though all programs have an uninstall tool, it may fail to work for different reasons. However, you shouldn’t get worried when in such a situation since many alternatives exist. This article outlines five alternative options for uninstalling a program on your computer.
You may want to uninstall a program to optimize your computer’s performance or free up extra space. You can achieve that using Windows built-in tools or third-party uninstallers. You can also do it by learning how to manually delete a program. Keep reading to learn about the best third-party uninstaller for removing programs on a PC.
Why Uninstall a Program Without the Uninstall Tool?
Most programs come with an uninstall.exe file that can be used for uninstallation purposes whenever you don’t need it on your computer. However, you may find it impossible to uninstall the program using the uninstall tool. This could happen due to the following reasons:
- Faulty uninstall tool: This could happen if the tool is not working correctly, preventing you from removing the program from your computer.
- Missing uninstall tool: It could happen that you accidentally deleted the uninstall.exe file. This means that you’ll need other options to uninstall the program.
- A stubborn program: Programs affected by viruses can become hard to remove using their original uninstall tool. You’ll need to try out other standard approaches to remove them.
Are you wondering how to remove a program without its original uninstall tool? The next section will discuss how you can do that conveniently.
5 Ways How to Uninstall an Old Program Without the Uninstall Tool
You may want to remove a program on your PC to clear up space or just get rid of it. Apart from the uninstall tool, there exist other ways to uninstall a program. This article will discuss five approaches, including the following:
- Using Third-Party Uninstaller.
- Using Command Prompt.
- Manually deleting the files.
- Using the Registry Editor.
- Via Safe Mode removal.
Keep reading to learn how each method works.
#1. Uninstall Program Using Third-Party Uninstaller
One of the most reliable approaches for uninstalling a program without the uninstall tool is via third-party uninstaller software. The Master Uninstaller is a dependable tool for removing any unwanted program on your PC. You can use it on Windows 10/11 to remove built-in apps or third-party programs. No matter the program size, this installer lets you delete it quickly.
If you want to delete multiple programs at once, Master Uninstaller got you covered! Its batch deletion feature allows you to select multiple programs at once and uninstall them simultaneously. It also deletes residual files and registry entries, optimizing your PC’s storage space. Additionally, the Master Uninstaller helps to remove any bundleware that is affecting how other apps run.
Key Features of Master Uninstaller
- Access all the programs installed on your PC.
- Delete multiple programs simultaneously.
- Detects even the most hidden programs.
- Optimize performance by deleting residual files and registry entries.
- Delete bundleware programs.
- Displays the most unused apps and allows you to delete them.
Do you want to get started with Master Uninstaller today? Ensure you download a free version of the software now.
Steps for Using Master Uninstaller
Step 1. Visit the Master Uninstaller website and download a free version of the software to your device.
Step 2. Next, install and launch the uninstaller. Click “All Programs” to find the program you want to uninstall.
Step 3. Tick the checkbox next to the program and select the “Uninstall’ button. When a popup message displays, check the button for “Automatically remove software remnants” and click “Ok” to initiate the uninstallation process. This will completely remove the selected program (s) from your PC.
#2. Uninstall Program Using the Command Prompt
Command Prompt is one of the most common ways of uninstalling a program without an uninstall tool. This Windows built-in utility lets you enter specific commands to remove the selected program from your system. How to uninstall an old program without the uninstall tool using this method? Check these steps:
Step 1. Search for “CMD.” From the results, select “Run as an administrator” to launch CMD.
Step 2. Type the following command and hit Enter:
wmic
Step 3. Next, type the following command and hit Enter again (this will list all the programs installed in your system):
product get name
Step 4. You can then type the following command and hit Enter (replace “ProgramName” with the correct application name):
product name where name=”ProgramName” call uninstall
Step 5. The uninstall process will then begin.
#3. Uninstall Program By Manually Deleting Its Files
You can also remove a program by deleting its related files and folders if the original uninstall tool isn’t available. Check the steps below to learn how to manually remove software:
Step 1. End all background running processes in the Task Manager.
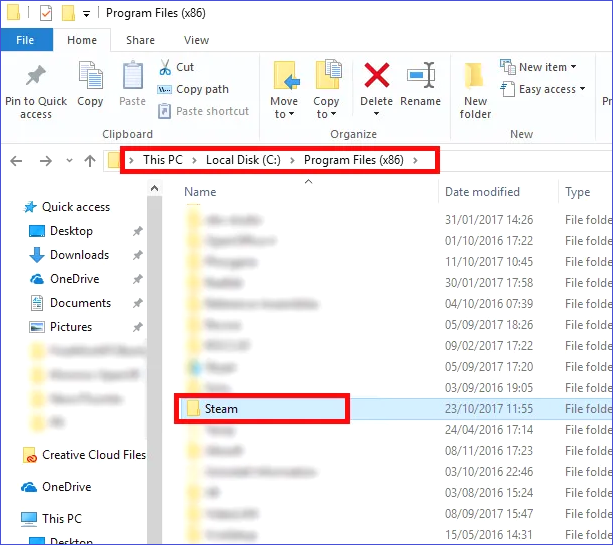
Step 2. Open File Explorer and navigate to Local Disk C.
Step 3. Click on “Program Files (x86).” Right-click on the folder for the program to uninstall. Next, select “Delete.” The system will delete all the files and folders related to that program.
Step 4. You must also remove the AppData files for the selected program to completely uninstall it.
#4. Uninstall a Program Via the Registry Editor
Each program installed on your system has its entries recorded in the registry. You can access them through a specific folder within the Registry Editor. Check these steps:
Step 1. Search for “Registry Editor” and run it as an administrator.
Step 2. Next, go to HKEY_LOCAL_MACHINE\SOFTWARE. Find the folder of the program you’ve just removed. Right-click on it and select “Delete.”
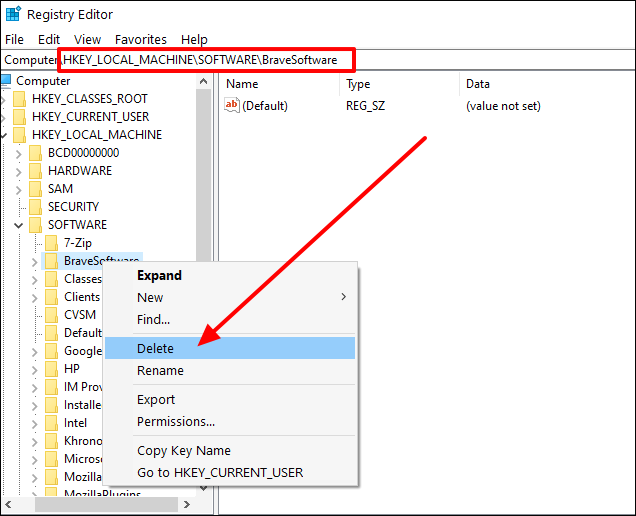
Step 3. Next, go to HKEY_CURRENT_USER\SOFTWARE and delete any program-related entries.
Step 4. Lastly, restart your device.
#5. Uninstall a Program via Safe Mode Removal
This solution mostly applies if all the other options have failed to uninstall the program. It entails booting your device into Safe Mode, where no processes will be running in the background, making it simple for you to remove malware-infested programs. Follow the steps below:
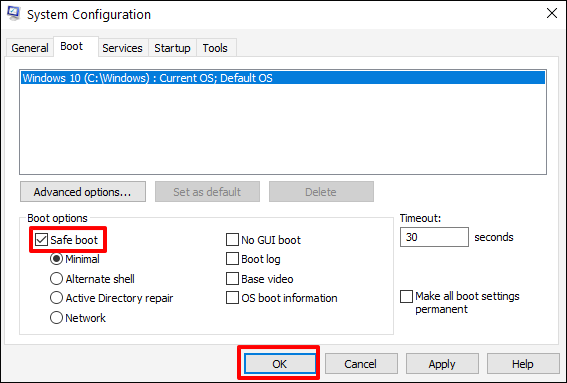
Step 1. Hit Win + R to open the run dialog box. Type “msconfig” and hit Enter.
Step 2. Click on the “Boot” tab and enable “Safe boot.” Click OK and exit this window.
Step 3. Restart to enter Safe Mode. You now use Command Prompt to delete the stubborn program.
Step 4. Remember to exit Safe Mode once you’ve finished the above process. You should also restart your PC.
Bonus Tips: How Do I Remove a Program That Won’t Uninstall
You can apply the following tips to address this issue:
- Use a third-party uninstaller: The tools are efficient in removing the most stubborn programs since they scan your entire drive.
- Exit background processes: you need to stop any process using the program to uninstall it conveniently.
- Run disk cleanup: This helps clear leftover files.
- Try reinstalling the app before uninstalling: Some users have reported this method effective, especially if the uninstall.exe file was initially missing.
- Use PowerShell: You can try this option if Command Prompt fails to detect/uninstall your program. PowerShell scripts are more reliable when performing an advanced uninstall.
Ensure you apply these tips if your program fails to uninstall.
FAQs About How to Uninstall a Program
Q:
Why Has My Program Failed to Uninstall?
The first reason could be some program-related processes running in the background. It may also happen if your program has malware. You should close all the background processes before initiating the uninstall or try using third-party uninstallers for malware-attached programs.
Q:
Can You Delete a Program Instead of Uninstalling It?
You can achieve that by manually locating the program’s folder in the File Explorer and deleting it. However, this method may leave residual files or registry entries in your system files. It’s better to perform a regular uninstall using third-party uninstallers or Windows built-in tools.
Q:
Is It Risky to Manually Delete a Program?
The answer is YES. Doing that may result in system instability issues if you accidentally delete the unintended files. Manually deleting a program may also leave behind unnecessary files related to the program in the registry entries.
Q:
Which Is the Best Way to Uninstall Any Program on Windows?
The best approach for uninstalling a program should allow you to remove all the files related to it. It should guarantee the safety of your other files. The best way to do that is via third-party uninstallers. Try these tools today to efficiently manage all the programs installed in your system.
Final Thoughts
You’ve now learned how to uninstall an old program without the uninstall tool. As a recap, the methods we’ve discussed entail using a third-party uninstaller, Command Prompt, Registry Editor, Safe Mode, and manually deleting files. The most recommended approach among these alternatives is using a third-party tool.
Try Master Uninstaller today to efficiently manage all the programs installed on your PC. This uninstall tool allows you to remove any program on your device without restrictions. It supports removing both large and small apps. It also boosts your storage by removing residual files. Download Master Uninstaller now to manage all the programs on your computer seamlessly.
Master Uninstaller
-
Simple and Practical: Easily uninstall unwanted software.
-
Thorough Cleanup: Completely remove residual files.
-
Blacklist Protection: Identify and block malware and adware.
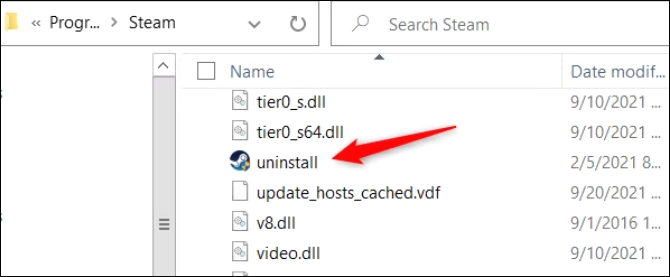
How to Uninstall a Game from Steam- A Detailed Guide
The Steam Library stores all the information for your installed game, including your game saves. With time, however, you may discover that your PC’s storage space keeps declining as you install and play more games. Wondering how to uninstall a game from Steam and free up more space? This article seeks to offer the right solutions if you’re looking for help.
We’ll discuss six methods concerning how to uninstall Steam games. Removing a game that you no longer need helps to boost the overall performance of your device. One of the most reliable options for uninstalling any Steam game entails using a third-party uninstaller. We’ll show you the best uninstaller shortly.
Why Uninstall a Game from Steam?
You may want to remove a game from Steam for different reasons. However, here are the main reasons that may force someone to uninstall a game from Steam:
- Fixing bugs: Some games may develop bugs with time. The viable solution in such cases is to uninstall and reinstall the game.
- Creating more disk space: You may want to uninstall a game if it’s taking a larger chunk of your memory than expected.
- Not interested in the game anymore: You may have played it several times to the point of losing interest, hence the need to remove it and create room for new games.
- Managing bandwidth and updates: Some games receive regular updates that consume more resources than required. Removing them helps to manage data usage on your PC.
No matter the reason for wanting to uninstall a game, the next section will discuss how you can do that efficiently.
How to Uninstall a Game from Steam in Different Ways
Steam gives users access to the game library so that they can manage all their games in a simple manner. It’s possible to uninstall a Steam game seamlessly whenever the need arises. This section seeks to outline six ways to do that, including the following:
- Using Third-Party Uninstaller.
- Via Steam Library.
- Manually Deleting Game Files.
- Using Windows Settings.
- Using Steam Storage Manager.
- Using Command Prompt.
Keep reading to learn how to get rid of games on Steam using these methods.
Way 1. Uninstall Game Using Third-Party Uninstaller
One of the best tools for removing a game from Steam is the Master Uninstaller. This third-party app lets you eliminate everything related to the uninstalled game. This ensures a sufficient storage space remains. It deeply scans your Steam folder to ensure all files related to the uninstalled game are detected and removed.
If a game has malware, the Master Uninstaller provides the best option for removing it. This is because no files will stay hidden during the uninstall process. It also safeguards your device against bundleware programs, allowing you to detect and uninstall them easily. Apart from allowing you to uninstall third-party programs, Master Uninstaller also removes Windows built-in apps that you rarely use.
Key Features of Master Uninstaller
- Quickly uninstall any Steam game.
- Removes leftover files and registry entries during uninstallation.
- Allows you to conduct a deep scan of all related files before uninstalling the game.
- Delete multiple Steam games at the same instance.
- Allows you to delete rarely used Windows apps.
- Detecting and deleting malware in programs.
Do you want to efficiently manage your games on Steam today? Ensure you download Master Uninstaller and quickly uninstall those games you no longer need. You can accomplish that in very simple steps.
Steps for Using Master Uninstaller
Step 1. Visit the Master Uninstaller website and download a free version of the software to your device.
Step 2. Install and start the uninstaller, then go to “All Programs.” You can then look for the game you want to remove.
Step 3. Choose the game you want to remove and click the “Uninstall” button. Next, click “Automatically remove software remnants” and then “Ok” to launch the uninstallation process. This will completely remove the selected Steam game from your device.
Way 2. Uninstall Game via Steam Library
This is another simple approach to remove a game if you don’t want to use a third-party uninstaller. It allows you to access the games library using your Steam client and uninstall it. Check these steps:
Step 1. Click on the “Library” tab in your Steam client.

Step 2. Right-click on the name of the game you want to eliminate. Next, go to “Manage” and then “Uninstall.”
Step 3. Confirm your selection to initiate the uninstallation process. This move will completely delete the game from your Steam library.
Way 3. Uninstall Game By Manually Deleting Game Files
Uninstalling a game isn’t just enough. You need to ensure that the system removes the related files as well. Follow these steps:
Step 1. Hit Win + E to access the File Explorer window.
Step 2. Open your Local Disk C and go to Program Files (x86)\Steam\steamapps\common\
Step 3. Right-click on a specific game folder and select “Delete” to erase leftover files.
Way 4. Uninstall Game Using Windows Settings
The Settings app allows you to access all the “Apps & features” installed in your system and uninstall any program you want. It’s another option for uninstalling a game without opening your Steam client. Wondering how to uninstall Steam games on PC using this method? Check the steps below:
Step 1. Hit Win + I to access the Settings window.
Step 2. Next, click on “Apps” then “Apps & features.”
Step 3. Find the game you want to remove from the list of installed apps. Click on it, select the “Uninstall” option. Please follow the onscreen guide to finish the process.
Way 5. Uninstall Game Using Steam Storage Manager
The Storage Manager is a built-in utility on Steam that allows you to manage all the installed applications. You can also use it to uninstall a Steam game that you no longer need. How do I delete a game on Steam using this method? Check these steps:
Step 1. Launch your Steam client.
Step 2. Click on the “Steam” tab and select “Settings.”
Step 3. Once the Settings menu opens, click on “Storage.”
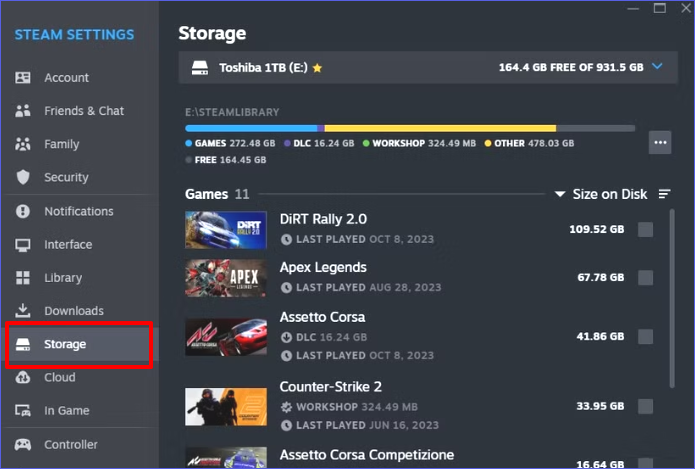
Step 4. Select your game and click the “Uninstall” button. Your Steam Storage Manager will then effortlessly remove the selected game.
Way 6. Uninstall Game Using Command Prompt
The Command Prompt offers an advanced option for uninstalling Steam games from your PC. Through a chain of commands, this Windows built-in utility allows you to access a list of all the installed Steam games and select the one you want to delete. Follow these steps to uninstall a game using CMD:
Step 1. Launch Command Prompt as an administrator.
Step 2. Paste this command and hit Enter to view your Steam games folder:
cd “C:\Program Files (x86)\Steam\steamapps\common”
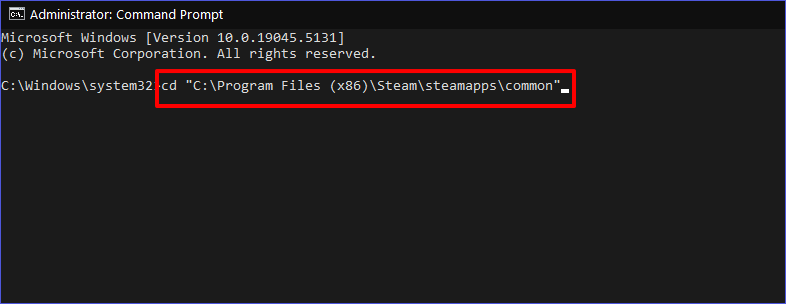
Step 3. Type the following to delete the game you want (ensure you select the correct game name):
rmdir /s /q “GameName”
Step 4. Command Prompt will then remove the selected game from your system.
Bonus Tips: Manage Steam Games Efficiently
You should consider applying the following fixes to manage your team games efficiently.
- Consider moving the game to an external drive if the main reason for uninstalling it was to clear disk space.
- Use a third-party uninstaller for seamless uninstallations.
- Back up your saves to protect your progress.
- Disable the “auto-update” feature for dormant games. This saves on bandwidth.
- Use the Steam Storage Manager to quickly identify large games and uninstall them.
FAQs About How to Uninstall a Game from Steam
Q:
How to Check the Space Used By a Game Before Uninstalling It?
You can follow these steps:
Step 1. Launch your Steam client and click on “Library.”
Step 2. Right-click on any game and go to “Properties.”
Step 3. You can then go to the “Installed Files” section and check how much storage space is used.
Step 1. Launch your Steam client and click on “Library.”
Step 2. Right-click on any game and go to “Properties.”
Step 3. You can then go to the “Installed Files” section and check how much storage space is used.
Q:
Will Uninstalling a Game Delete It from My Steam Account?
The answer is NO. Uninstalling a game will only remove it from your local storage. Your Steam library will keep a copy of it and allow you to reinstall the game in your system whenever you need it again.
Q:
Does Uninstalling a Game Remove All My Saved Data?
It depends on whether you backed up your saved data to the Steam Cloud or not. You can still access your game saves after uninstalling the game if you have saved them to the cloud. However, you’ll no longer access them if you delete them from your local storage without backup.
Q:
Why Is My Disk Space Not Increasing Even After Uninstalling a Large Game?
You might have left behind some leftover files and registry entries. Try deleting them as well to free up more space on your device.
Wrapping Up
This article has discussed everything you need to know about how to uninstall a game from Steam. The six methods discussed entailed using a third-party uninstaller, the Steam Library, Windows Settings, the Steam Storage Manager, the Command Prompt, or manually deleting game files. The best method among these is using a third-party uninstaller.
Try the Master Uninstaller today if you want to conveniently delete any Steam game from your PC. This uninstall tool allows you to access a list of all the installed games on your PC and quickly delete those you no longer need. It also allows you to delete leftover files and registry entries. Download the Master Uninstaller now to seamlessly manage your Steam games.
Master Uninstaller
-
Simple and Practical: Easily uninstall unwanted software.
-
Thorough Cleanup: Completely remove residual files.
-
Blacklist Protection: Identify and block malware and adware.
How to Fix Disk Usage Windows 10 | 11 Tried-and-Tested Methods
Working on a slow and sluggish computer can frustrate anyone. Have you ever faced this situation and discovered that your drive is overloaded? While it is okay in rare cases when performing disk-intensive tasks, constantly seeing 100% disk usage is problematic for your PC’s health.
Hence, you must fix it using the right methods. But this is only possible when you have identified the reason behind the overloaded drive. Here is a quick rundown of the common causes of disk 100 usage in Windows 10 and how to solve it.
What is Disk Usage?
Simply put, disk usage is the percentage of the space the computer uses from your hard disk to operate and carry out routine tasks. It is related to the performance and speed of your system rather than simply its storage capacity.
This computer disk uses metrics to evaluate the load on the drive and items that consume most space. However, when your Windows Task Manager shows 100 percent disk usage, it indicates that your drive is experiencing speed and performance issues. Identifying the right problem and finding its solution is crucial for your system’s normal functioning.
Some common reasons behind 100 disk usage include,
- High CPU usage.
- Background processes and temporary files.
- Fragmented disk and logical disk flaws.
- Faulty hardware.
How to Identify the Cause of 100% Disk Usage Windows 10?
The most effective way to identify what is causing a 100 disk space usage in Windows 11 is through the Task Manager. This system utility shows the items increasing the disk usage, so you know which issue to resolve and how. Here is how you can do it.
- Open Task Manager from the Search menu.
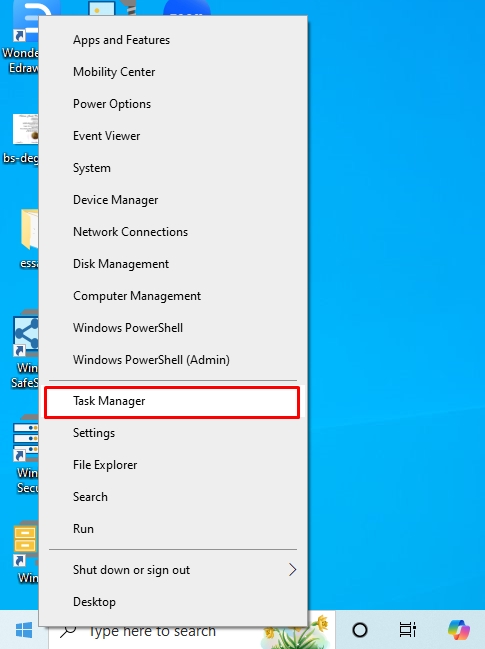
- Click the Disk tab from the dashboard to see all running processes that are taking up the disk space.
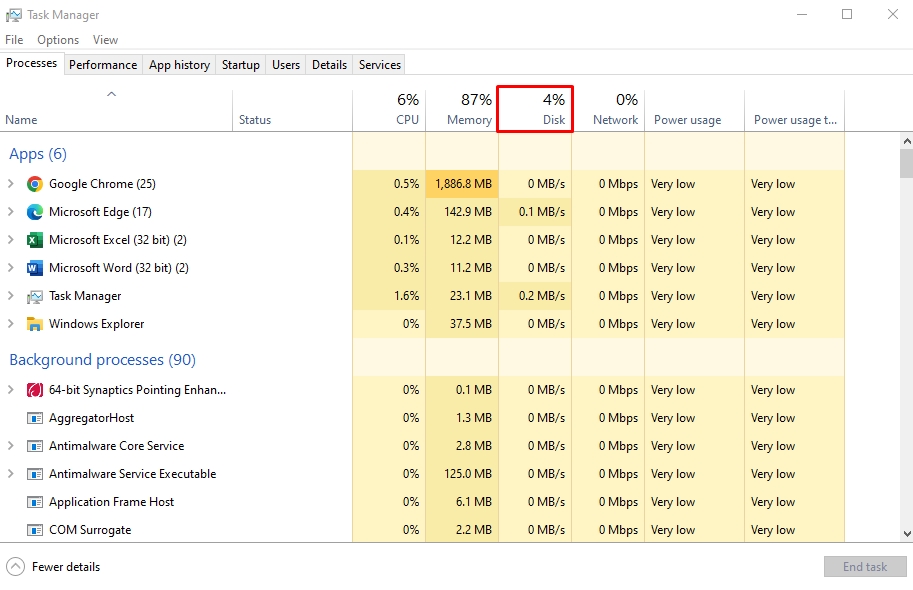
- Look for orange components, as they usually require more storage per second than usual. Consider these items problematic and find a solution using the quick fixes below.
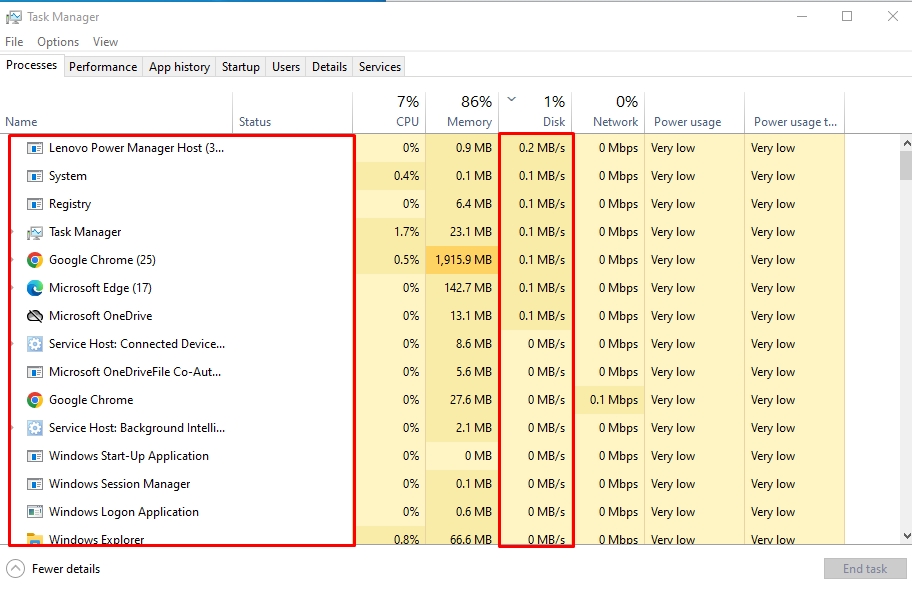
11 Quick Fixes for 100% Disk Usage Windows 10 | Quick and Easy
Check out these 11 Windows 10 100 disk usage fixes and resolve your PC’s performance issues.
Method 1: Update Your Windows
Microsoft constantly releases updates to fix bugs and security issues, which download automatically. However, these updates stay in standby mode until you install them, which takes up many of your disk resources.
Additionally, Windows updates can resolve most problems with 100% disk usage. Here is how to fix 100% disk usage for Windows 10 after a fresh install.
- Open Windows Settings by pressing Windows + I and visit the Update and Security tab.
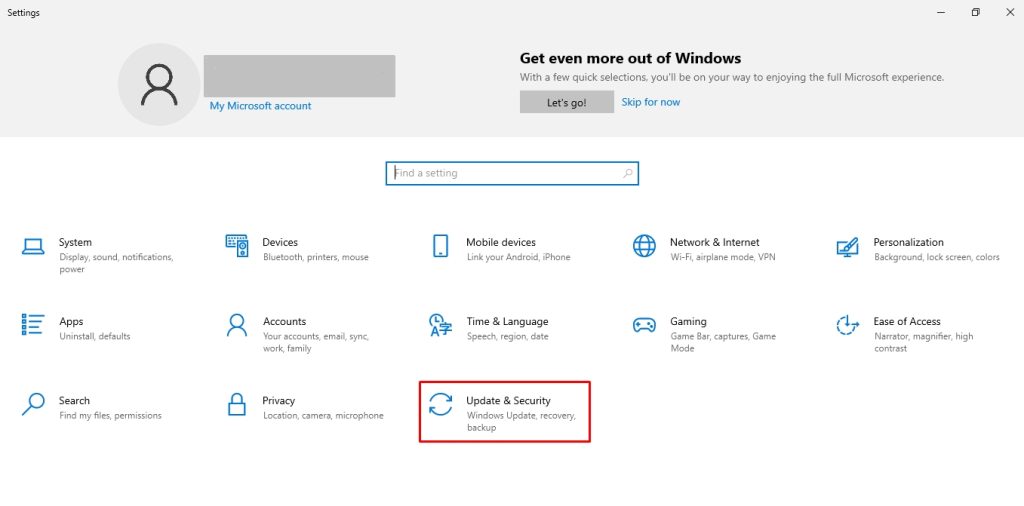
- From here, click Window Updates > Check for Updates. You can install them depending on the status of the update.
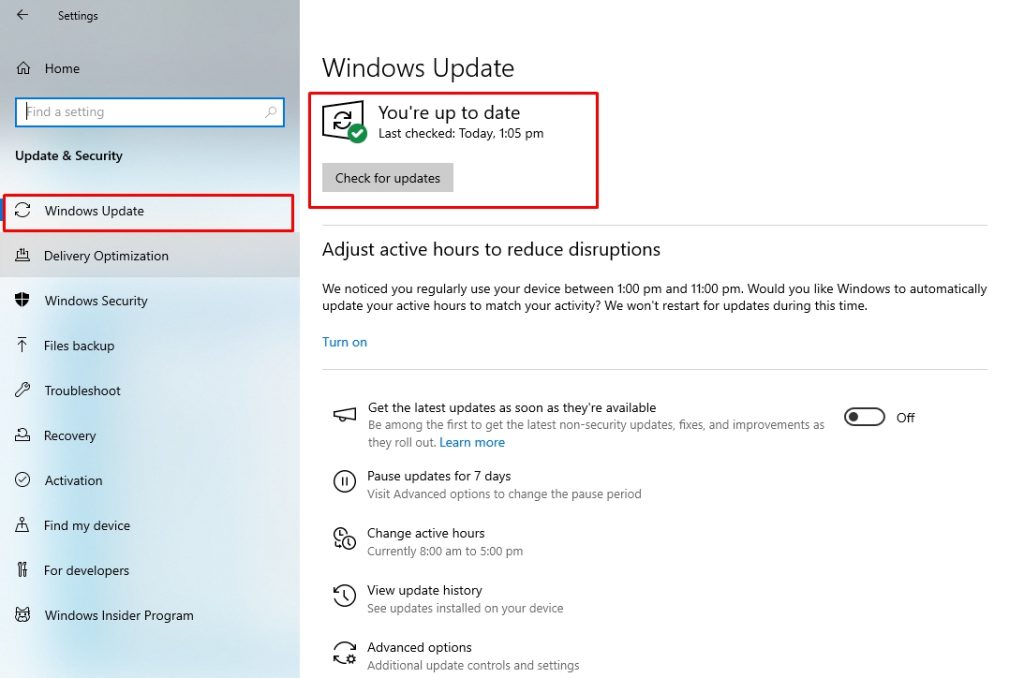
Method 2: Reduce Unused and Startup Apps
Some programs in your computer run on startup by default, consuming resources and adding to Windows 10 disk storage. Limiting these programs is an easy and effective way to lower disk usage. Follow these simple steps to do this.
- Press Windows + I to open Windows Settings and visit the Apps tab.
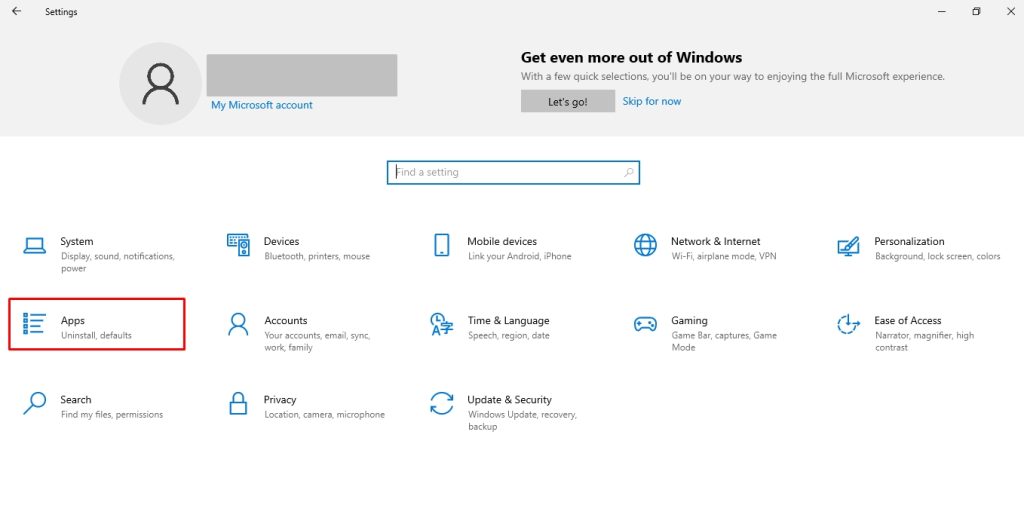
- Select Startup and Toggle Off the apps you do not want.

Moreover, you can delete these apps if they are no longer in use to free up system resources. Here is how it goes.
- Open Run by pressing Windows +R. Type shell:startup common in the search box and press Enter.
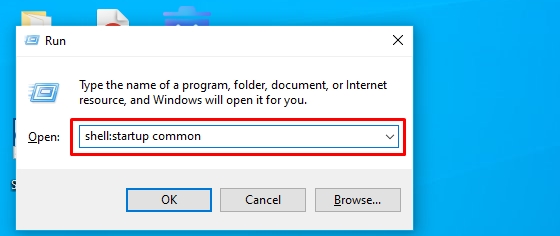
- This will show you startup items on your computer. Right-click the desired program to delete it.
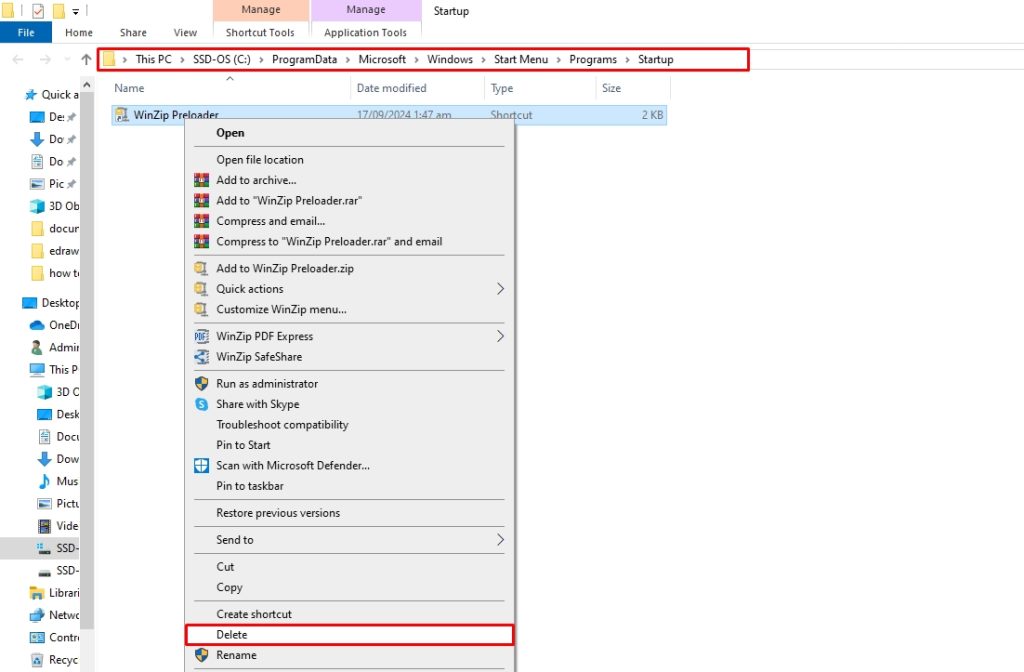
While this is a simple way of deleting startup apps, it does not entirely remove the program’s background processes and registry traces. Here, using a third-party uninstaller like Master Uninstaller can help.
This program is designed to uninstall apps, their associated files, and residues from your PC with just one click. Here is how to use it to uninstall apps.
- Download Master Uninstaller from here and register your email.
- Visit the Windows Apps from the dashboard, choose your desired app, and click Uninstall.
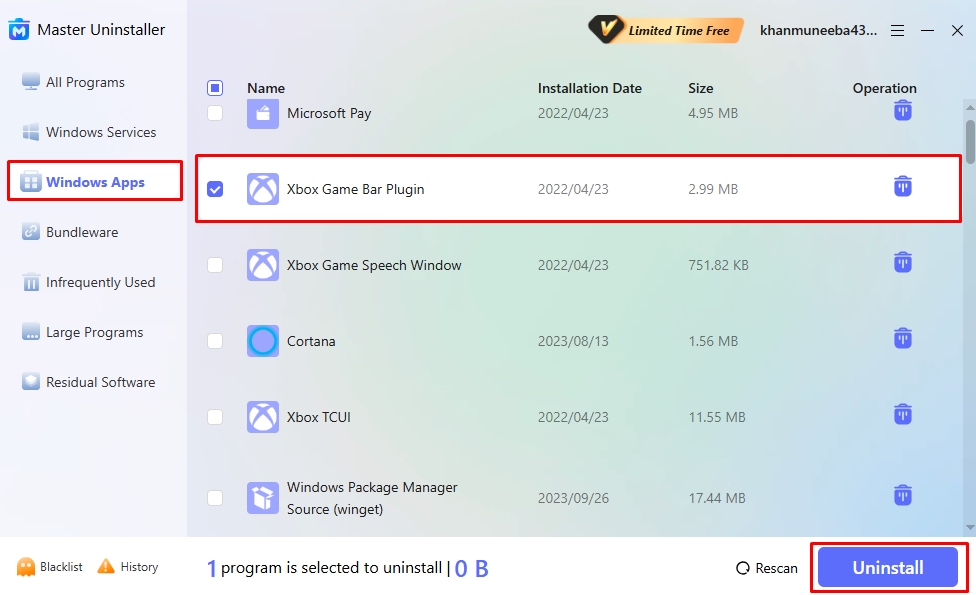
- Click OK to confirm uninstalling the program.
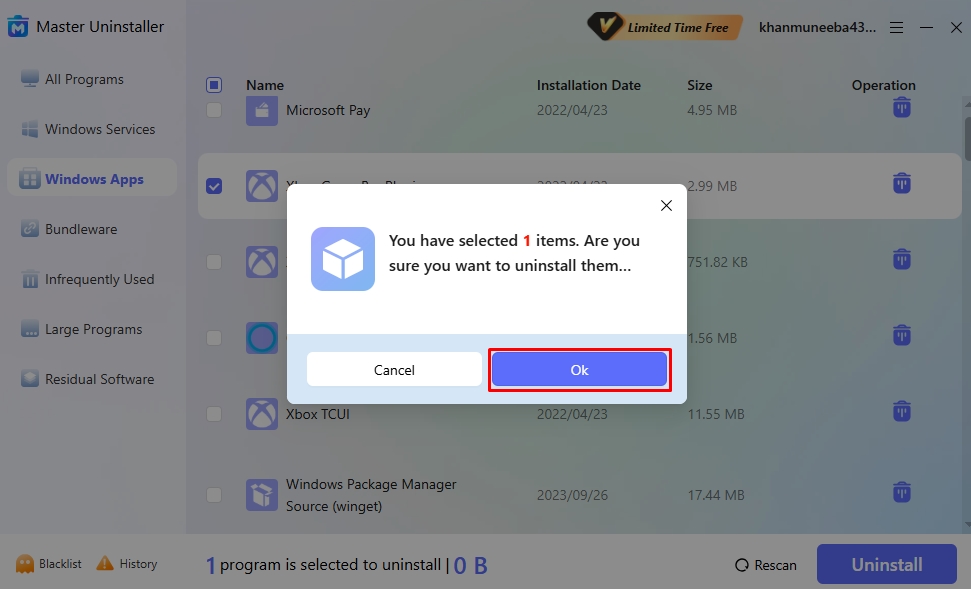
Method 3: Disable Windows Search
Windows Search helps you find programs and utilities in a computer. However, a bug in Windows 10 causes a search loop that pulls items from the search engine. This takes up the disk space and slows down your computer. Hence, the only solution is to limit Windows Search so it only retrieves items from local files. And here is how it goes.
- Visit the Start menu and type Registry Editor in the search box. Once opened, double-click Microsoft and double-click Windows.
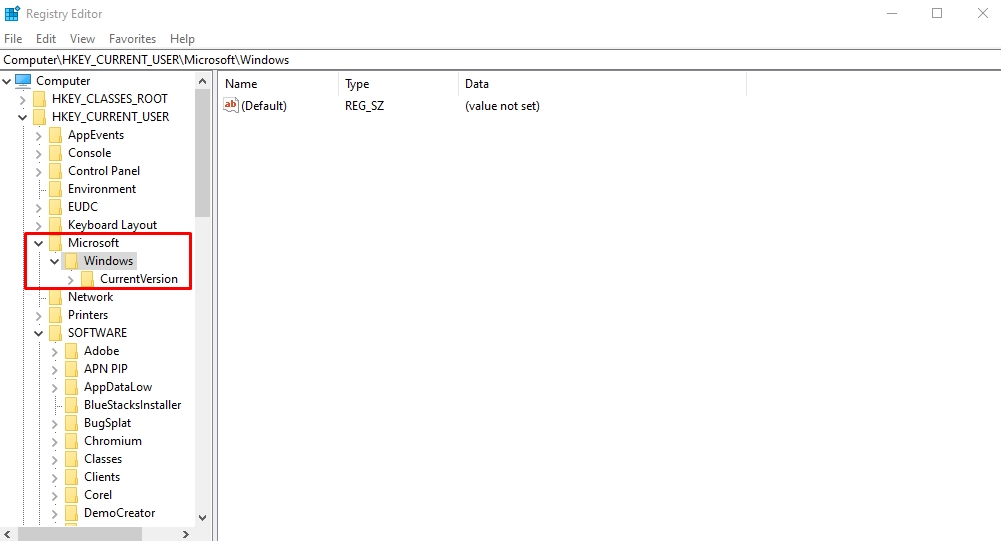
- Right-click CurrentVersion and select New > Key to create a sub-folder.
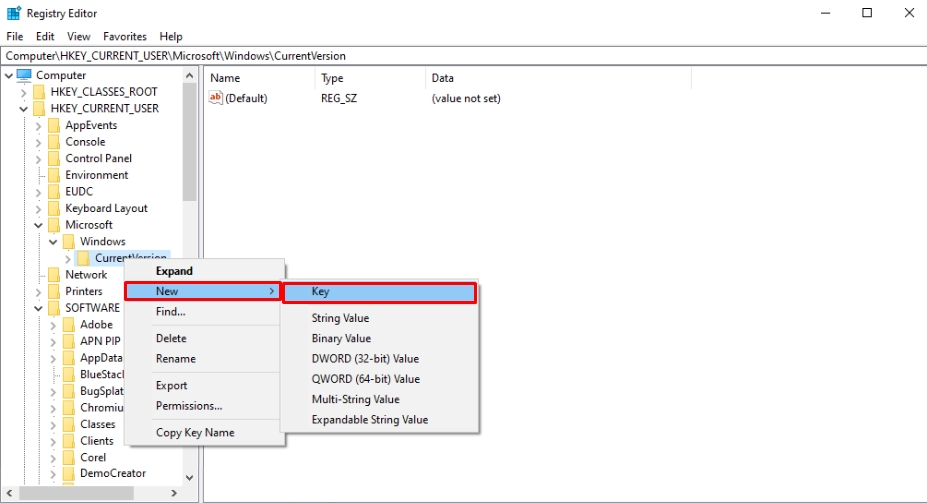
- Allocate the name Explorer to this folder.
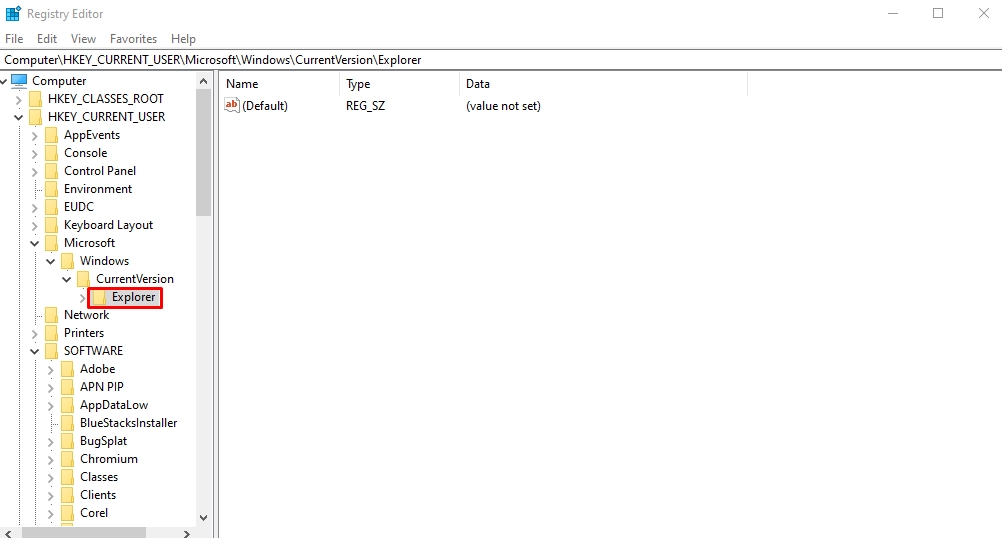
- Right-click Explorer and select New > DWORD (32-bit) Value to create a new registry under this name.
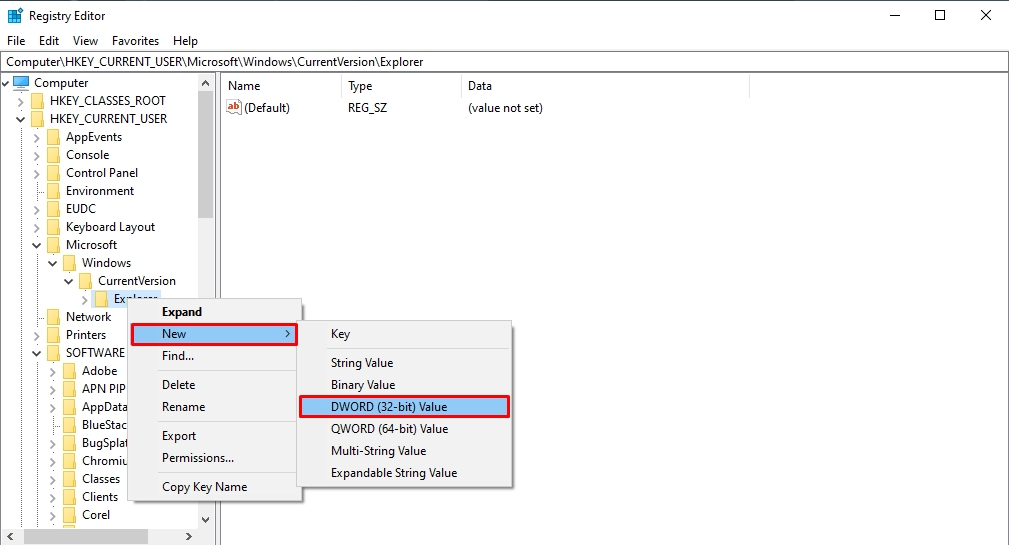
- Now, name this new entry DisableSearchBoxSuggestions.
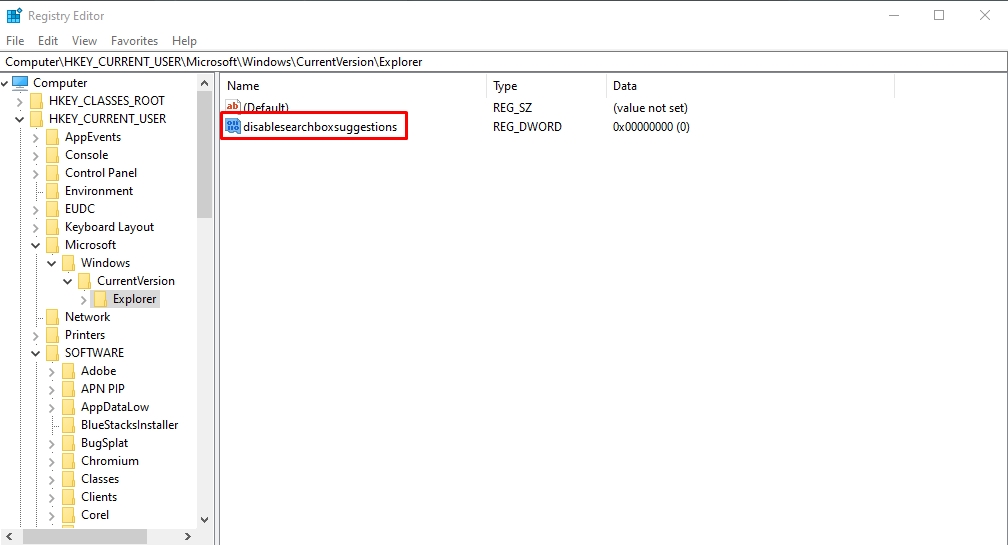
- Right-click this entry and click Modify. Type 1 under the Value Data tab and click OK.
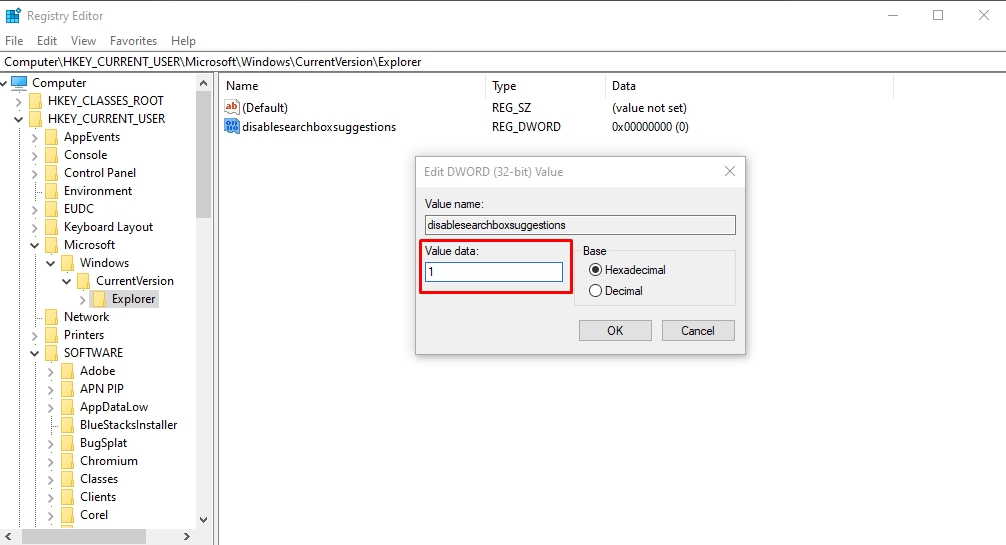
- Finally, restart your computer. Now, the Windows Search will only find items from your local computer, speeding the process and reducing disk usage.
Method 4: Reset Virtual Memory Windows 10
Virtual memory is a Windows storage management technique in which the RAM borrows storage from the hard disk if it has already used its own. This strategy compensates for the overloaded, already smaller RAM by temporarily transferring some of its files to the disk. However, it can also contribute to 100 percent disk usage.
Hence, the best solution is adding more RAM, which might not be possible for everyone. In this case, resetting your virtual memory might help.
- Visit the Start menu and open Advanced System Settings. Under the Advanced tab in the System Properties menu, click Performance > Settings.
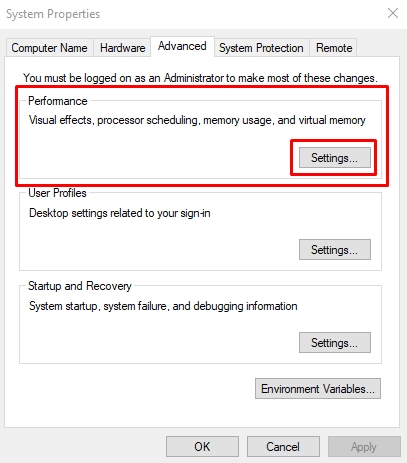
- Select Change from the Virtual Memory section under the Advanced tab.
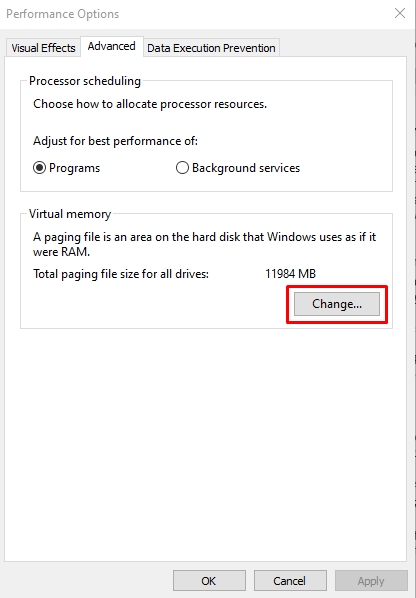
- Now, untick the Automatically Manage Paging File Size for All Drivers option, select Windows (System Managed), and choose Custom Size for the virtual memory. Once done, click Set > OK.
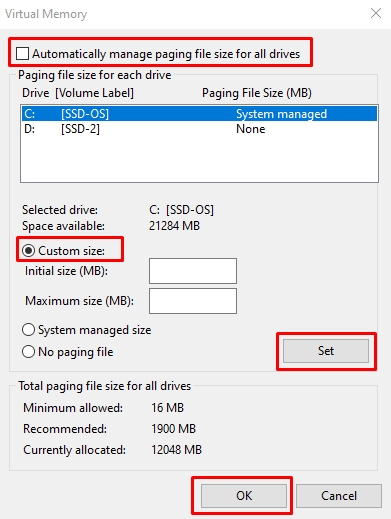
Now, you can delete the temporary folder files.
- Open Run by pressing the Windows + R keys. Type temp in the search box and press Enter.
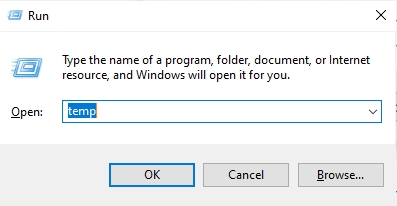
- Select all Temp files and right-click to delete them.
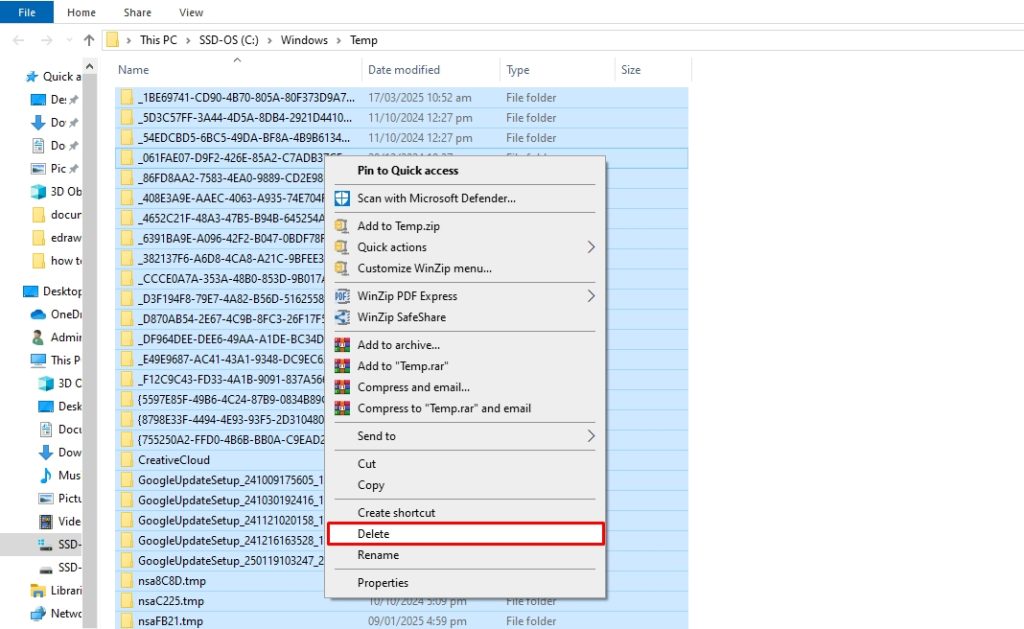
Congratulations, your virtual memory is now reset.
Method 5: Update Device Drivers
Your computer drivers control all the hardware, including your hard drive and disk controller. However, an outdated driver is prone to bugs and security issues, which can contribute to a disk 100 usage Windows 10 issue. So, follow these simple steps to update your device drivers.
- Open the Start menu and type Device Manager in the search box. Once opened, double-click the Disk Drives and choose Update Driver.
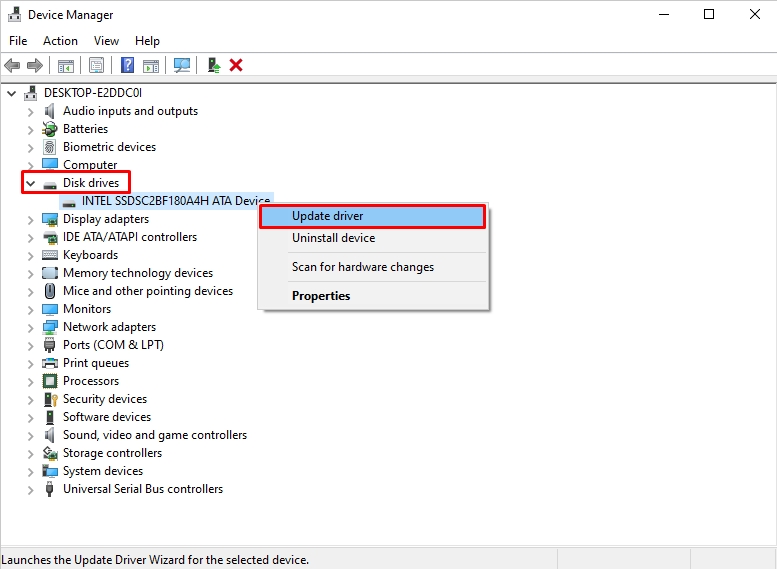
- Click Search Automatically for Drivers from the pop-up menu.
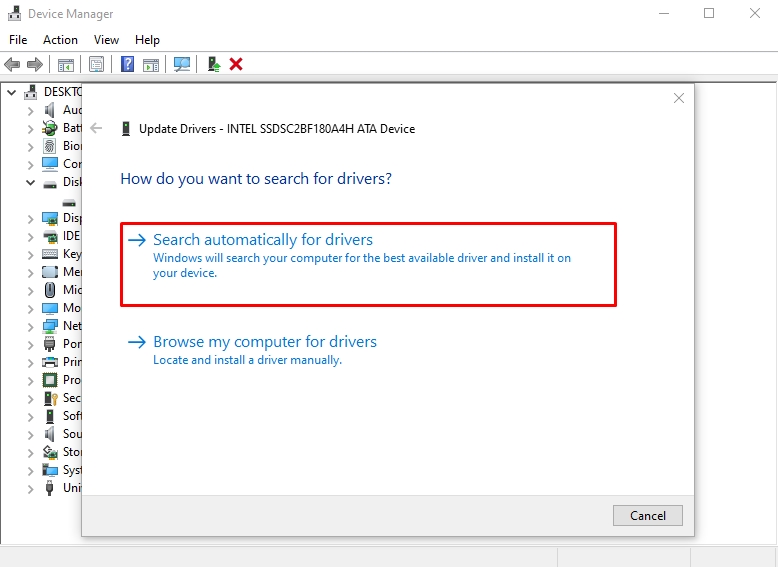
- Windows will now search for the updated driver and install it accordingly.
Method 6: Disable Superfetch
Superfetch improves your computer’s RAM performance by anticipating the program you will use and preloading its data. This reduces load time and boosts speed. However, when you don’t have the latest hardware, this feature can consume significant disk usage and result in disk performance issues.
Hence, the only solution is to disable Superfetch. Here is how it goes.
- Open Run by pressing Windows + R. Next, type services.msc in the search box and click OK.
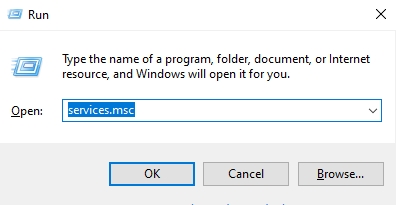
- Visit the Services (Local) menu, double-click SysMain under the Name menu, and choose Disable.

- Click OK, restart your computer, and the Superfetch is gone.
Method 7: Delete Temporary Files
Deleting temporary files is yet another effective way of freeing up system space. Often, these files are infected with bugs, making hundreds and thousands of copies, which adds to your 100% disk usage issues in Windows 10. Here is how you can remove temporary files from the PC.
- Open your computer’s Settings (Windows + I) and select System.
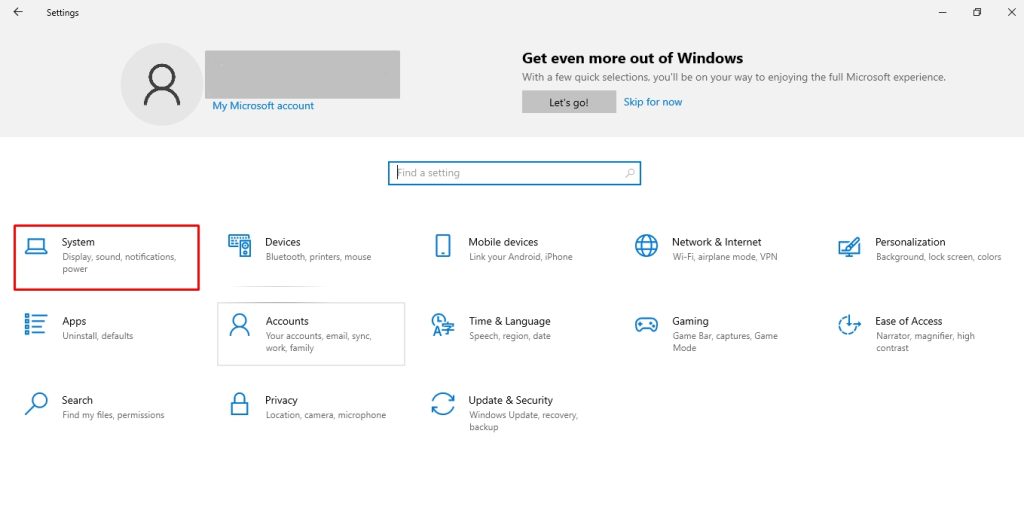
- Under the system Storage tab, choose Temporary Files.
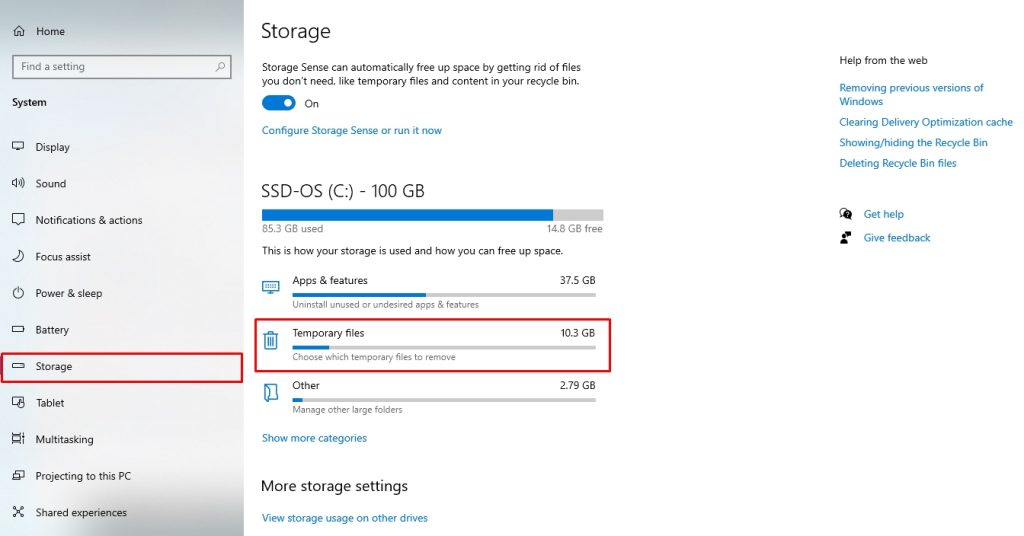
- Select what type of temporary files you want to delete and click Remove Files to confirm deletion.
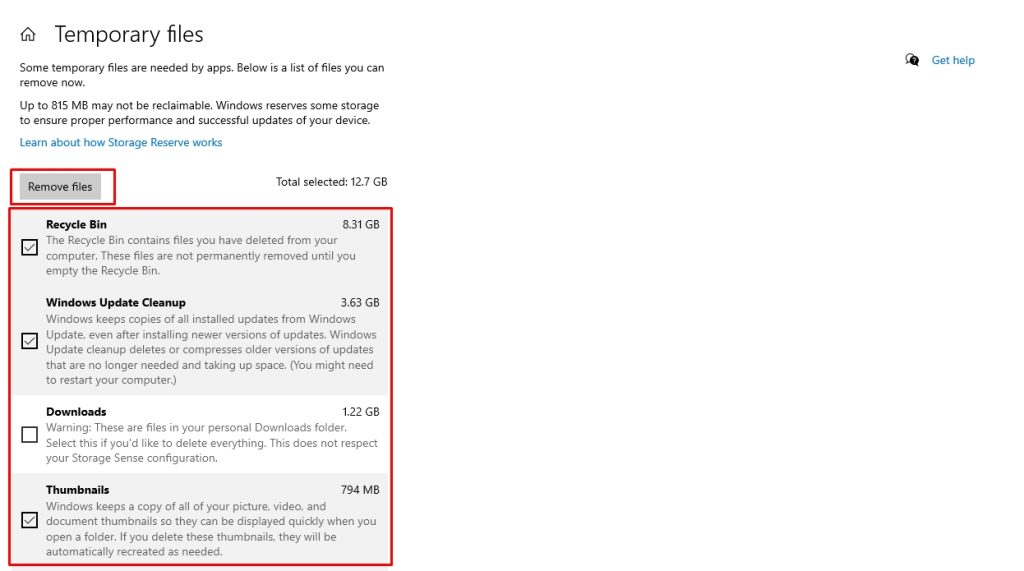
Method 8: Adjust Energy Options
Windows 10 has various energy settings to help you save battery, maintain the CPU’s temperature, and improve system performance. Our PC is set to a Balanced setting by default. However, if you are constantly experiencing a disk 100 usage in Windows 10 and no method has yet been successful, switching to a High-Performance mode might help.
Follow these steps to do it.
- Press Windows + X on your keyboard to open Power Options.
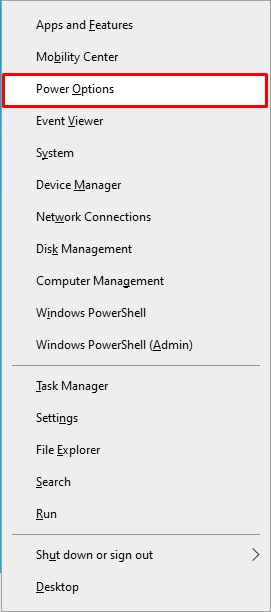
- Now, click Additional Power Settings under the Power & Sleep menu.
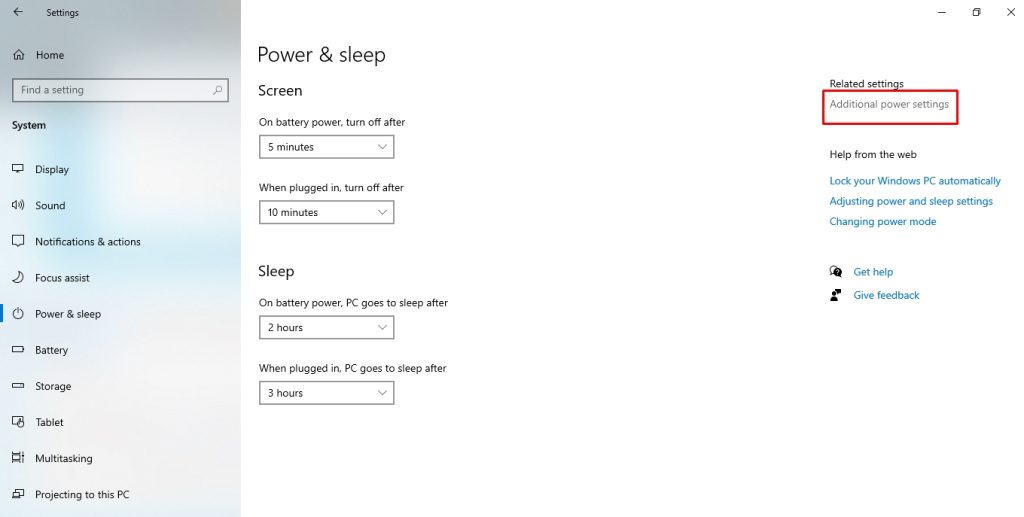
- Select Change Plan Settings from the Power Options window.
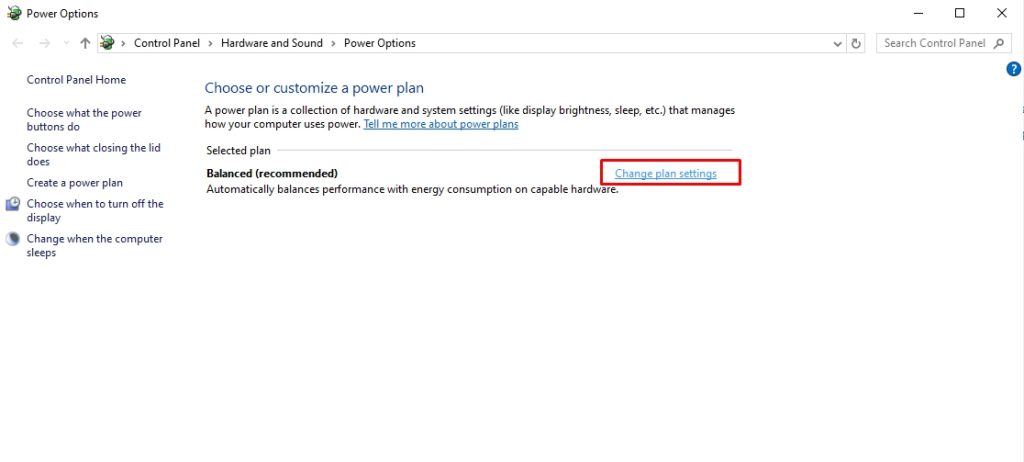
- Choose Change Advanced Power Settings, and switch from Balanced to High Performance. Click OK to confirm.
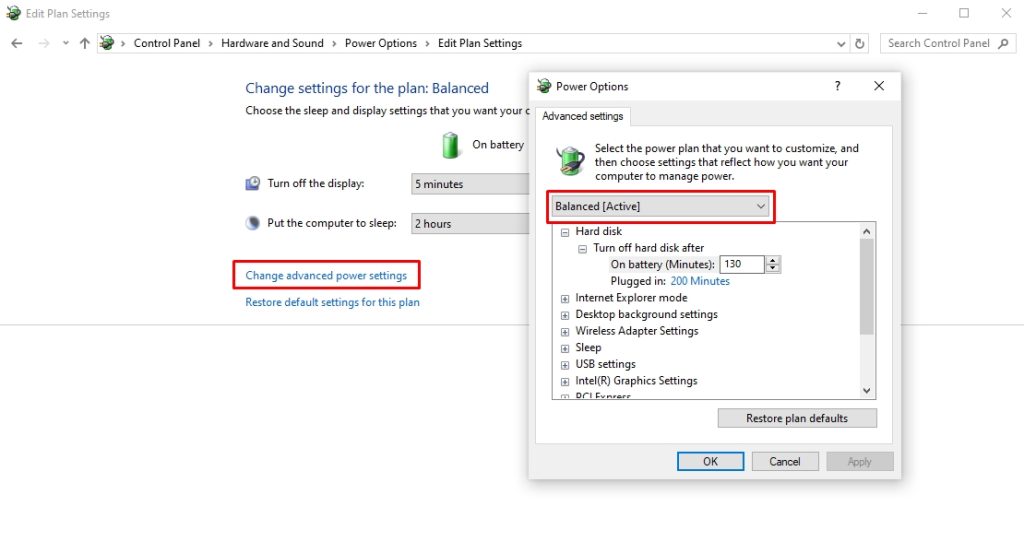
Method 9: Disable Antivirus Software Temporarily
Do you have antivirus or anti-malware programs downloaded to your PC? These programs create temporary files during security scans and updates. Accumulated over time, this can significantly increase disk space usage. Windows Defender can add to this issue by increasing network usage and I/O.
You can temporarily disable your PC’s antivirus to see if it is causing the 100 percent disk usage on Windows 10. Once you do so, see if the performance and storage improve.
Method 10: Run Disk Defragmentation
Defragmentation is an excellent way to keep your disk data organized, making it easy to access and retrieve files. If the system has not undergone defragmentation, and your device data is scattered throughout, it will take the system longer to read and access parts of it. Hence, it may consume more disk resources.
Windows usually handles the defragmentation process automatically once a week. However, you can also do this manually if it is disrupted even once. This method only applies to HDDs (hard disk drives) and not SSDs (solid-state drives).
- Open the File Explorer, right-click your local disk, and click Properties.
- Visit the Tools tab and choose Optimize > Optimize to complete the process, and you are done.
Method 11: Perform a Disk Check
Still no progress? Running a disk check, also known as CHKDSK, might help. It systematically identifies disk logical and physical issues, which may have contributed to the disk 100 usage, and repairs them accordingly. Here’s how you can perform a disk check.
- Open the Command Prompt from the Start menu. Once opened, type chkdsk.exe /f /r and press Enter.
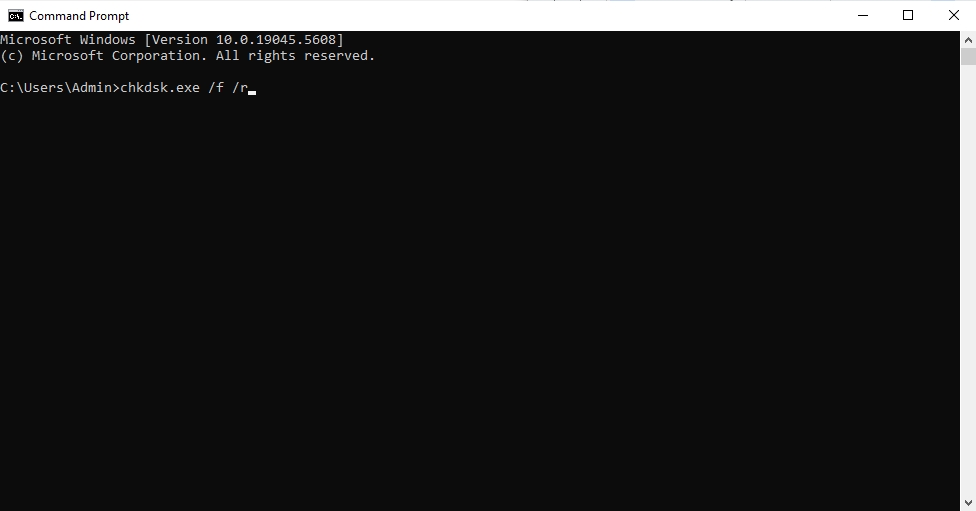
- Now, type Y to confirm the disk check.
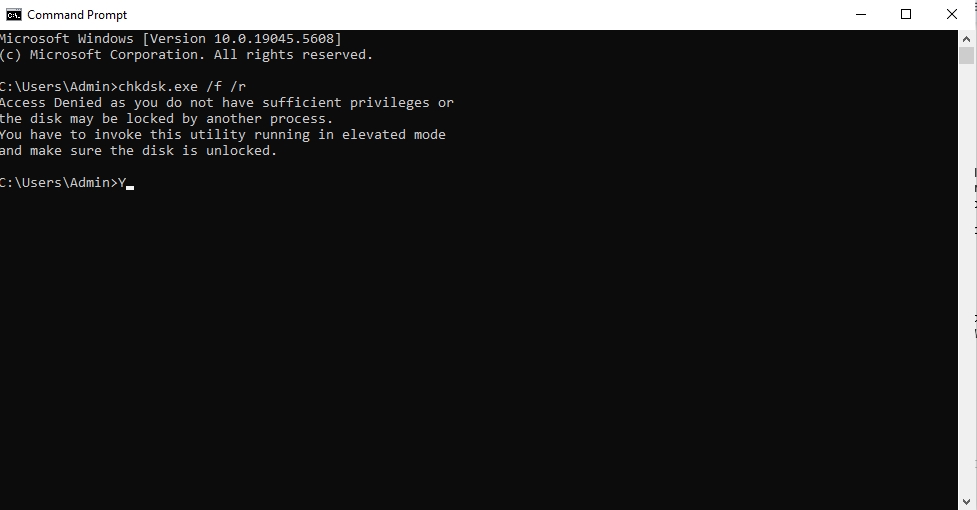
- Restart the computer and make sure all apps are closed. Once the disk check is complete, open the Task Manager to see your disk usage.
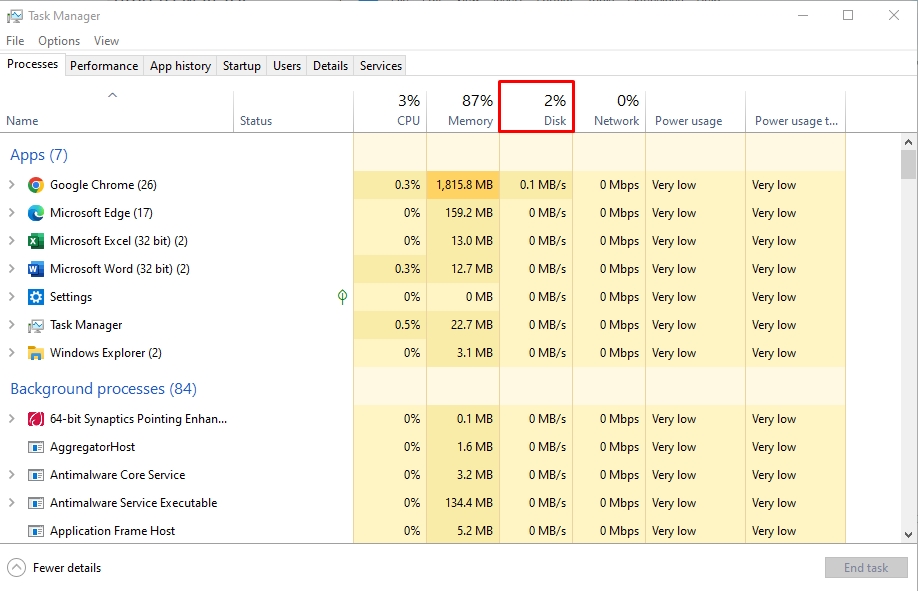
Disk Usage Best Practices
The 100 percent disk usage can slow down your computer and even shut it down abruptly. Here are some best practices you must follow to avoid this issue.
- Never Stop Disk Fragmentation: Fragmentation is crucial for maintaining your system’s speed. If you are working while a fragmentation process is running, Windows will pause it. Hence, it is better to allocate some free time for this process.
- Don’t Disable Windows Update: It is a misconception that disabling Windows updates can improve disk speed. However, this is not true. Updates are crucial for fixing security issues and bugs.
- Delete Unused Programs: Deleting unused apps can free up space. However, using Windows’ built-in uninstallation process does not completely remove the program’s associated residues, traces, and background processes. Credible third-party solutions like Master Uninstaller might help delete all the app’s associated components in a single click.
- Regularly Delete Temporarily Files: Regularly check your PC for cache, temporary files, background processes, and startup apps. It can help you free up space and avoid overloading the drive.
- Upgrade Hardware If Required: If you are still using an outdated HDD drive, consider switching to an SSD. An SSD is more efficient than traditional alternatives and has a low risk of 100% disk usage.
FAQs
Q:
Is 100% Disk Usage Bad?
Yes, 100% disk usage means your hard drive has no space left, negatively impacting your PC’s performance. It can also indicate the presence of malware and virus in your system. Hence, fixing the disk 100 usage is crucial for running your system seamlessly.
Q:
How Do I Clear Temp Files?
learing temp files is simple. Open Run by pressing Windows + R. Type %temp% in the search box, and press Enter, and it will open the Temp Folder. Press Ctrl + A to select all files, right-click, and click Delete > Yes.
Q:
How Do I Fix Disk Usage On Windows 10?
To fix the disk usage on Windows 10, you must know what is causing it. To do this, open Windows Task Manager, visit the Disk tab, and locate the orange highlighted processes. These items usually represent more than usual disk usage. Depending on the reason, you can find the right solution.
Q:
How To Run Disk Cleanup?
To run a disk cleanup, visit the Start menu and type Disk Cleanup. Select the drive you want to clean and click OK. Tick the type of files you want to delete and click OK to complete the cleanup.
Final Thoughts
Disk 100 usage in Windows 10 can significantly have a negative impact on your system’s speed and performance. Hence, it is crucial to avoid it from the start. Following some best practices like deleting temporary files regularly, uninstalling unused apps, and clearing out system registries might help.
However, it can get hectic to do everything again and again. But no worries! Master Uninstaller can help. Simply locate some infrequently used programs on your computer and delete them using this uninstaller. It will then remove their residues, background processes, and system traces for you.
Master Uninstaller
-
Simple and Practical: Easily uninstall unwanted software.
-
Thorough Cleanup: Completely remove residual files.
-
Blacklist Protection: Identify and block malware and adware.
Windows How to Uninstall a Font: What You Should Know
Windows fonts are important since they help enhance the aesthetics of texts displayed on your device. The apps and programs installed on your PC use different fonts to boost the user experience. At times, however, you may want to uninstall a font for different reasons. This guide seeks to elaborate more about “Windows how to uninstall a font.”
We’ll start by outlining different ways how to delete fonts on your computer. Next, we’ll discuss scenarios where you may want to delete a font that’s in use. The article will also discuss fixes you can apply when Windows refuses to delete a font. Keep reading to learn more.
How to Uninstall a Font in Windows in Different Ways
The Windows operating system allows you to remove a font whenever you don’t need it. There exist different ways to uninstall a font on your PC. This section will cover the following four options:
- Using a Third-Party Uninstaller.
- Using Windows Settings.
- Using the Control Panel.
- Doing It Manually.
We’ll show you how to use each method shortly.
Method 1. Uninstall Font Using Third-Party Uninstaller
A third-party uninstaller is arguably one of the best approaches for removing any font on your computer. One of the most recommended uninstallers to try out today is Master Uninstaller. This font uninstaller software lets you view all the available fonts on your device and remove those you no longer need. It conducts a deep scan on your device to ensure even the most hidden fonts are detected.
The software lets you delete the selected font in just a few steps. This helps to optimize the performance of your device by ensuring that you only remain with those fonts that are needed. You can do this by going to the “Infrequently Used” tab to find those rarely used fonts on your system. What more? Master Uninstaller allows you to turn off any Windows service that isn’t actively in use.
Key Features of Master Uninstaller
- Uninstall multiple fonts on your PC at once.
- Conduct a deep scan to detect all the fonts installed.
- Access and delete or disable infrequently used fonts.
- Remove all files, including leftovers.
- Faster uninstall speeds.
- It gives a history of all the uninstalled apps/programs.
Do you want to efficiently uninstall or manage different fonts on your PC? For the best results, download Master Uninstaller. The steps for using this tool are very straightforward.
Steps for Using Master Uninstaller
Step 1. Visit the Master Uninstaller website and download a free version of the software to your device.
Step 2. Next, install and launch the uninstaller. Click “All Programs” to find the font you want to uninstall.
Step 3. Tick the checkbox next to the font and select the “Uninstall’ button. When a popup message displays, check the button for “Automatically remove software remnants” and click “Ok” to initiate the uninstallation process. This will completely remove the selected font from your PC.
Method 2. Uninstall Font via Windows Settings
Windows has a built-in Settings app that allows you to manage all the programs and features on your device. You can use it to find and remove fonts that are no longer needed on your computer. You can accomplish that using the following steps:
Step 1. Launch your Windows Settings app.
Step 2. Next, click on “Personalization,” then select “Fonts.”
Step 3. Browse through the list of fonts and click on the one you want to uninstall.
Step 4. When the next window displays, select the “Uninstall” button to remove the selected font from your computer.
Method 3. Uninstall Font via Control Panel
Another option to remove a font if you don’t want to use a third-party uninstaller is via the Control Panel. This Windows built-in utility allows you to access and manage all the programs and features installed on your device. Want to learn more about “Windows how to uninstall a font” using Control Panel? Check these steps:
Step 1. Open the Control Panel, then go to “Appearance and Personalization.”
Step 2. Next, click the “Fonts” option to access a list of all the fonts installed on your PC.
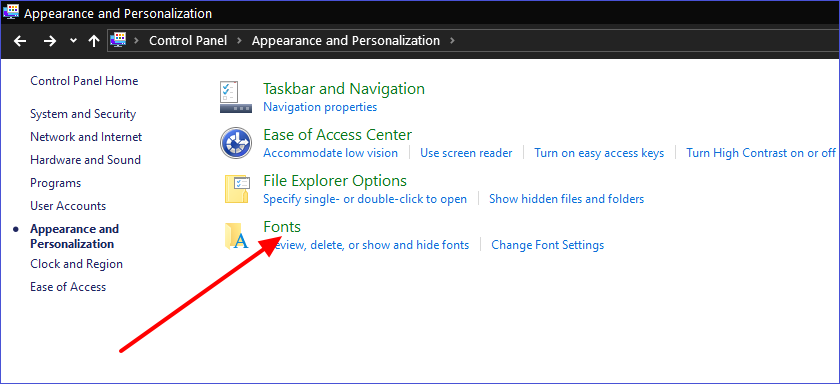
Step 3. To uninstall a font, click on it and select the “Delete” option. The system will then remove the selected font from your computer using the Control Panel.
Method 4. Uninstall Font Manually
Sometimes, the font you want to delete may not appear in the Control Panel font window. The only option is to manually find and delete the font file from your system. Check these steps:
Step 1. Go to File Explorer and open your C drive. Next, navigate to “Windows” and then “Fonts.”
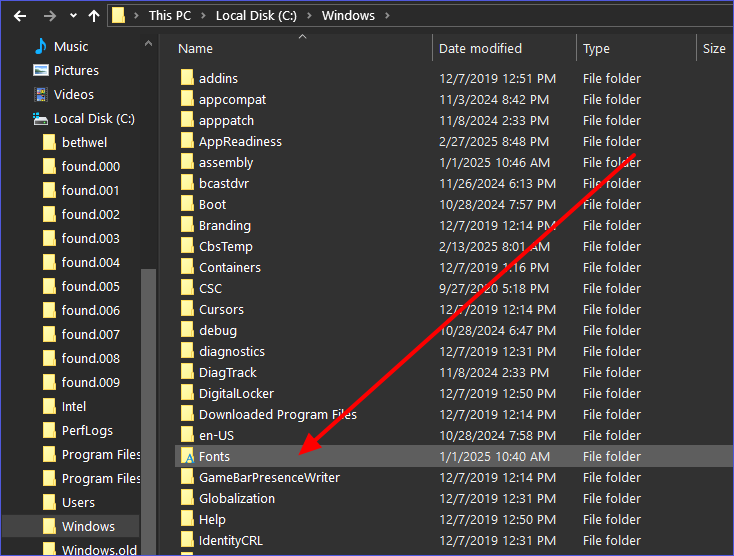
Step 2. The system will then display all the fonts installed on your device.
Step 3. To delete a font, right-click on it and select the “Delete” option. This will remove the selected font from your device. You can repeat the same process for the other fonts.
How to Delete Fonts That Are Open in the System
Sometimes, you may encounter challenges deleting a font, especially when the system is actively using it. How do you navigate to ensure you uninstall the font without disruptions? Below are some methods you can apply to fix the issue and delete open fonts in the system.
Method 1. End the Process Using the Font
Applications running in the background, such as Photoshop or Microsoft Word, may prevent you from successfully deleting an active font. You’ll need to close these applications first before resuming the process. Another option would be going to the Task Manager and ending any background-running processes that could be using the font. You can thereafter try deleting the font again.
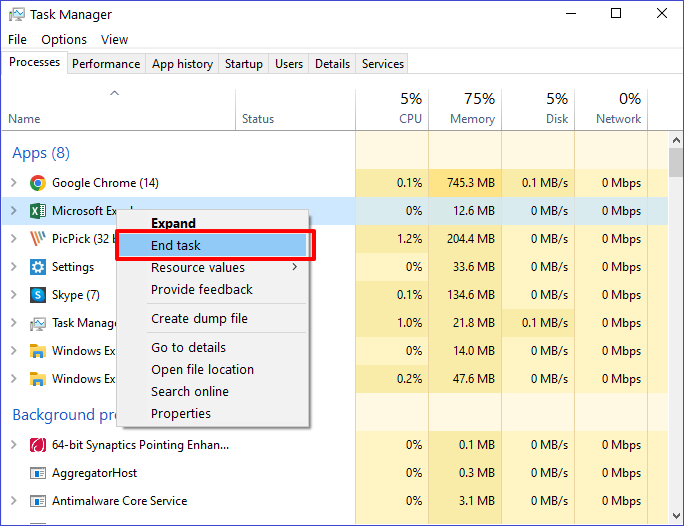
Method 2. Restart PC in Safe Mode
Entering Safe Mode makes your device limit the processes running in the background, allowing you to conveniently uninstall any font. You can restart in this mode using the following steps:
Step 1. Hit Win + R to open the Run dialog box. Next, type “msconfig” and click “OK.”
Step 2. When the system configuration window opens, navigate to the “Boot” tab and check the button next to “Safe boot.” Click “OK,” then restart your PC.
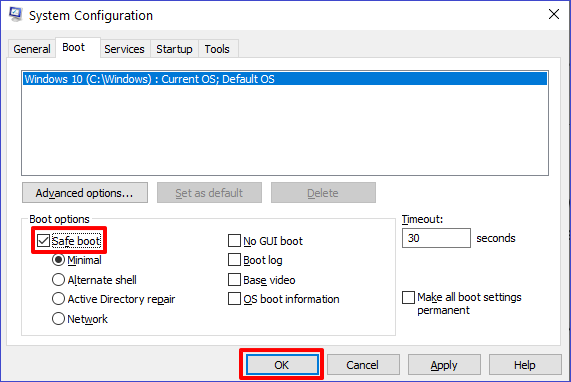
Step 3. Your device will then restart in Safe Mode. You can now remove any unwanted font by going to C:\Windows\Fonts.
Step 4. Once you’re done with the above step, return to the system configuration settings and uncheck the “Safe boot” option. Restart your device to return it to its normal state.
Method 3. Use Command Prompt
Command Prompt is a powerful tool that can allow you to delete fonts even if they are in use. This is made possible by inputting specific commands in the CMD window. Check these steps:
Step 1. Type “CMD” in the search bar and select the “Run as administrator” option under “Command Prompt.”
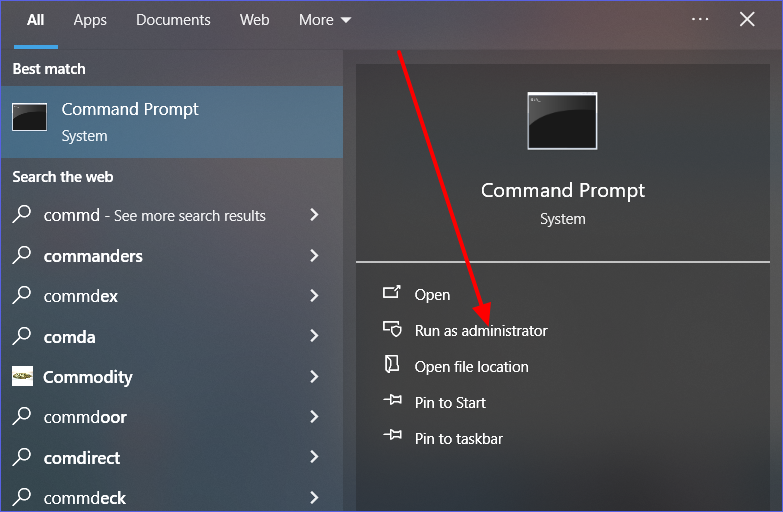
Step 2. When the CMD window opens, type the following command and hit Enter to access the Fonts Directory:
cd C:\Windows\Fonts
Step 3. Once the list of all installed fonts is displayed, you can delete a font using the following command (ensure you replace “fontname.ttf” with the exact name of the font you want to delete):
del fontname.ttf
Step 4. Hit Enter to run and execute the command. That’s how to delete a ttf file using Command Prompt.
Bonus Tip: Windows Can’t Delete Font? How to Fix It
Have you tried the steps mentioned previously, but Windows still can’t delete your font? This could happen for different reasons, including restrictions from your system. You can fix the issue in the following three ways.
Fix 1. Use a Font Management Tool
There exist some third-party applications that can allow you to manage fonts on your computer. They let you enable or disable any fonts restricted by your system. Tools such as NexusFont or FontBase are efficient in collectively managing all the fonts installed on your system. You can try these tools whenever you face issues with deleting any font.
Fix 2. Take Ownership of the Font
Yes! A simple thing as taking ownership allows you to access all the restricted fonts. You can do that in the following steps:
Step 1. Go to your C drive and open the “Windows” folder.
Step 2. Locate the “Fonts” subfolder and right-click on it. Next, select “Properties” and then go to “Security”>”Advanced.”
Step 3. You can then change ownership by selecting your user account. You’ll now have access to the restricted fonts and can delete those you don’t want.
Fix 3. Use CMD
Command Prompt can allow you to delete any font where all the other methods have failed. To get started, you’ll need to launch CMD as an admin, then type the following command and hit Enter (ensure you replace “fontname.ttf” with the correct name of the font you want to uninstall): del /F /Q C:\Windows\Fonts\fontname.ttf.
You can then restart your computer after this command’s execution finishes.
FAQs About Windows How to Uninstall a Font
Q:
Are There Fonts That I Should Never Delete?
YES. Some fonts are significant to your system, and deleting them could interfere with many things. Fonts such as Arial, Tahoma, and Segoe UI should not be deleted unless otherwise. This is because they are essential to most of the installed applications.
Q:
Can I Delete Several Fonts Simultaneously?
You can do that by accessing the “Fonts” folders under C:\Windows and selecting multiple fonts immediately before deleting them. You can also do this seamlessly using a third-party uninstaller like Master Uninstaller.
Q:
Can I Uninstall Font Using a Third-Party Uninstaller?
Absolutely. Third-party uninstallers also allow you to delete any fonts that you no longer need. Once you’ve installed the uninstaller on your PC, you can access a list of all the installed fonts and select the ones you want to remove. One of the most recommended uninstallers to try in this scenario is Master Uninstaller.
Q:
How to Restore Default Windows Fonts?
Follow these steps:
Step 1. Open the Control Panel.
Step 2. Go to “Fonts” and select “Font Settings.”
Step 3. Next, click “Restore default font settings.”
Step 1. Open the Control Panel.
Step 2. Go to “Fonts” and select “Font Settings.”
Step 3. Next, click “Restore default font settings.”
Final Remarks
This guide has covered everything you need to know about “Windows how to uninstall a font.” You can uninstall a font using a third-party uninstaller, Windows Settings, Control Panel, or doing it manually. You’ve also learned how to uninstall fonts that your system is actively using. The best way to uninstall any Windows font is via third-party uninstallers.
Try Master Uninstaller today to delete those stubborn fonts on your PC. This software detects even the most hidden fonts on your device. It also supports deleting those fonts that are system-restricted. Master Uninstaller helps optimize your system by removing all residual files. Ensure you download this tool today to manage all your Windows fonts.
Master Uninstaller
-
Simple and Practical: Easily uninstall unwanted software.
-
Thorough Cleanup: Completely remove residual files.
-
Blacklist Protection: Identify and block malware and adware.
How to Uninstall a Driver in Windows 10 in Simple Steps
You may want to uninstall a driver in Windows 10 if it’s causing hardware components to malfunction or has resulted in compatibility issues. You may also want to remove a driver because there’s a new version that you want to install. No matter the situation, learning how to uninstall a driver on your PC is important.
This tutorial discusses five ways and the simple steps you can apply to conveniently remove any driver from your system. Removing a driver using the correct steps ensures your system functions normally. Want to learn how to uninstall device drivers using an efficient third-party uninstaller? Read on to learn more about it.
How to Uninstall a Device Driver in Windows 10
Removing a device driver on your PC is not a difficult thing. However, you need to apply the appropriate techniques to ensure you don’t interfere with other drivers essential to your system. This section will discuss five ways to uninstall device drivers on Windows 10, including the use of:
- Third-Party Uninstaller.
- Device Manager.
- Control Panel.
- Command Prompt.
- Windows PowerShell.
Keep reading to learn how to uninstall a driver using these methods.
Method 1. Using a Third-Party Uninstaller
This is one of the best approaches for removing any device driver from your system. It’s specifically applicable for those stubborn drivers that are difficult to remove via conventional methods. A reliable tool like Master Uninstaller allows you to access a list of all the installed drivers in your system and uninstall those you no longer need.
The uninstallation process is straightforward since it only takes a few steps. You must select a specific driver and hit the “Uninstall” button to initiate the process. The good thing about using a third-party driver uninstaller is that you can delete multiple drivers simultaneously. This greatly saves time and effort.
You can also detect and find hidden malware causing a specific driver to malfunction in your system. What more? The Master Uninstaller lets you delete leftover files and registry entries related to the driver software you uninstalled.
Key Features of Master Uninstaller
- Uninstall multiple device drivers simultaneously.
- Detecting and deleting deeply hidden drivers.
- Supports the removal of Windows built-in drivers.
- Fast and secure uninstallation speeds.
- Remove leftover files and registry entries related to the uninstalled driver.
- Rescan your device several times to locate all stubborn drivers.
Are you having trouble with stubborn device drivers on your Windows PC? Download Master Uninstaller today to conveniently delete unwanted drivers.
Steps for Using Master Uninstaller
Step 1. Visit the Master Uninstaller website and download a free version of the software to your device.
Step 2. Next, install and launch the uninstaller. Click “All Programs” to find the device driver (s) you want to uninstall.
Step 3. Tick the checkbox next to the driver and select the “Uninstall’ button. When a popup message displays, check the button for “Automatically remove software remnants” and click “Ok” to initiate the uninstallation process. This will completely remove the selected driver (s) from your device.
Method 2. Using Device Manager
The second method that helps answer the “how do I uninstall drivers in Windows 10” issue entails using the Device Manager. This built-in Windows utility allows you to manage all the connected hardware and their respective drivers. You can quickly uninstall any driver via this method as follows:
Step 1. Right-click on the Start menu and select “Device Manager” to open it.
Step 2. When the Device Manager window opens, find the hardware whose drivers you want to uninstall. Double-click on a specific category to expand it, then right-click on the specific device. Next, select the “Uninstall device” option.
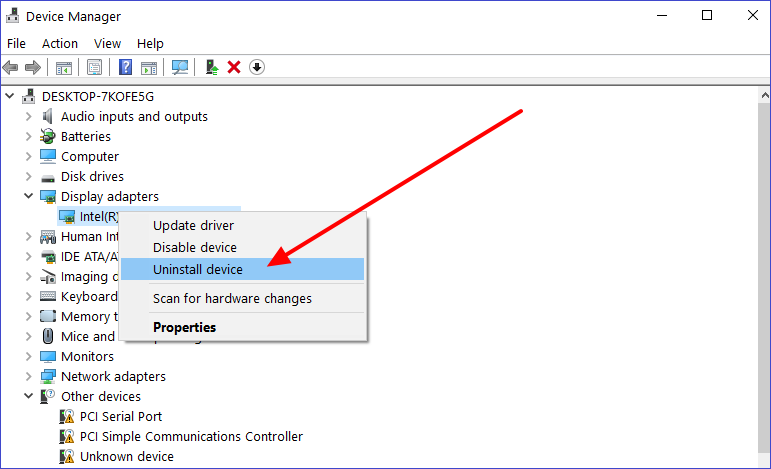
Step 3. Select “Delete the driver software for this device when the next window appears.” Then, click the “Uninstall” button to instruct the system to remove the selected device driver.
Step 4. Restart your PC to apply the changes made.
Method 3. Using Control Panel
You can apply this method if the driver you plan to uninstall comes with a dedicated software package such as Realtek Audio Driver or NVIDIA Graphics driver. You can then find the respective package under your Control Panel’s “Programs & Features” section and delete it from there. You can learn how to delete driver software packages using these steps:
Step 1. Type “Control Panel” in the search bar and hit Enter to open it.
Step 2. Click on “Programs & features” under the Control Panel window.
Step 3. Next, find the driver software, i.e., “Intel Graphics Driver”, and click on it. You can then click the “Uninstall” button at the top to remove the selected driver software from your system.
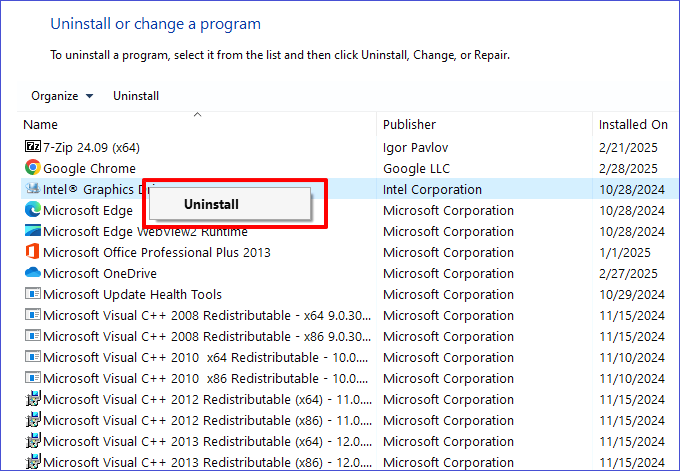
Step 4. Restart your device to finish the uninstallation process.
Method 4. Using Command Prompt
This method can enable you to forcefully remove drivers that keep reinstalling. Through specific CMD commands, you can instruct the system to completely get rid of some select drivers. You must be familiar with using Command Prompt to apply this method efficiently. Follow these steps:
Step 1. Type “cmd” on the search bar and select “Run as an administrator” under the search results that display.
Step 2. Next, type the following command in the CMD window and hit Enter to check all the drivers installed in your system:
pnputil /enum-drivers
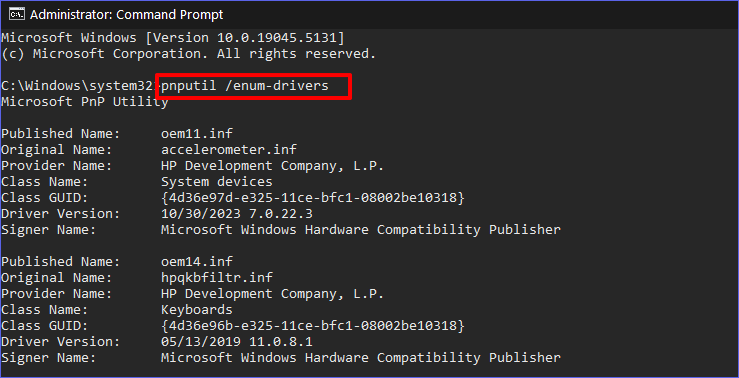
Step 3. You can then type the following command and replace [PublishedName] with the exact name of the driver you want to uninstall, then hit Enter:
pnputil /delete-driver [PublishedName].inf /uninstall /force
Step 4. Wait for the Command Prompt to uninstall the selected driver. Then, you can restart your device.
Method 5. Using Windows PowerShell
You can use PowerShell as an advanced option for uninstalling drivers in instances where CMD has failed. This method allows you to input special scripts that will allow you to remove any stubborn drivers. You can learn how to uninstall a specific driver via Windows PowerShell as follows:
Step 1. Right-click the Start menu and select “Windows PowerShell (Admin)” to open it.
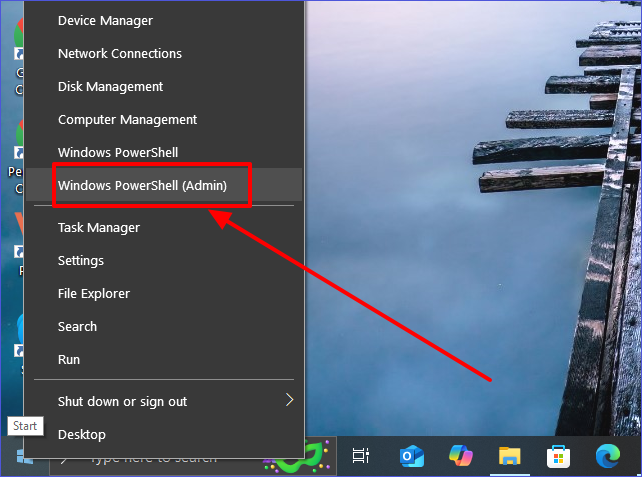
Step 2. You can then type the following command in the PowerShell window and hit Enter to access all the installed drivers:
Get-WmiObject Win32_PnPSignedDriver | Select-Object DeviceName,DriverVersion
Step 3. The next step is to select the driver that you want to uninstall. You can do that by typing the following command and replacing [driver_name] with the exact name of the driver you want to uninstall:
pnputil /delete-driver [driver_name].inf /uninstall /force
Step 4. You can then hit Enter to run the above command. Restart your PC once the process is completed.
Bonus Tip: Use Safe Mode to Remove Stubborn Drivers
It’s possible to encounter stubborn drivers that are difficult to remove using the methods mentioned above. This could be the case if some background processes use the selected drivers. Since you may not know the exact process, entering Safe Mode is recommended so that you won’t have any background-running processes.
This will make it easier for you to uninstall any stubborn driver. You can enter Safe Mode as follows:
Step 1. Hit Win + R to access the Run dialog box. Type “msconfig” and press Enter to access your System Configuration settings.
Step 2. Next, click the “Boot” tab and check the box next to “Safe Boot” to enable this feature.
Step 3. You can then restart your device to enter Safe Mode and uninstall the stubborn driver using any of the methods mentioned previously. Remember to exit Safe Mode once you’ve finished the process.
FAQs About How to Uninstall a Driver
Q:
What Happens If I Uninstall a Critical Driver?
Uninstalling an essential driver like the Network or Display driver may significantly affect how the related hardware works. It’s important not to uninstall such drivers. However, you shouldn’t be worried since once you restart your computer, the system will reinstall them automatically.
Q:
How Do I Reinstall a Driver After Uninstalling It?
You can apply the following options:
Try updating Windows to find the latest drivers.
Restart your PC, and the system will reinstall some drivers automatically.
Visit the manufacturer’s website for your computer brand and download the latest driver.
Try updating Windows to find the latest drivers.
Restart your PC, and the system will reinstall some drivers automatically.
Visit the manufacturer’s website for your computer brand and download the latest driver.
Q:
What Happens After I Uninstall a Driver?
If the driver was causing errors in your system, uninstalling it may stop the issue. However, if some specific hardware was dependent on the uninstalled driver, it may malfunction thereafter. Something else that could happen is that Windows may automatically reinstall the removed driver if it is essential to your system.
Q:
Can I Uninstall a Driver Without Using Device Manager?
The answer is YES. Other alternatives exist, such as third-party uninstallers, the Control Panel, or Command Prompt. One third-party uninstaller that we recommended trying out is the Master Uninstaller.
In Conclusion
Learning how to uninstall a driver on your PC is an essential skill. This tutorial describes five simple steps, including using a third-party uninstaller, Device Manager, Control Panel, Command Prompt, and Windows PowerShell. The best method should allow you to uninstall a driver without restriction.
Using a third-party uninstaller like Master Uninstaller is the best approach to eliminate any stubborn driver in your system. This software allows you to efficiently detect and delete those drivers affected by malware. It supports deleting multiple drivers at once, hence saving time and effort. Ensure you download the Master Uninstaller today to efficiently manage all the drivers in your system.
Master Uninstaller
-
Simple and Practical: Easily uninstall unwanted software.
-
Thorough Cleanup: Completely remove residual files.
-
Blacklist Protection: Identify and block malware and adware.