


-

Simple and Practical: Easily uninstall unwanted software.
-
Thorough Cleanup: Completely remove residual files.
-
Blacklist Protection: Identify and block malware and adware.
How to Uninstall Extensions on Chrome | 3 Quick Methods
Have you ever installed an extension only to realize it’s not helpful or harmful to your PC? Knowing how to uninstall extensions on Chrome can help you keep your browser clean and secure.
Chrome extensions enhance your browsing experience, but some can be unnecessary, outdated, or harmful. Idle extensions quickly become worthless and take up space on our computer, slowing it down. Not only this, but some of them can risk security concerns, too, since they track your online activity and compromise your privacy.
Therefore, the best practice is to review them constantly and delete them. But the question is, how to get rid of a Chrome extension? No worries; We’re here to take you through the three easiest and safest methods to uninstall extensions on Chrome. So, dive right in.
What are Chrome Extensions, and why should you manage it?
Let’s define an extension before understanding why managing Chrome extensions is essential. Chrome extensions are browser add-ons that enhance your online experience by correcting grammar, blocking ads, and offering additional functionality. However, some extensions consume excessive system resources, slowing your browser despite their benefits.
Many extensions collected user data, potentially tracking sensitive information like fingerprints, banking details, and browsing history. This can compromise your privacy and affect your browsing experience. That’s why it’s essential to regularly uninstall extensions on Chrome when they are no longer needed.
That said, not all extensions are harmful. Here are some warning signs that indicate an extension should be removed:
- Unauthorized changes: If an extension doesn’t require permission but still modifies browser settings.
- Unusual browser behavior: If your browser lags, crashes, or freezes after installing an extension.
- Fake updates & security risks: Some risky plugins push fake updates introducing bugs or malware.
How to Uninstall Extensions on Chrome | 3 Quick Methods
Check out these three tried-and-tested methods to uninstall extensions on Chrome.
Method 1: Uninstall Visible Chrome Extensions Using the Extension Manager
The easiest way to delete an extension on Chrome is via the Chrome extension manager. Follow these simple steps to use this process. However, this method only removes the visible extensions on your browser. For hidden extensions, you may additionally remove them from the computer registry.
Step 1: Open Chrome Extension Manager
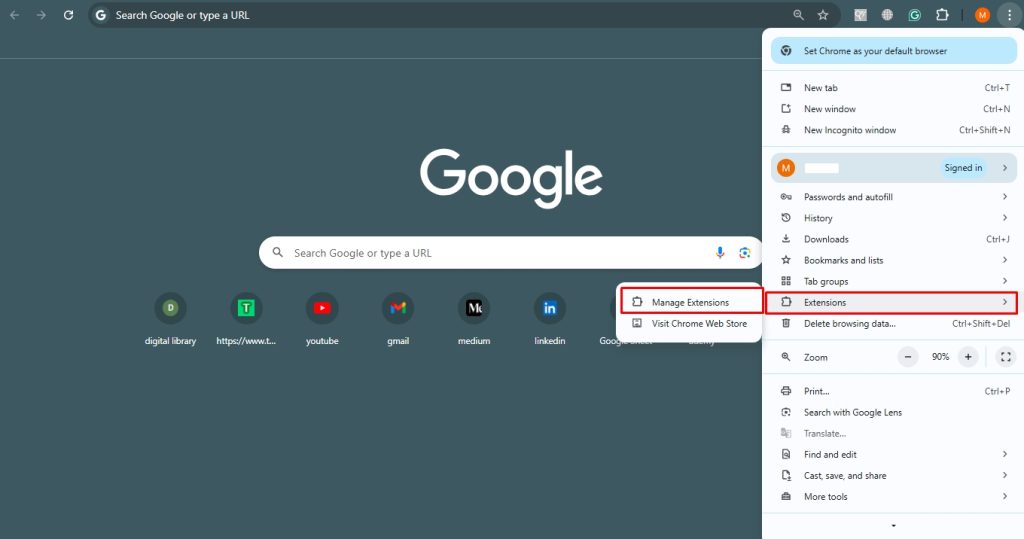
- Open your Chrome browser and go to the three-dot icon on the right corner of your screen. Now, select Extensions > Manage Extensions to open the Extension Manager page.
Step 2: Delete the Extension
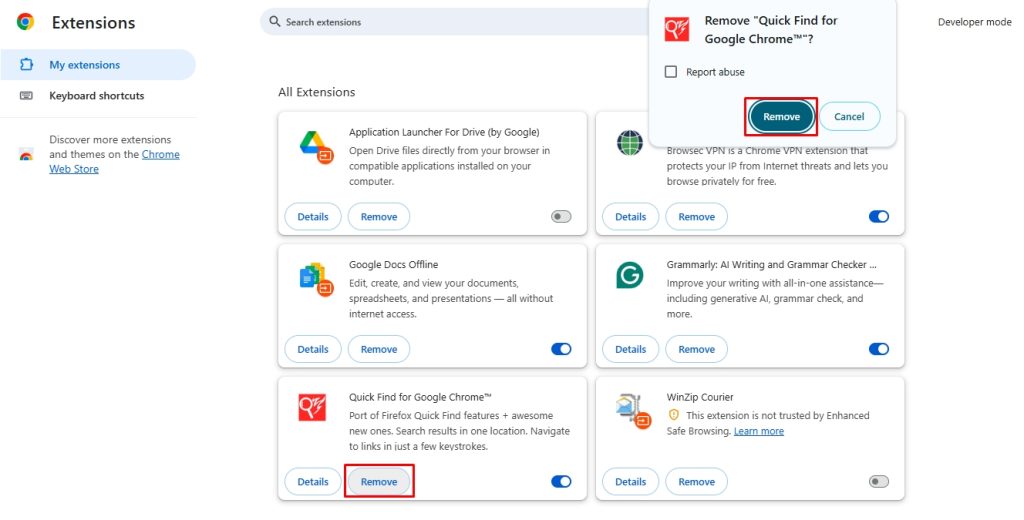
- Go to the extension you want to delete and click Remove. Confirm by selecting Remove again in the pop-up.
Pro Tip: You can also temporarily disable an extension if it is not currently in use and makes your computer slow.
Method 2: Uninstall Chrome Extensions from the Computer Manually
Some Chrome extensions don’t offer a delete or disable button in the extension manager, making them difficult to remove. These extensions can be particularly harmful as they may track your online activity, compromise security, and operate even in incognito mode. Since the standard extension manager cannot remove them, you must manually delete them from your computer’s registry.
Follow these steps to ensure a complete removal.
Step 1: Find the ID of the Extensions
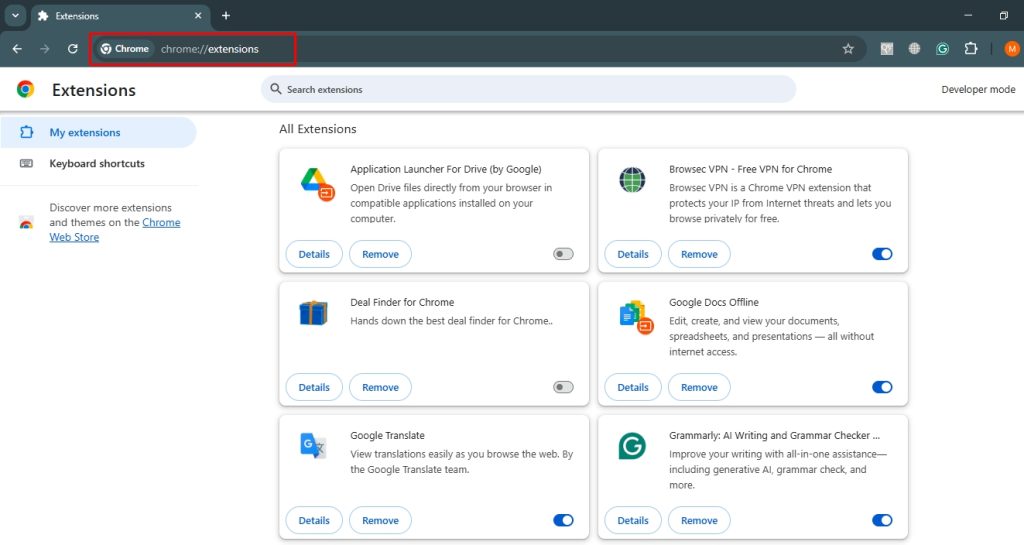
- Using this method, you’ll need the extension ID or string number to uninstall the Chrome extensions. Open Chrome, type chrome://extensions in the search bar, and note down the unwanted extensions.
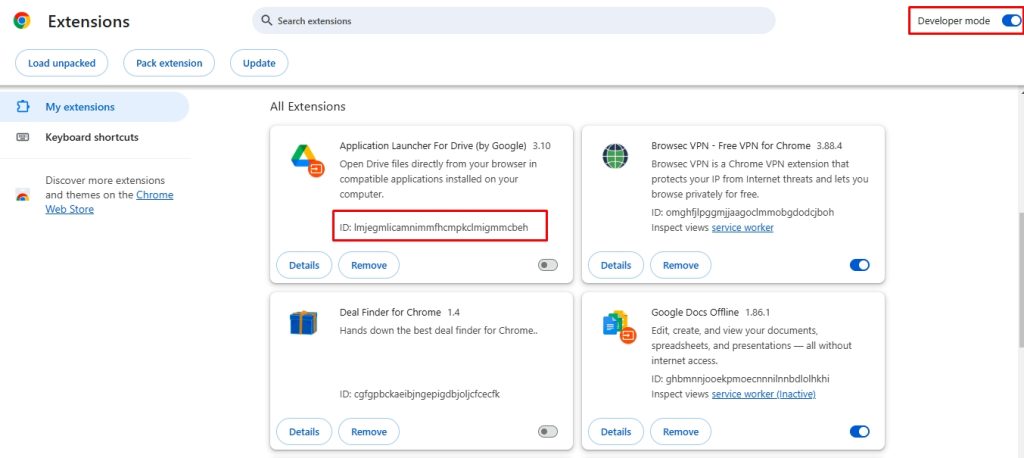
- Enable Developer Mode (top-right corner) to reveal each extension’s ID. Copy the ID of the extension you want to remove.
Step 2: Uninstall Extension from the Registry
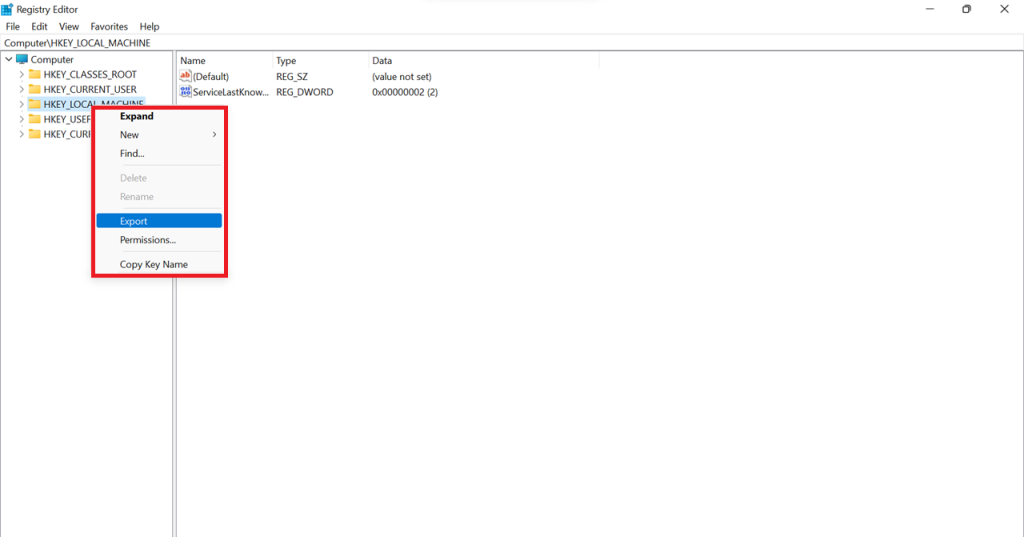
- Now, press the Win+r keys, type regedit on the pop-up menu, and click Okay. This will direct you to the computer registry.

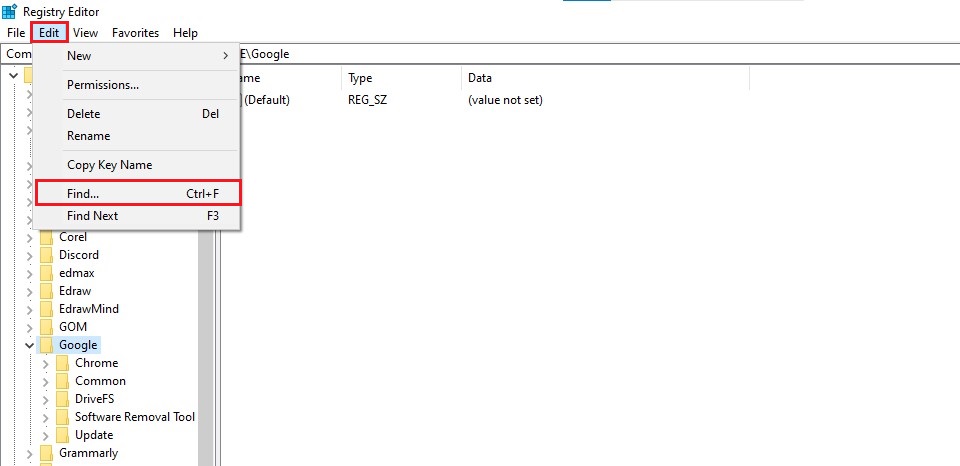
- In the Registry Editor, locate the Edit button at the top-left corner and select Find.
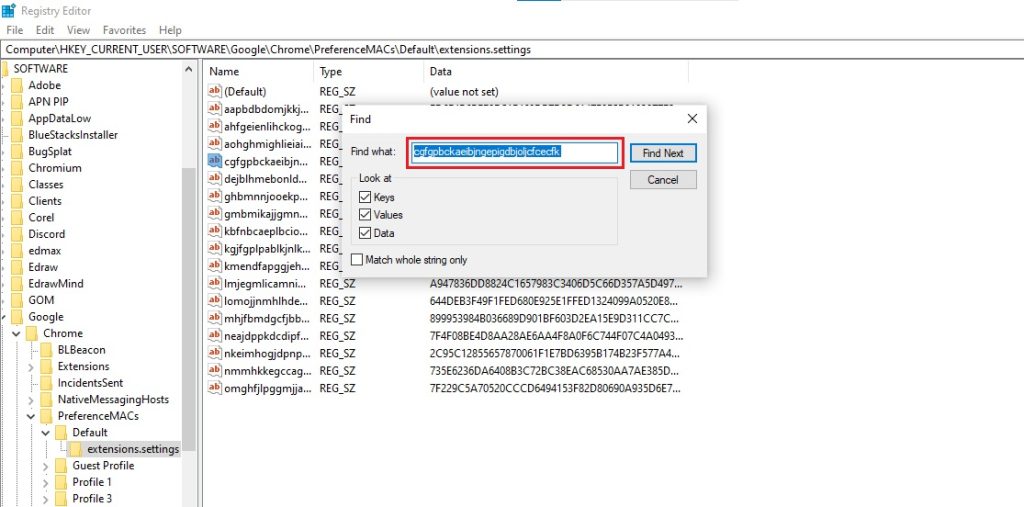
- Once you see the Find input window, paste the string number of the extension to be uninstalled.
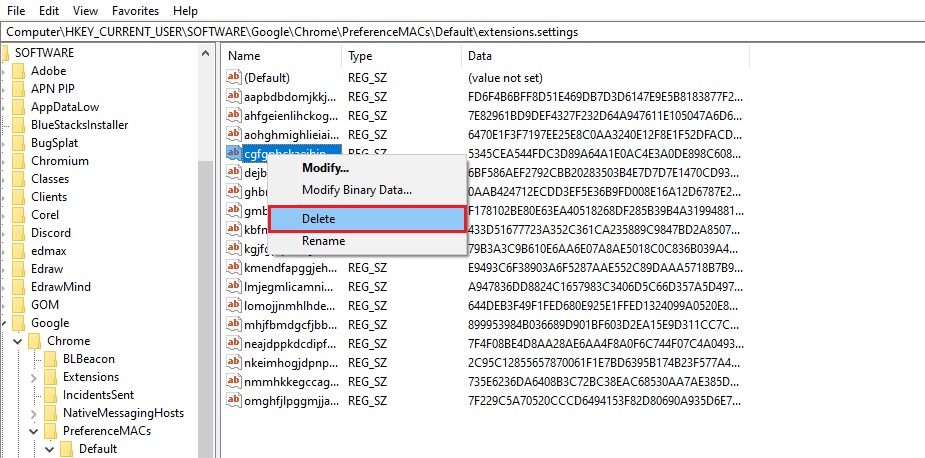
- The registry will search for the extension. Once it appears, right-click > Delete to remove it.
Step 3: Open Google AppData
You are almost there. All that’s left is to remove the source file from the Default folder.
- So, again, open the Extension Manager in your browser and click Load Unpacked.

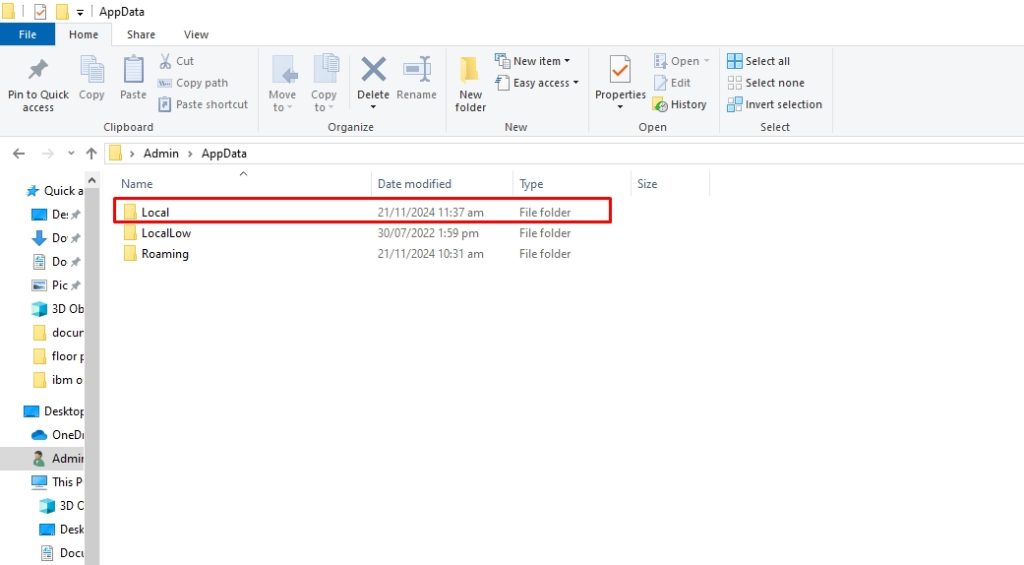
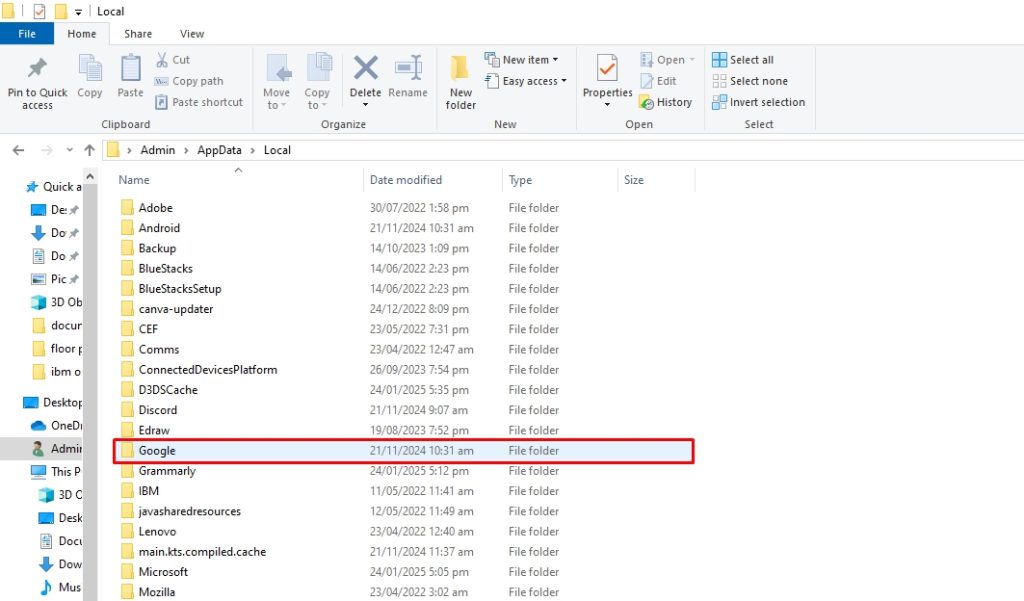
- This will directly take you to the Admin folder. Find AppData from the list of folders.
Alt: open appdata computer
Pro Tip: If you cannot see the AppData, open the View tab at the top of the screen and click Hidden items. It should be visible now.
- Next, select the Local folder from the app data folder.
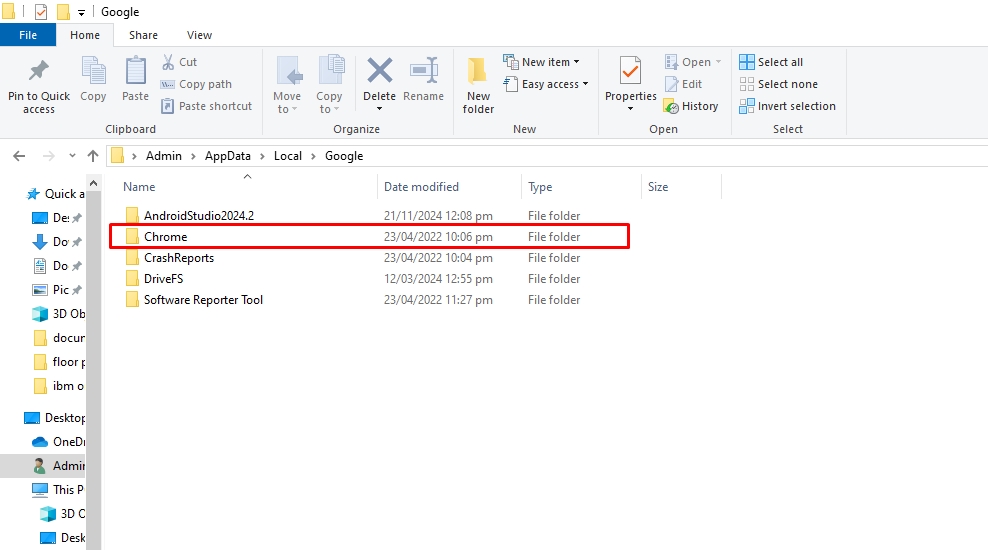
- Open the Google folder from the menu.
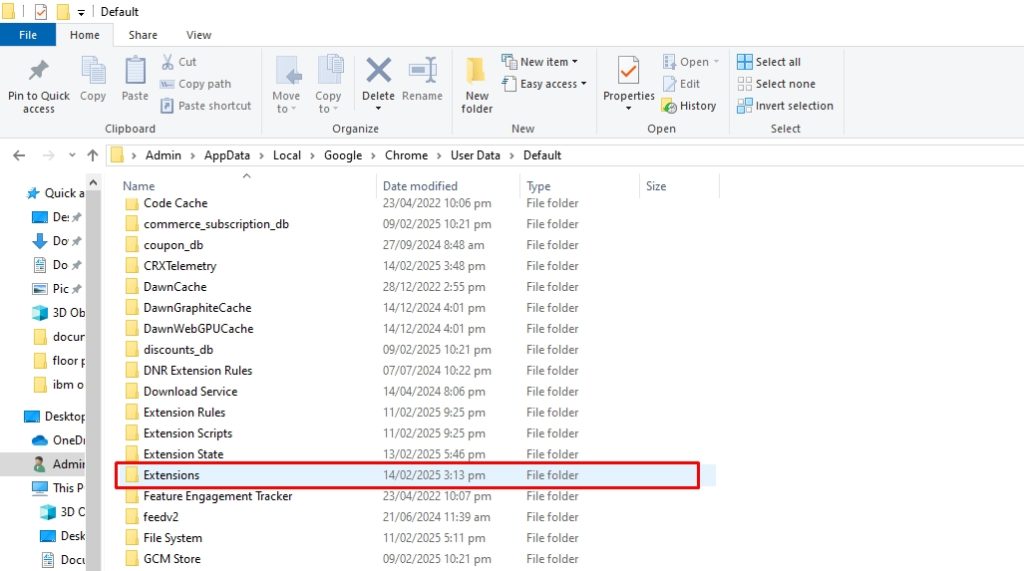
Step 4: Locate Default Folder
- It’s almost done! Now, click the Chrome folder.
- Open the User Data folder.
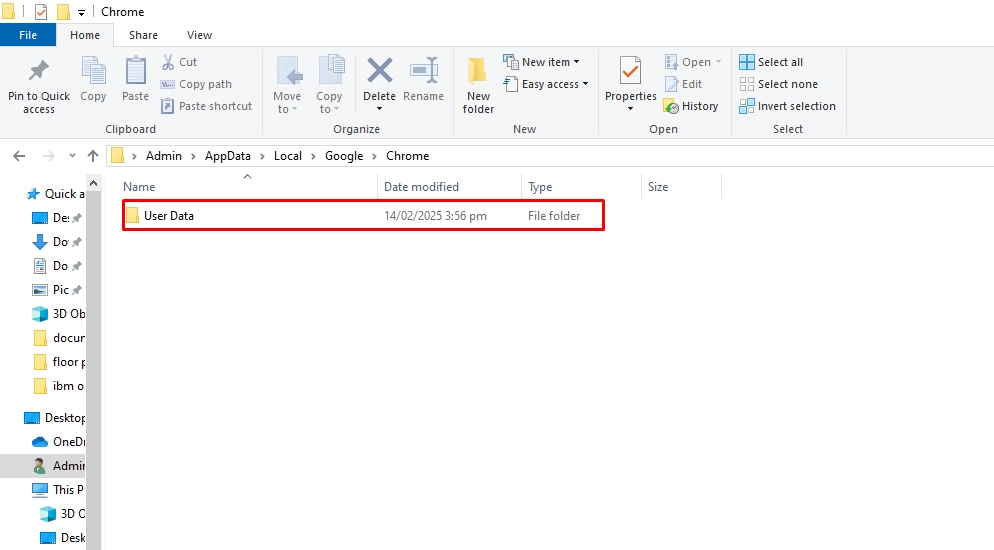
- You should now be able to see the Default folder on the display.
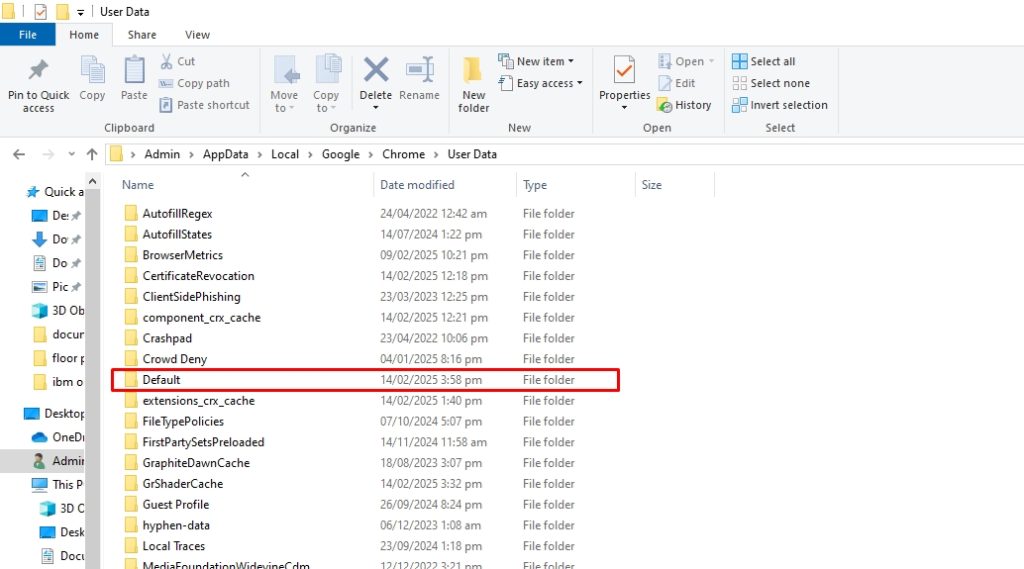
Step 5: Find and Uninstall Extension from the Computer
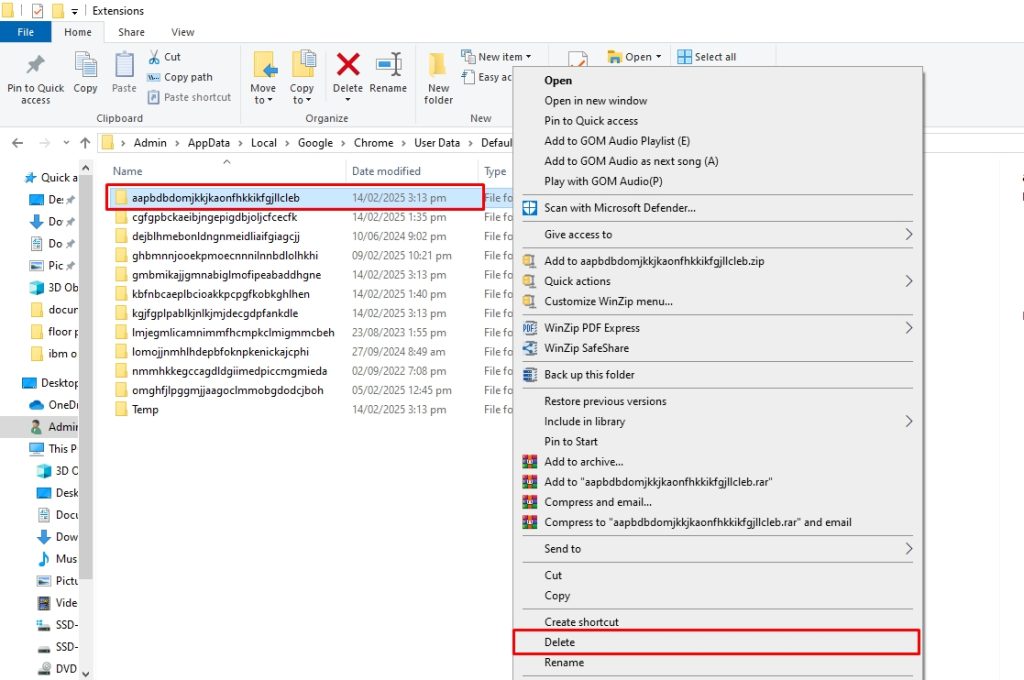
- Now, navigate to the Extensions folder. This folder contains all your Chrome extensions, including the hidden ones.
- Each extension has several subfolders with names consisting of multiple letters. These letters represent the Google URL of that extension. So, find the corresponding string number of the extension you just removed. Right-click the extension to delete it from the computer.
Finally, your unwanted harmful Chrome extension is wholly and safely uninstalled. Rest assured of your online privacy.
Master Uninstaller: A Faster and Quicker Way to Uninstall a Program from Your Computer
Harmful applications, such as some browser extensions and stubborn software, take up your computer space and make it slow. Moreover, these apps always refuse to be uninstalled with the standard methods. Even if it seems like you have deleted a program, its residues remain in the system without your notice.
Hence, using the Master Uninstaller to completely remove the program and its traces from your system registries. Here is how it goes.
Step 1: Download and Register
- Download Master Uninstaller from here and register your email account.
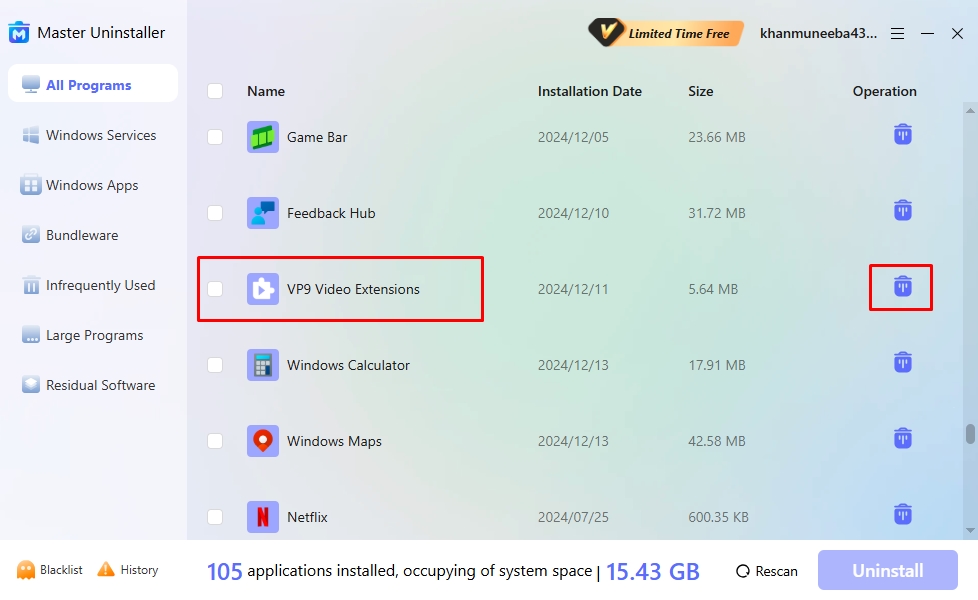
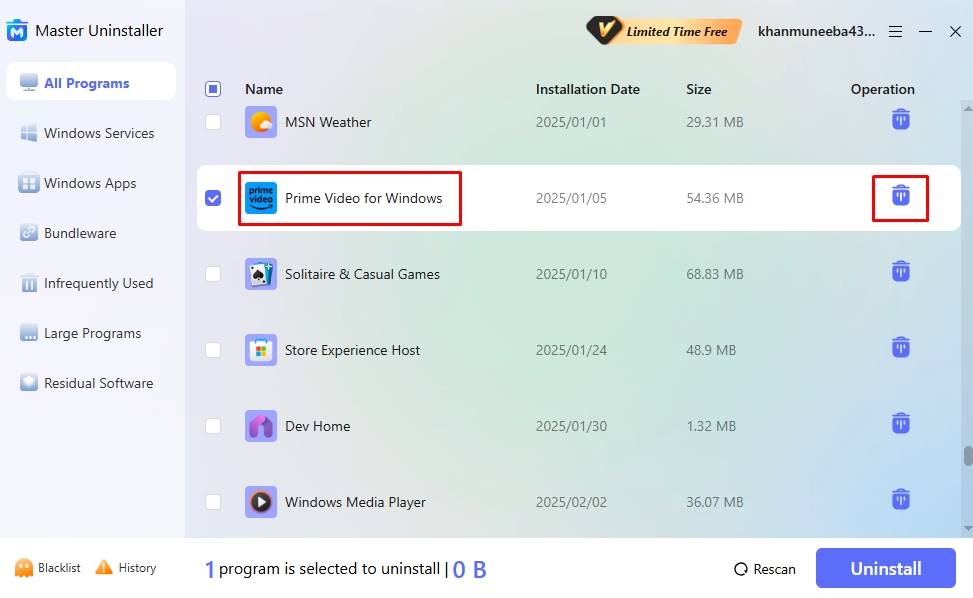
Step 2: Uninstall the Program
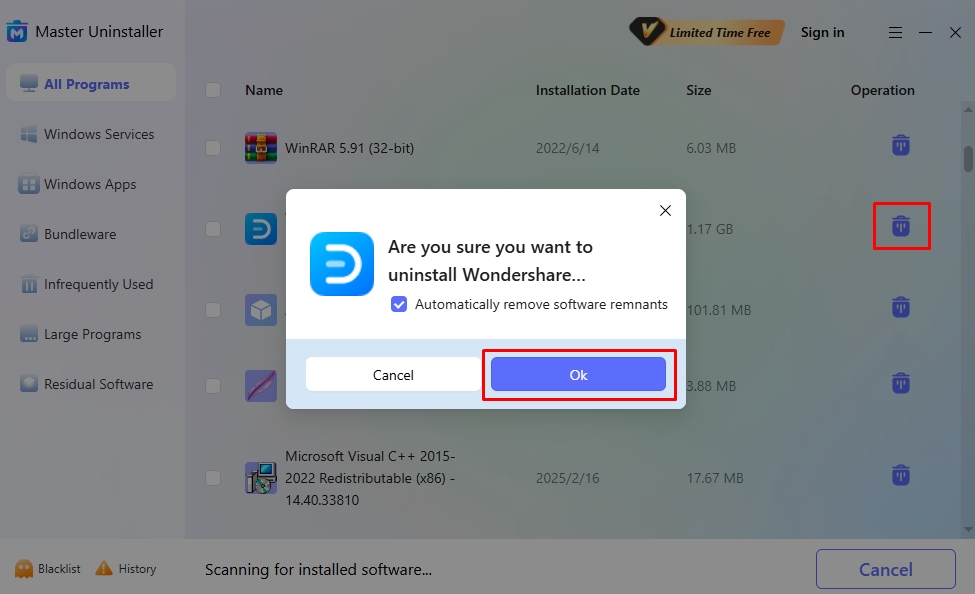
- Navigate to the program you want to uninstall from the main menu and click the Delete icon.
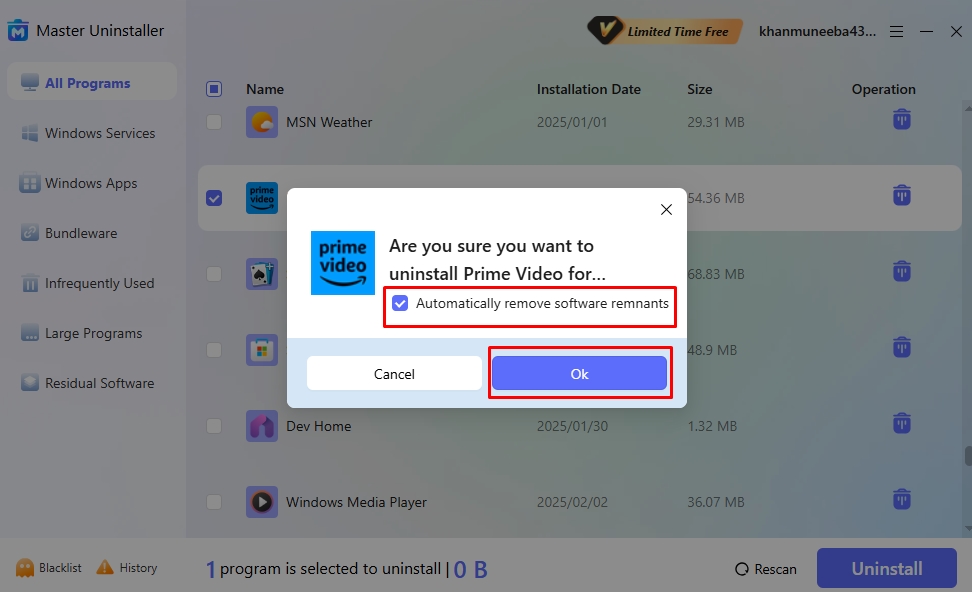
- Enable the Automatically Remove Software Remnants option from the pop-up menu and click Yes.
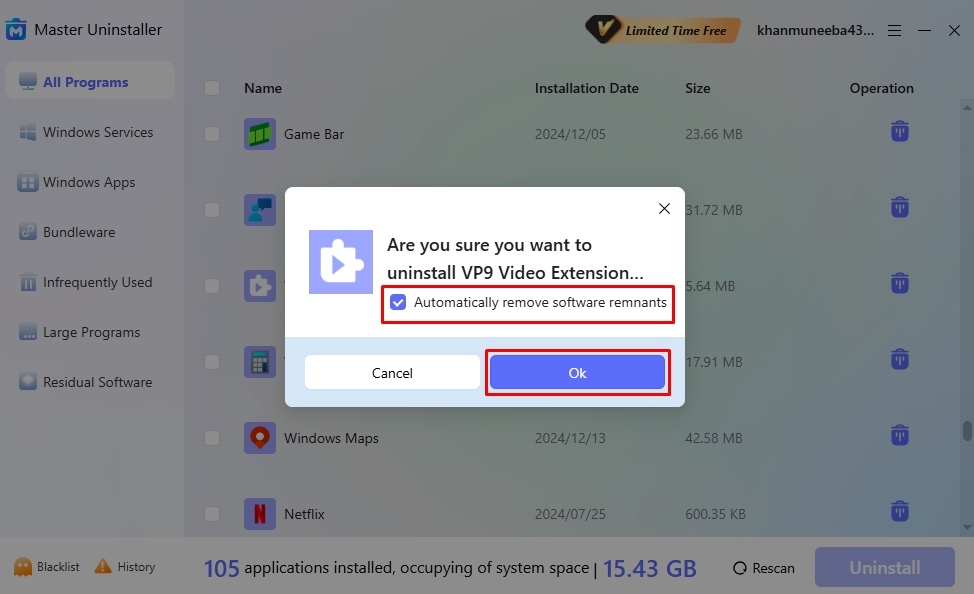
- Congratulations! You’ve successfully deleted an app and will receive a confirmation message shortly.
Why Choose Master Uninstaller?
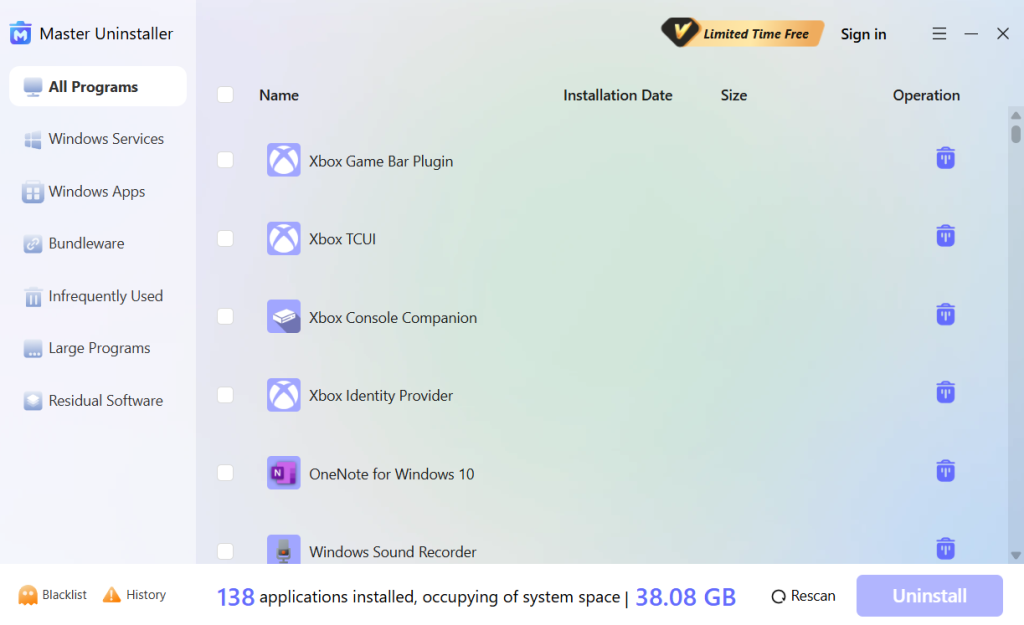
Master Uninstall is a third-party software, designed to simplify the uninstallation process. It offers a complete removal of programs and their associated files from your system. Here are some reasons why it is better than manually removing apps from your computer.
- Intuitive Interface: Master Uninstaller has a simple interface with easy-to-use controls. The dashboard categorizes apps so users can easily locate and uninstall the desired apps.
- Single-Click Operation: With just one click, you can locate and uninstall large programs and rarely used software from your system using Master Uninstaller. Moreover, it can delete gigabytes of storage in a few seconds.
- Complete Residual Cleaning: The Master Uninstaller offers post-uninstallation cleanup, which deletes all associated background processes, residual files, and system logs. This frees up space from your PC and maintains its performance.
- Bundleware Uninstallation: Master Uninstaller scans the computer for harmful programs that get downloaded with large applications without your notice.
Best Chrome Extension Practices to Keep Your Browser Safe
Managing Chrome extensions is the first step towards a seamless and safe browsing experience. Here are some things you must employ to keep your extensions in check.
1. Research Before You Install
Research is necessary, even when downloading an extension from the Chrome Web Store. A good way to approach it is by visiting the developer’s website. Check their track record to see any trustworthy apps or software. If you can’t find any information on the extension, proceed cautiously.
2. Install from Legitimate Sources
Most people undermine it, but downloading software from a credible source makes a significant difference. So, when installing extensions, always go for secure browser extension stores like the Google Web Store. Also, be wary of third parties offering add-on installs.
3. Check Reviews
One way to determine whether an extension is worth downloading is through reviews. Software with high ratings and positive reviews is a good sign, so you can safely install it. Google web store displays ratings and reviews. With this, you can figure out if the extension is for you.
4. Update Extensions Regularly
Update your Chrome extensions regularly and make it a habit. Extensions, like any other software, need constant maintenance. It fixes compatibility issues, deals with security holes, and removes bugs. Though Chrome automatically updates extensions, it’s not immediate. So, do it yourself manually.
5. Don’t Go Overboard
We often tend to ignore the balance between necessity and luxury. The same is the case with extensions. But, it is essential to get this; the more extensions you have in the browser, the more it is prone to safety breaches and affects your system’s performance. So, don’t go overboard; install only what you need.
FAQs
Q:
Should I remove browser extensions?
Yes, you should remove any browser extension that is no longer in use. Extensions slow down your system performance, and keeping them may also result in safety breaches, especially when the extension is outdated and filled with bugs.
Q:
How do I remove an extension from Chrome?
First, open your Chrome browser and type chrome://extensions in the search box. This will take you to the extension manager. Go to the extension you want to delete and click Remove > Remove to uninstall it.
Q:
Where can I find Chrome extensions?
You can find Chrome extensions on Google’s Web Store. Simply navigate to the Extension panel from the left column and browse the entire collection. Find one that suits your requirements and click Add to Chrome.
Q:
How to uninstall Edge extensions?
Deleting an Edge extension is simple. Open Edge and click the menu button at the top-right corner. Then select Extensions > Manage Extensions. Once the manager page opens, navigate to a desired extension and click Remove to uninstall it.
Have a Safe Browsing Experience!
There you have an in-depth Google Chrome extension uninstall guide. Whatever method you choose, make sure you have removed the extension from the registry and the PC. Also, make it a habit to review your browser extensions and uninstall them periodically. Regularly cleaning up unnecessary extensions enhances browsing speed and strengthens security by preventing malicious add-ons from tracking your activity.
Keeping your extension list minimal and well-managed ensures a smoother, more private online experience. Additionally, always download extensions from trusted sources and review their permissions before installation to avoid potential risks. By taking these simple steps, you can keep Chrome optimized, responsive, and secure. allowing you to browse with confidence and efficiency.

Master Uninstaller
VPN Not Connecting on Windows 11? How to Uninstall Updates for a Fix
Though Microsoft has confirmed that its recent April 2024 security update is causing VPN connection failure, the company has no apparent justification for this.
Microsoft has recommended using the Windows Get Help app if they encounter this VPN issue. Despite this, it seems like there is no solution, and the only way to avoid this is by uninstalling the update.
If your VPN is not connecting in Windows 11 and you don’t know how to uninstall updates, worry not. Here are three proven methods to delete the recent security update on Windows 11. So, dive right in.
Windows 11 VPN Not Working After the Update | 3 Quick Methods to Uninstall Security Updates
Is your VPN not connecting to Windows 11? Is this because of the Windows update? How do you uninstall updates? Let’s look at these three quick and effective methods.
Method 1: How Do You Uninstall An Update Using the Master Uninstaller?
Windows 11 is infamous for its update corruption issues, which usually means standard manual uninstallation is insufficient to fully remove the updates. Hence, a foolproof way to get rid of a program and all its associated files is to use the Master Uninstaller. It offers post-deletion cleanup so the registry has no system traces or leftovers.
So, if your VPN is not connecting in Windows 11 after the update, you can use the uninstaller to delete the updates.
Step 1: Download and Log Into Master Uninstaller
- Download Master Uninstaller.
- Once downloaded, run the program and register yourself.
Step 2: Uninstall the Windows 11 Update
- Now, navigate to the All Programs tab and locate the desired Window update.
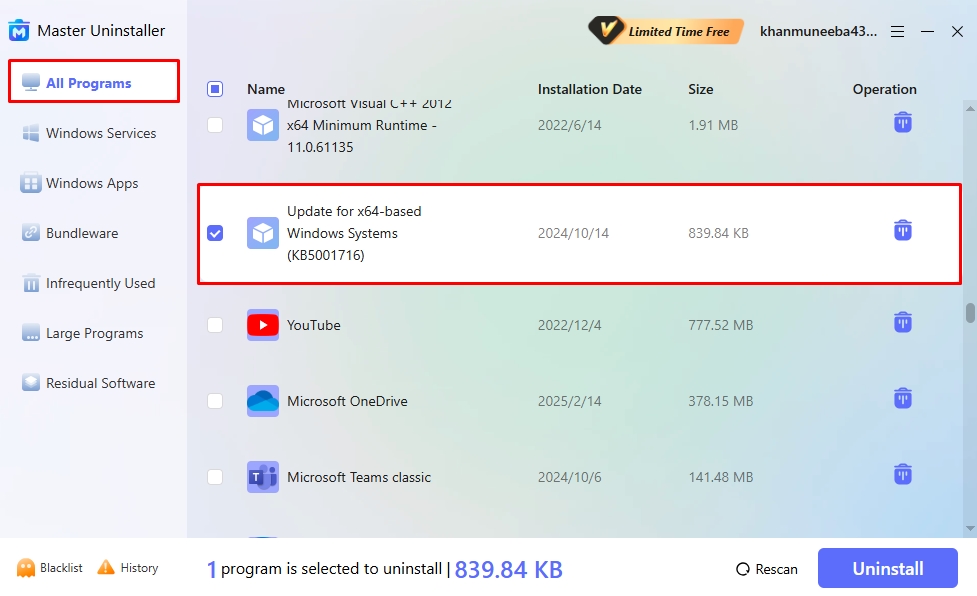
- Click the Delete icon next to the updates or press the Uninstall button from the bottom.
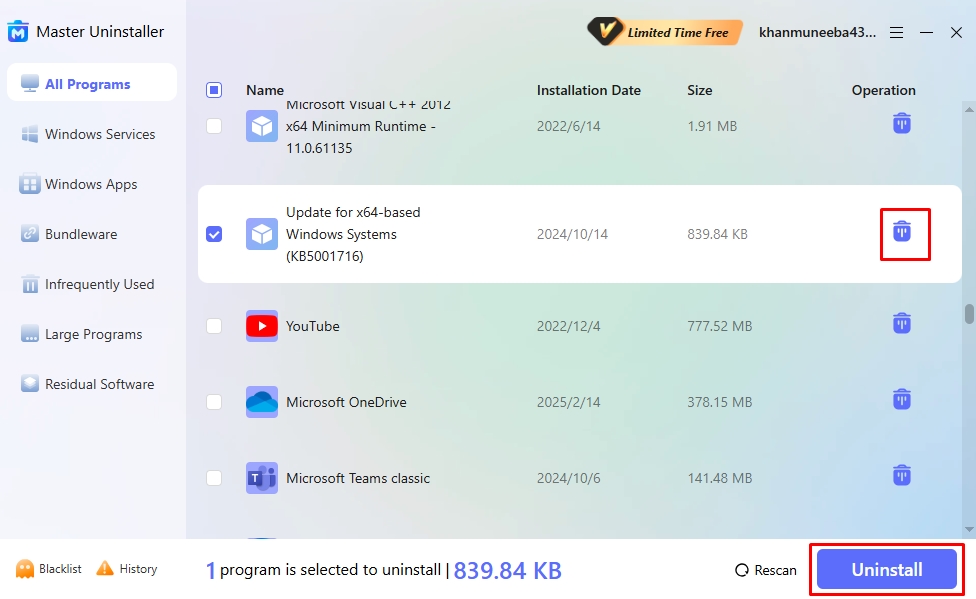
- Click OK to confirm the uninstallation, and you’re done. Now, restart your PC and try using your VPN.

Method 2: How to Uninstall the Windows 11 April 2024 Security Update from Windows Settings?
If your Windows 11 VPN is not working after the update KB5036893, here is the easiest and safest official Microsoft method to uninstall this security update from Windows settings. However, doing this may remove some features of the operating system.
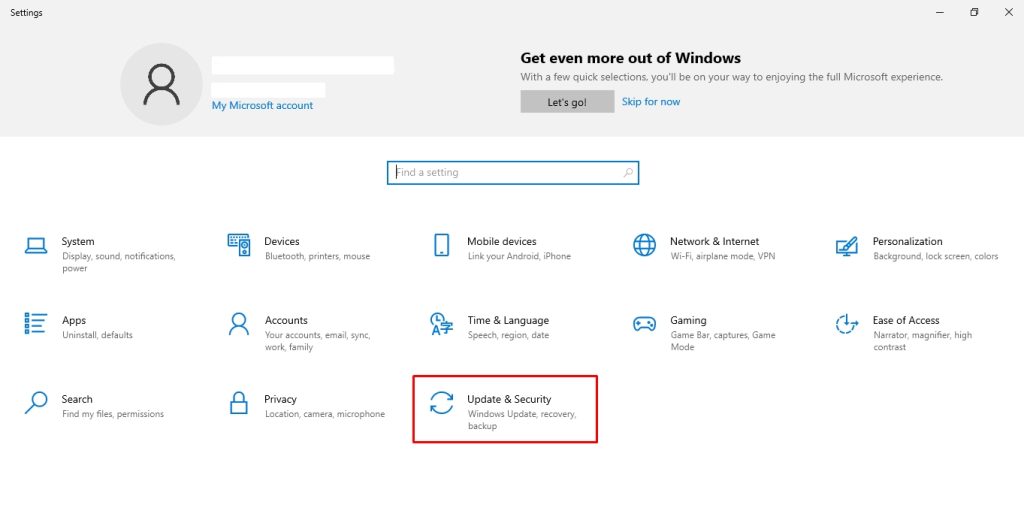
Step 1: Open Update and Security Settings
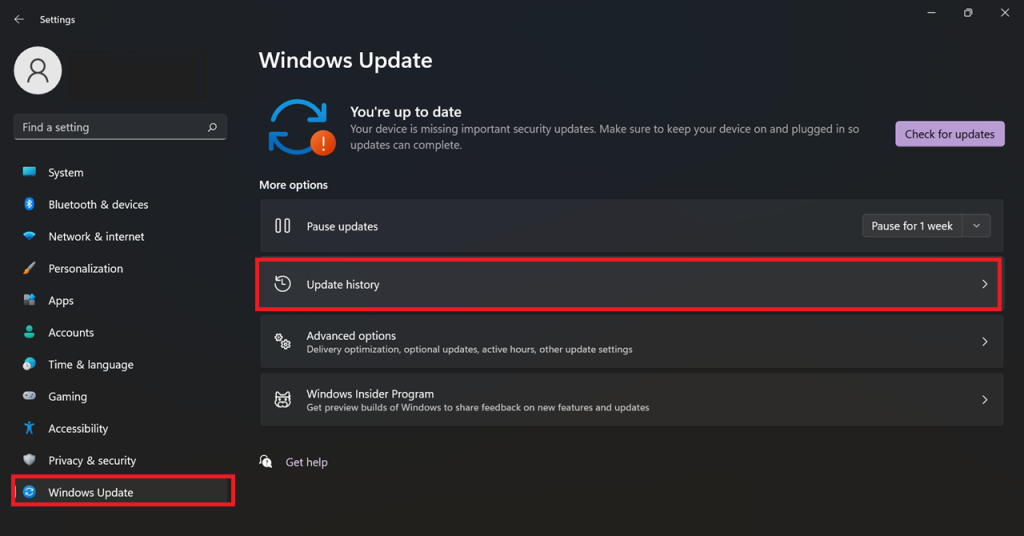
- Press Windows + I to enter the Windows Settings menu. Select Windows Update from here, then click Update History.
Step 2: Uninstall the KB5036893 Update
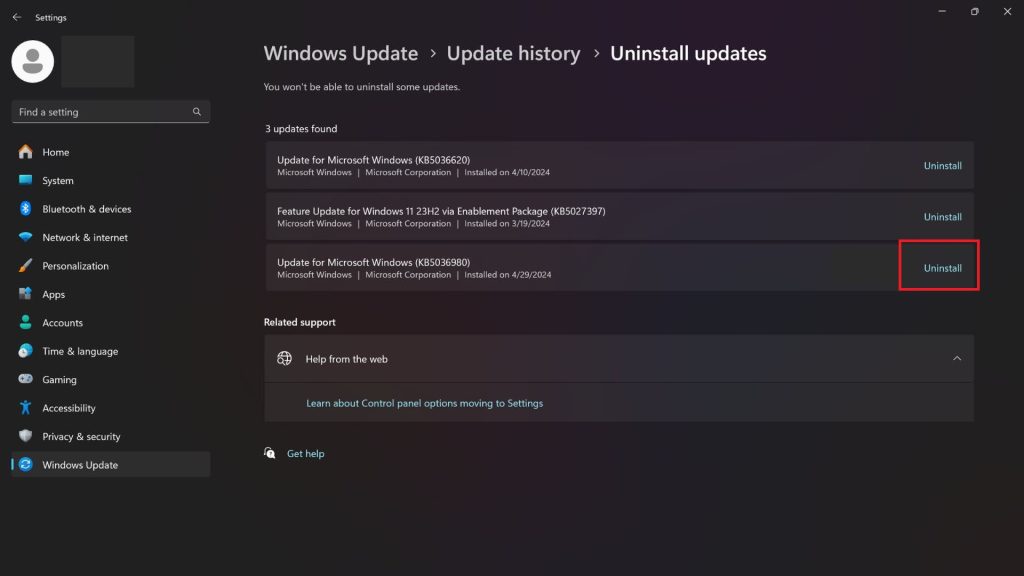
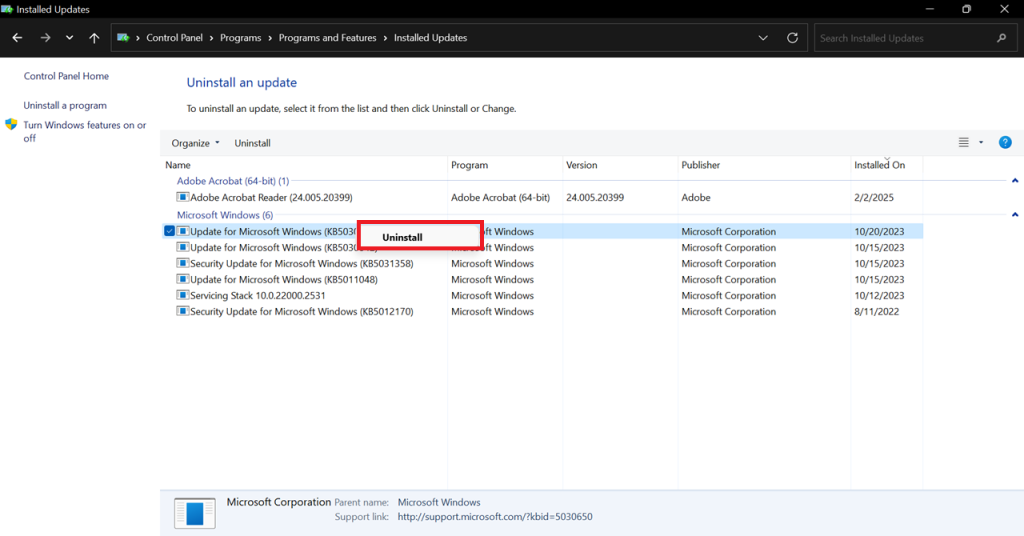
- Scroll down to the bottom and select Uninstall Updates. Find KB5036893 from the list of updates and select Uninstall.
Method 3: How to Uninstall Windows 11 Update in Control Panel?
Another official Microsoft method for uninstalling Windows 11 updates is from the control panel. Like the previous method, it manually deletes the update, so your security remains intact. However, it may also remove helpful operating system features. Here is how it goes.
Step 1: Open the Control Panel
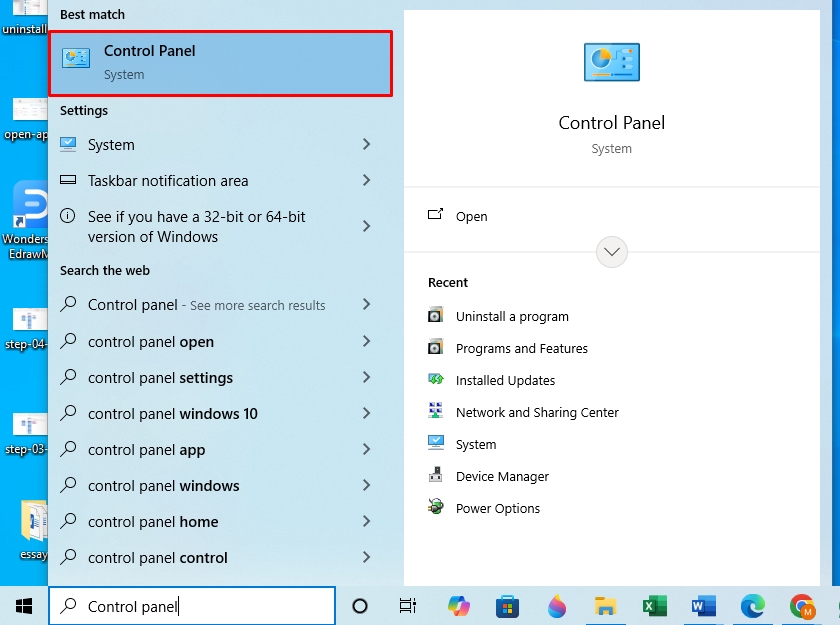
- Open the Windows Start menu and type Control Panel in the search box.
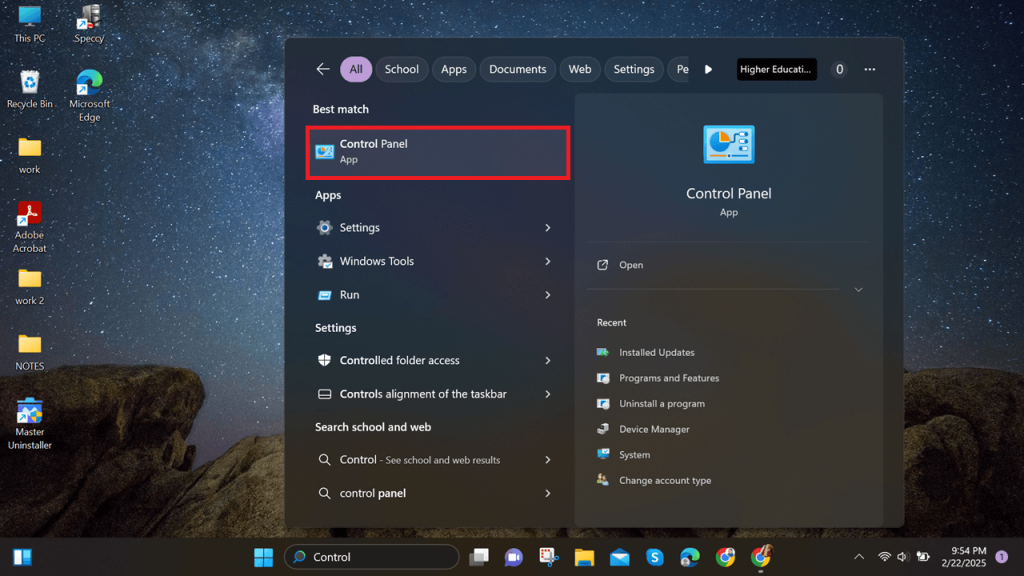
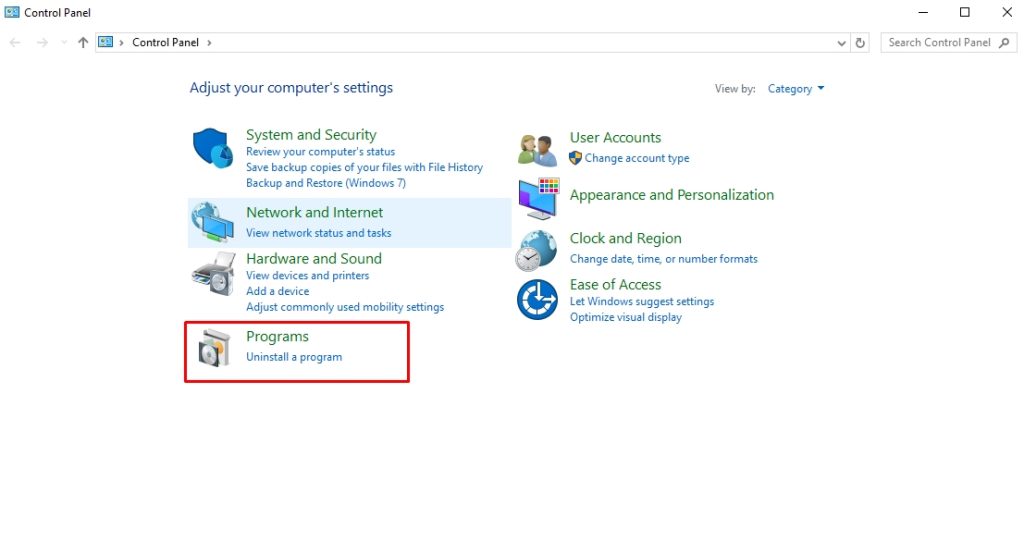
- From the on-screen menu, click Programs > Uninstall a Program.
Step 2: Uninstall Windows 11 Update
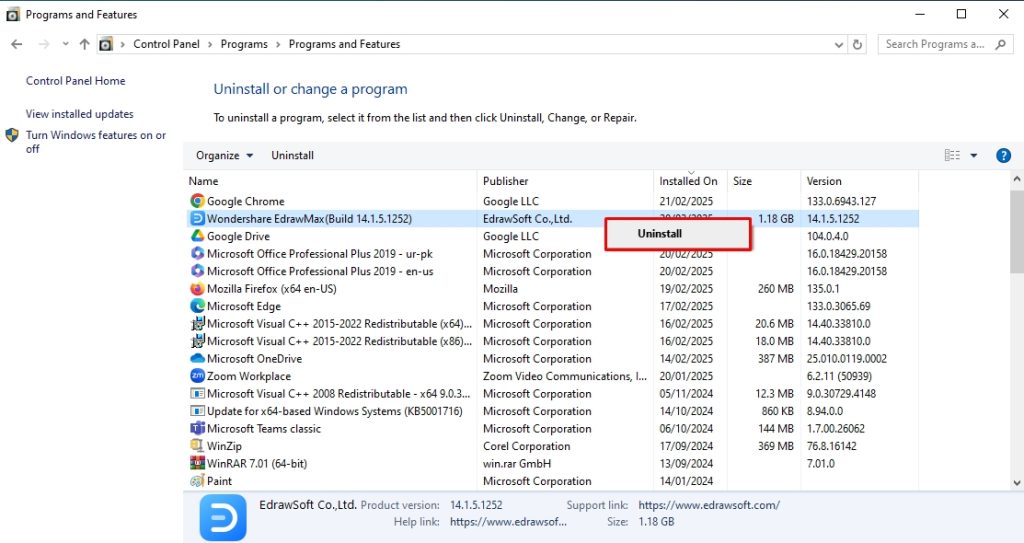
- Now, select View Installed Updates from the left panel. It will display a list of your computer’s current updates.
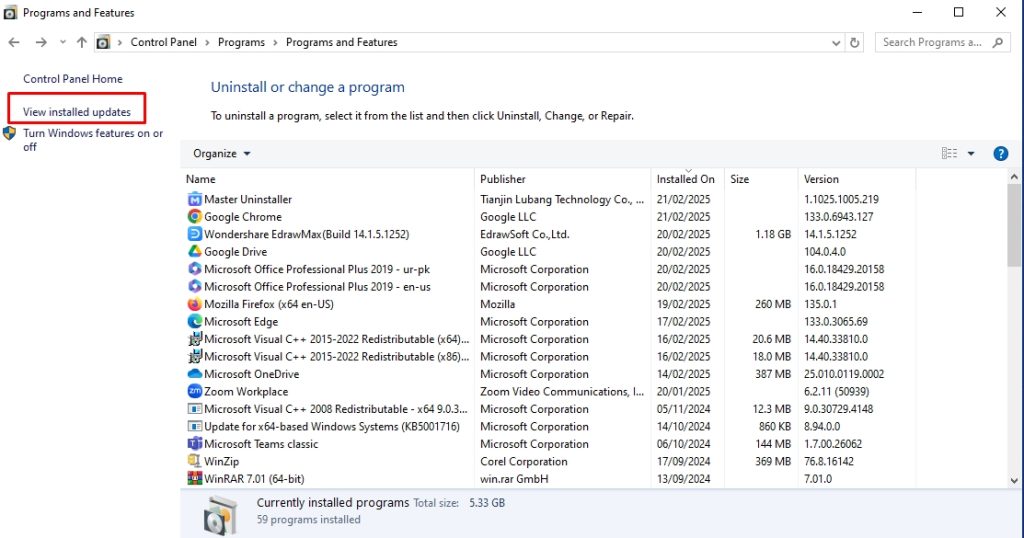
- Choose the desired update, click Uninstall, and that’s it. You have successfully deleted the Windows 11 updates.
Why Should You Use Master Uninstaller?
Using Windows’s built-in uninstall function often leaves residual files and registry traces behind. A dedicated uninstaller, like Master Uninstaller, ensures complete removal of stubborn software while optimizing system performance. Choosing the right uninstaller makes all the difference in maintaining a clean and efficient PC. Here is what makes this uninstaller better than conventional alternatives.
- Intuitive Interface: Master Uninstaller is an easy-to-use program with a one-click software removal operation. Moreover, the categorical division of installed apps, Windows programs, and bundleware make locating a desired program easy in minutes.
- Post-Uninstallation Cleanup: This uninstaller program offers automated residual cleaning. It scans your system for leftover files, registry entries, and unnecessary folders, ensuring the device remains clutter-free and efficient.
- Fast Uninstallation: Unlike standard uninstallation methods, Master uninstaller deletes gigabytes of storage within seconds. All you need to do is locate the desired program and remove it.
- Versatile Operation: Master Uninstaller lets you delete almost all types of software on your PC, including Windows services, pre-installed applications, and third-party programs. It even shows bundle software that may install multiple programs without your notice.
- Blacklisting Functionality: If a program is stubborn and has components harmful to your PC, the Master Uninstaller blacklisting function is your savior. It blocks the program from installing again, so you can browse freely without worrying about your safety.
What Other Things You Can Do to Fix VPN Issues on Windows 11?
If your VPN still does not connect after the Windows 11 update uninstallation, the problem lies elsewhere. Here are four other things you can do to fix the VPN issue.
1. Flush Prior DNS Records from Cache
The DNS cache can also be why your VPN is not working in Windows 11. The only way to avoid this is by flushing the DNS records. This will eliminate the temporary storage from the DNS records and prevent the loss of your data. Follow these simple steps to do this.
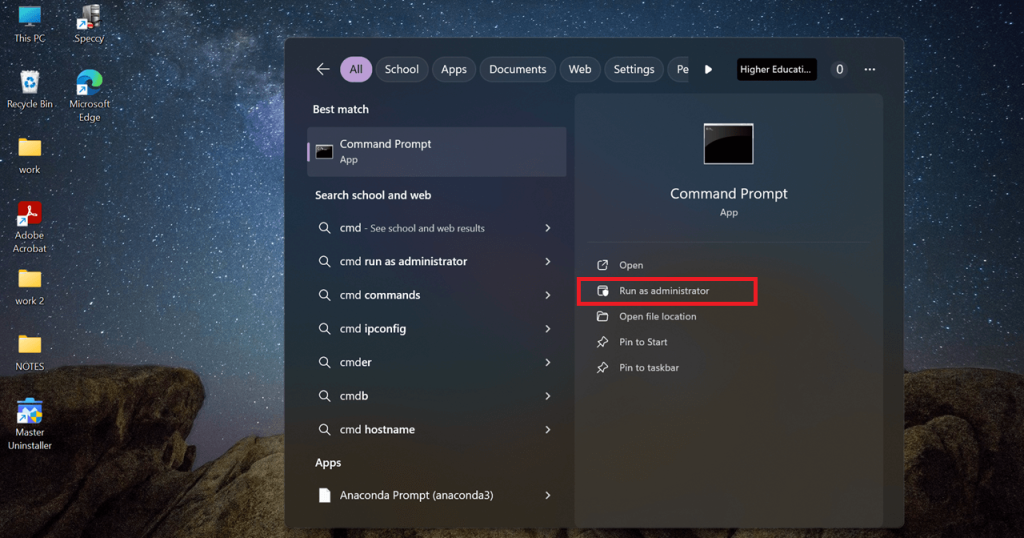
Step 1: Open Command Prompt
- Press the Windows + S keys to open the Start menu, and type CMD in the search box.
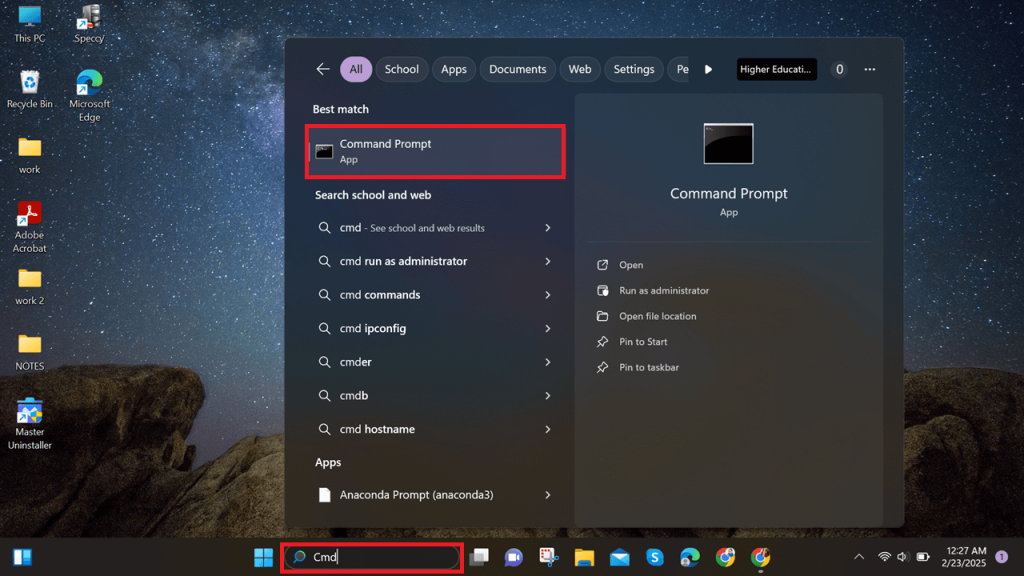
- Select Run as Administrator from here, and click Yes to permit.
Step 2: Run the Command Prompt
- Once in the command prompt, run the following commands one by one.
ipconfig /release
ipconfig /flushdns
ipconfig /renew
netsh int ip reset
netsh winsock reset
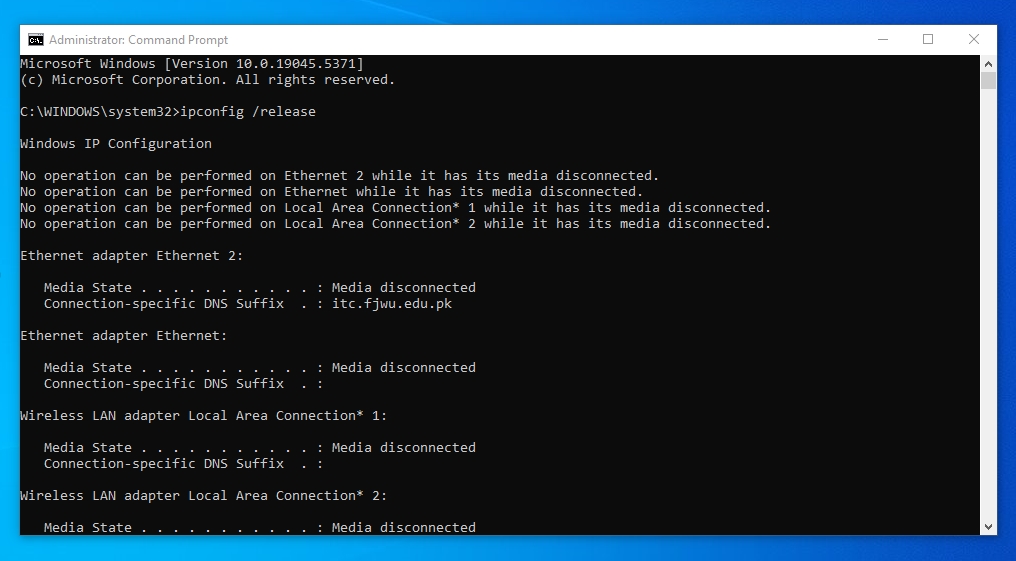
- Finally, close the command prompt and restart your PC. Try using the VPN; it will work fine.
2. Check Your PC Proxy Settings
On Windows 11, you have both the proxy and VPN settings. Sometimes, enabling the proxy settings causes issues running the VPN. In this case, you must check if your Windows is using proxy networks instead of VPN. Follow these simple steps to do this.
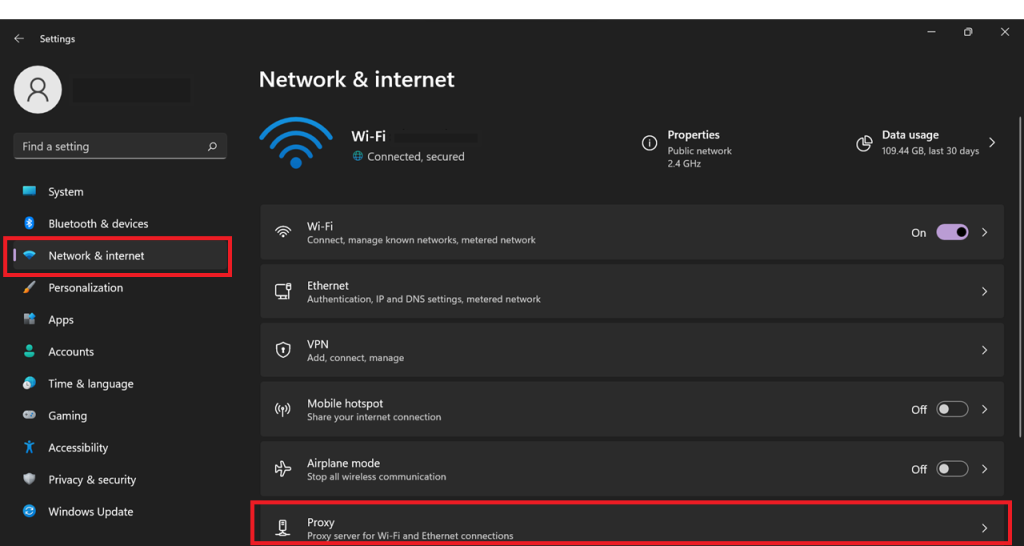
Step 1: Open Network and Internet Settings
- Open Windows Settings by pressing Windows + I on your keyboard, selecting Network and Internet from the display menu, and then navigating to the Proxy settings option.
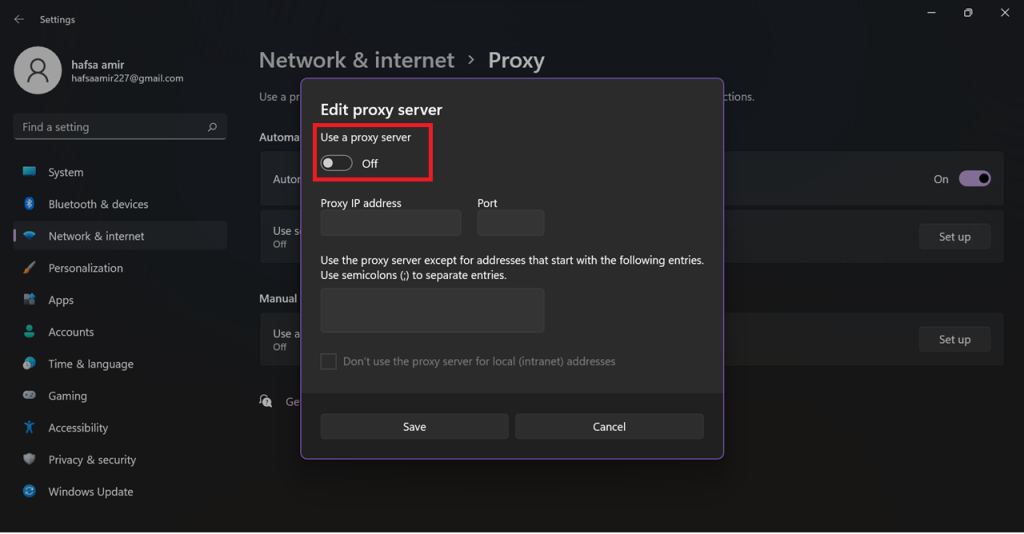
Step 3: Turn Off Proxy Server
- Locate the Manual proxy setup to see if the server is on. If it is, switch it off, and you are done.
3. Modify Windows Firewall Settings for VPN Access
Windows 11 uses an advanced version of the firewall for high-level security. However, it may also block your VPN connection. To avoid this, you must modify your firewall settings to let the VPN pass through the system.
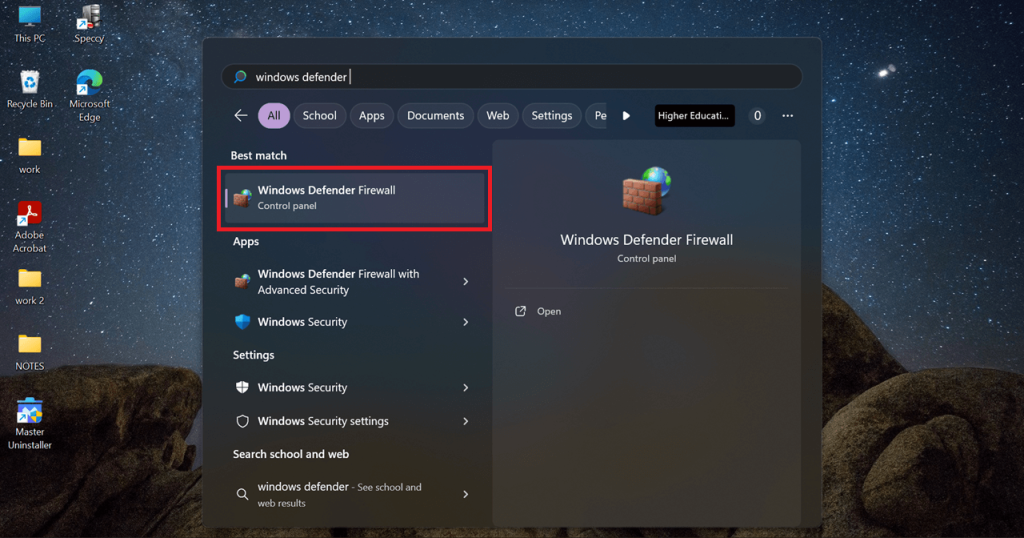
Step 1: Open Windows Defender Firewall
- Open Windows Search by pressing Windows + S from your keyboard and type Windows Defender Firewall in the search box.
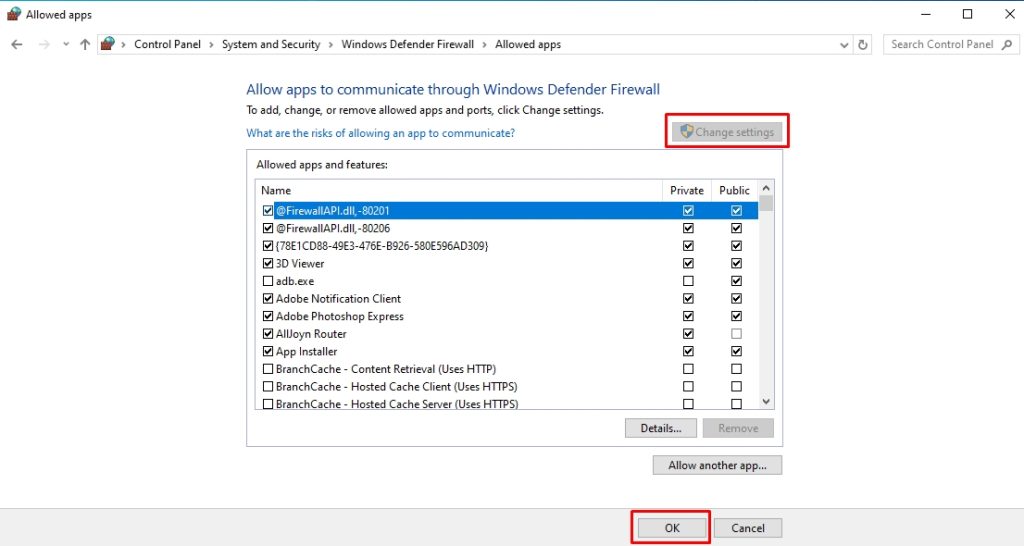
Step 2: Allow the VPN to Pass Through the Firewall
- Once the program opens, locate the button that states Allow an App or Feature through the Windows Defender Firewall in the left pane, and check if the VPN is on the list.
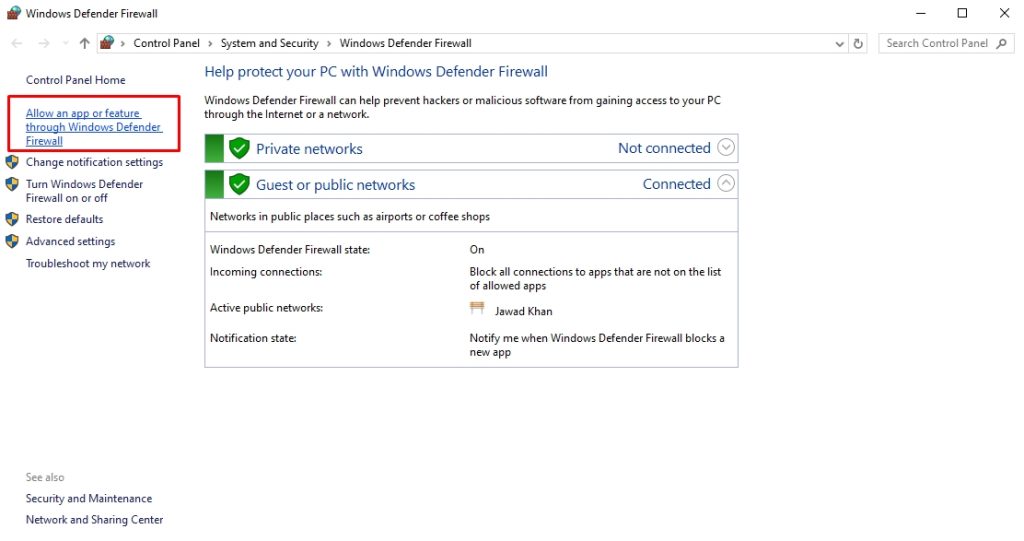
- If not, click Change Settings and enable the VPN access.
4. Reinstall WAN Miniport Drivers
Sometimes, faulty WAN Miniport drivers can also prevent Windows 11 VPNs from working. You must reinstall these drivers if you have tried everything and the issue persists. This will help restore your VPN connection. Here is how to do it.
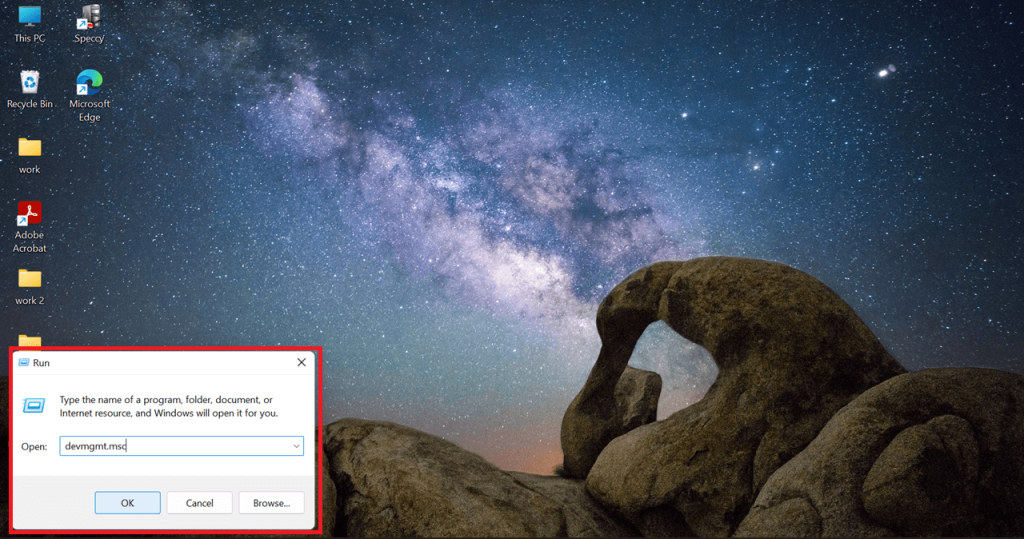
Step 1: Open the Device Manager
- Press the Windows + R keys to open the run menu, and type devmgmt.msc in the search box. Click Ok to enter the device manager.
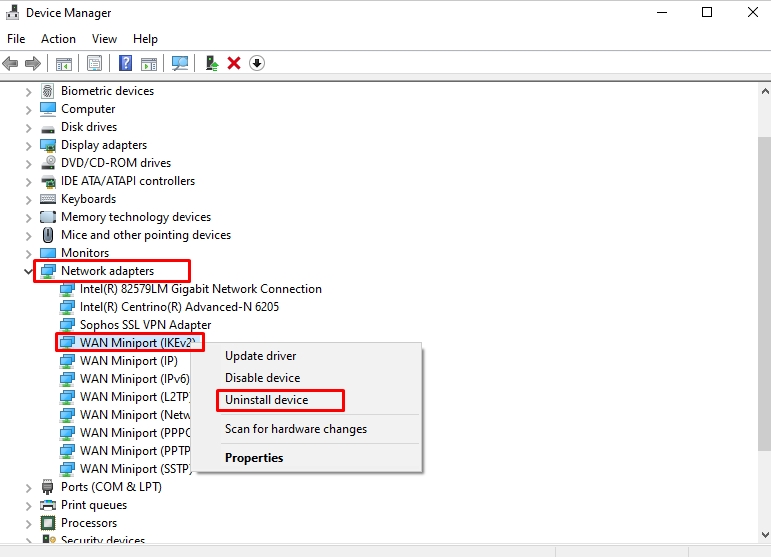
Step 2: Uninstall WAN Miniport Adapters
- Find the Network Adapters > WAN Miniport Network Adapter, right-click the menu, and choose Uninstall Device.
Step 3: Reinstall the Drivers
- Once uninstalled, locate the Action tab from the top of the device manager. From here, select Scan for Hardware Changes.
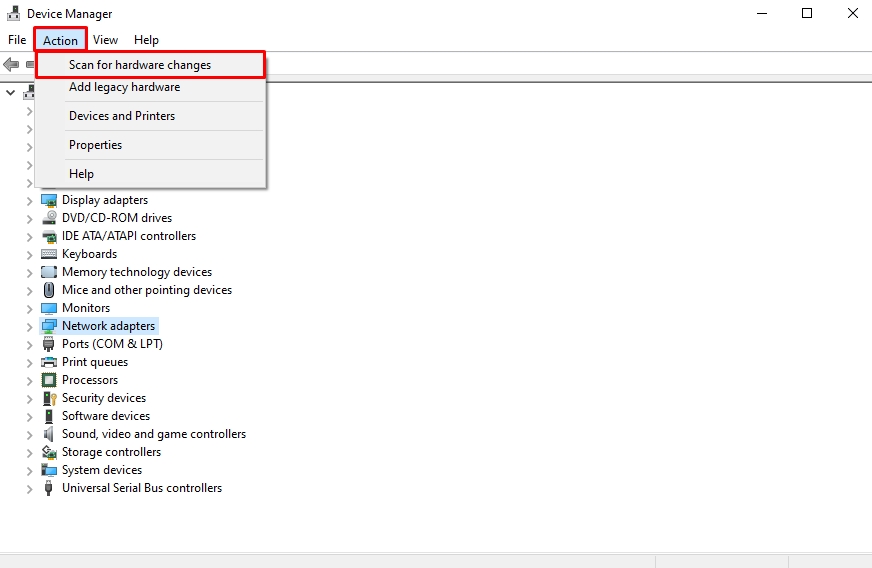
- Since the WAN adapters are your computer’s internal hardware, it will automatically reinstall the missing drivers. Now, restart your PC and see if the VPN is working fine.
Frequently Asked Questions
1. How do I uninstall security updates on Windows 11?
Start by opening the Windows Settings from the Start menu. Select Windows Updates from the side panel and click Update History. Choose Uninstall Updates > KB5036893 Update from the on-screen menu and click Uninstall to complete the process.
2. Why does the Windows update break AWS VPN?
The recent April 2024 security update on Windows 11 has caused VPN connection failures, including AWS. Microsoft is working to fix this issue with future updates. However, if you are experiencing this issue, it is best to uninstall the KB5036893 update from Windows Settings.
3. How to uninstall Windows 11 Update from the Control Panel?
First, access the Control Panel from the Start menu and select Uninstall a Program under the Programs tab. From here, click View Installed Updates and locate your desired Windows update. Right-click the update and click Uninstall.
4. Does Windows Update cause VPN issues?
Not all Windows updates cause VPN issues. However, the recent security update, KB5036893, seems to cause the VPN connection failure.
Final Thoughts
Finally, if your VPN is not connecting in Windows 11, here is how to uninstall updates. Though the standard methods to delete Windows updates are safe, they do not entirely remove the leftovers and system traces. Hence, it is always better to use something like Master uninstaller. It quickly and effectively eliminates updates and unnecessary files from the PC registry.
Master Uninstaller
-
Simple and Practical: Easily uninstall unwanted software.
-
Thorough Cleanup: Completely remove residual files.
-
Blacklist Protection: Identify and block malware and adware.
How to Uninstall Programs with Windows 10 | Step-by-Step Guide
Have you ever noticed your computer running slower than usual? Unnecessary programs could be the culprit. Over time, Windows 10 accumulates apps you no longer need, consuming system resources and affecting performance.
Simply deleting program files won’t do the trick. Leftover data can clutter your system and cause errors. Thankfully, Windows 10 offers multiple built-in methods to uninstall programs safely and completely. If you’re wondering how to uninstall programs with Windows 10, there are several ways to do it, depending on the type of app and its removal restrictions.
But what if a program refuses to uninstall? Or you don’t have admin access? Don’t worry; we’ve got you covered. In this guide, we’ll walk you through step-by-step methods to remove unwanted programs, including stubborn ones that won’t go away. Let’s dive in!
Methods to Uninstall Programs on Windows 10
Are there too many programs slowing down your PC? Uninstalling unwanted apps is the easiest way to free up space and keep your system running smoothly. If you’re unsure where to start, don’t worry. Windows 10 offers built-in options to remove programs quickly. Let’s start with the easiest method.
Method 01: Remove Programs via Windows 10 Settings (Best for Installed Apps)
Windows Settings provides the simplest way to uninstall programs. Follow these quick steps to remove unwanted apps from your computer.
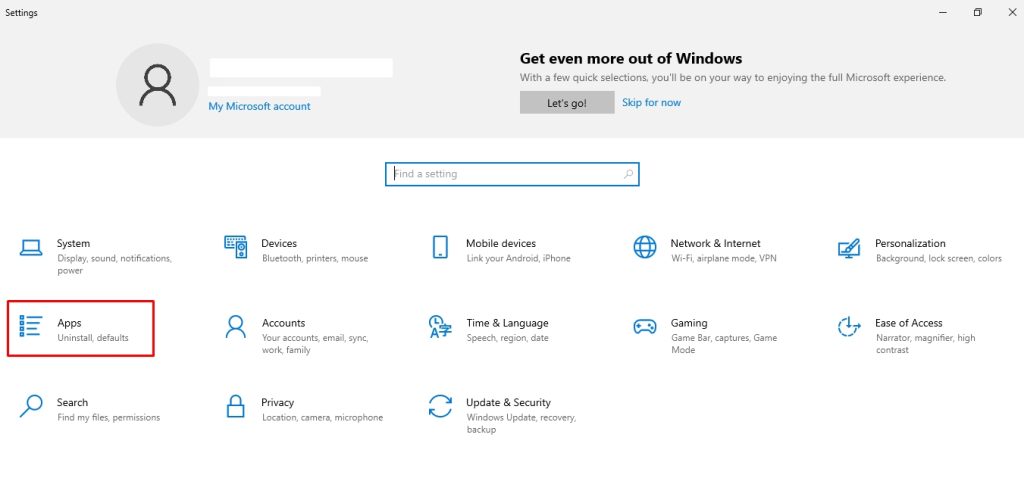
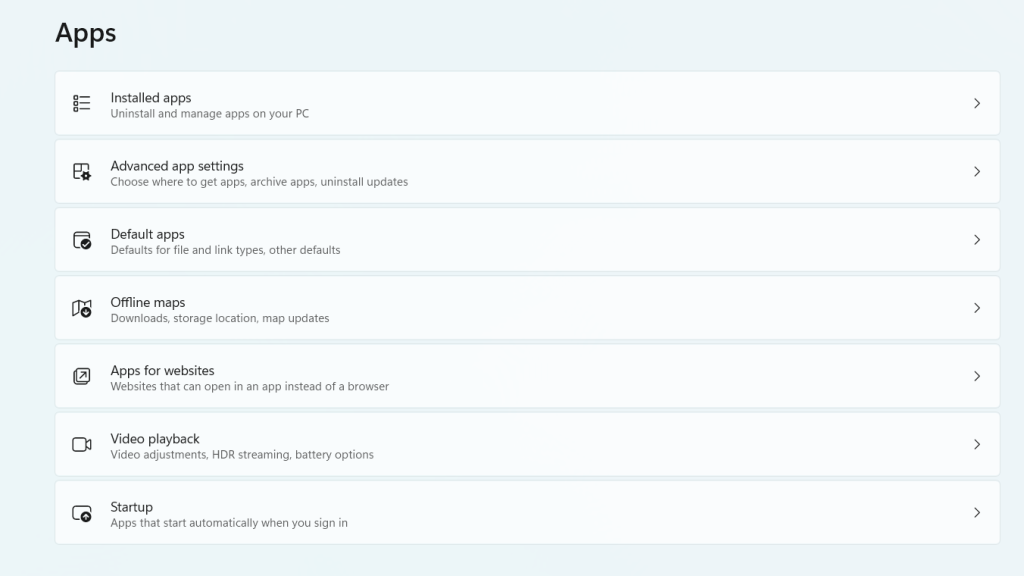
Step 1: Access Apps from Windows Settings
- Press Windows + I to open Settings, then click the Apps tab.
Step 2: Uninstall the Program
- Select Apps & Features to see all installed apps. Scroll through the list or use the search bar to find the program. Click Uninstall, then confirm the action.
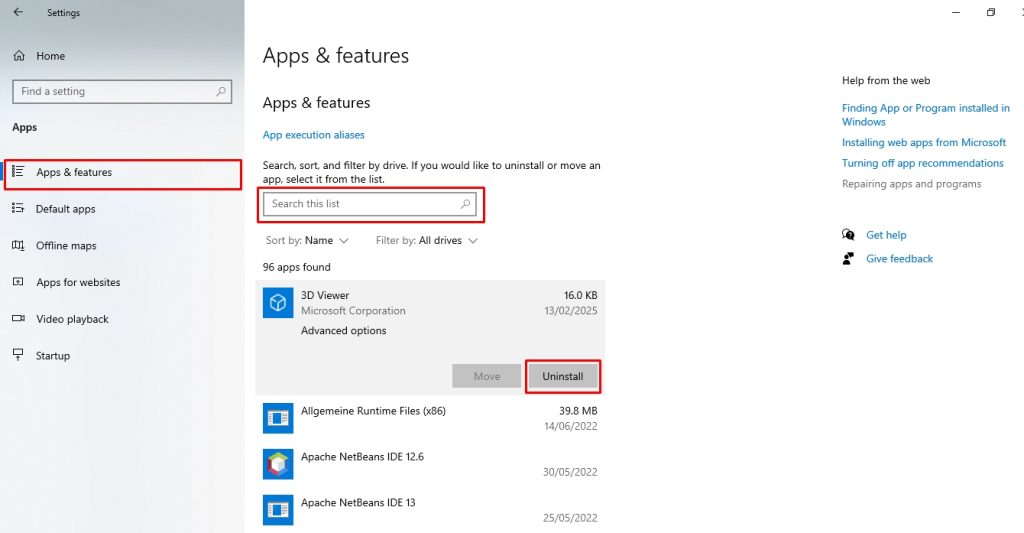
That’s it. The program is now removed. If it doesn’t uninstall completely, try using the Control Panel for a deeper removal.
Method 02: Uninstall Programs Using Control Panel (For Traditional Software)
Step 1: Open Control Panel
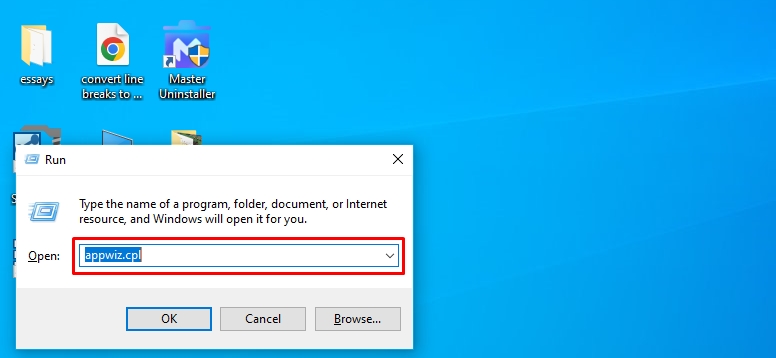
- Press Windows + R, type appwiz.cpl, and hit Enter to open the Control Panel.
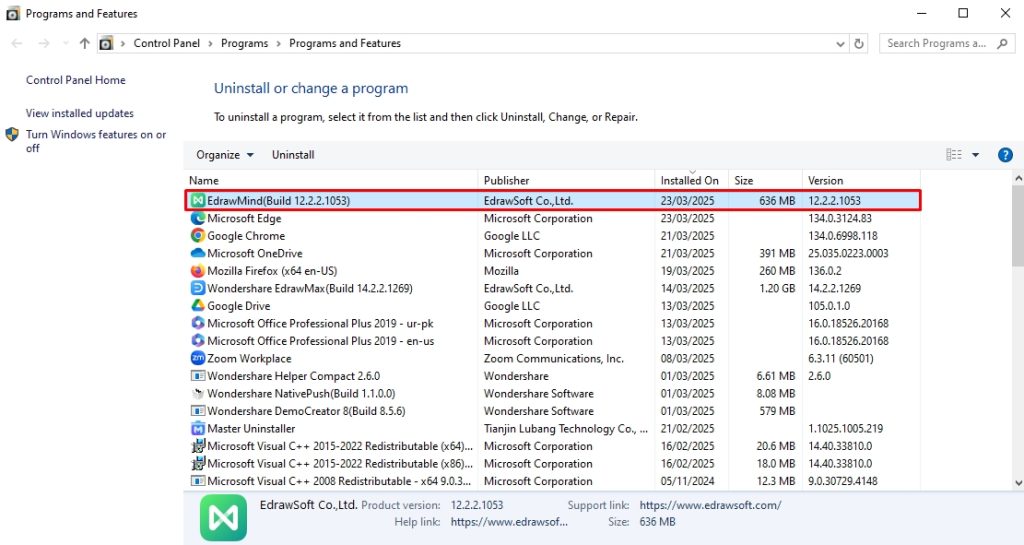
Step 2: Find the Program
- Once in the panel, scroll through the list or use the search bar to locate the program you want to remove.
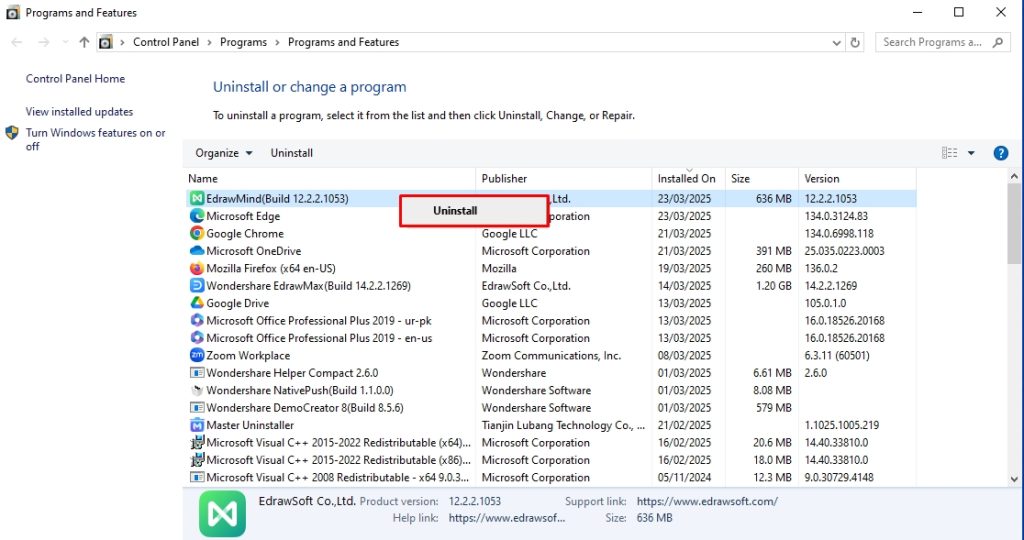
Step 3: Uninstall the Program
- Right-click the program, select Uninstall, and confirm the action when prompted.
That’s it. The program is now uninstalled. If it leaves behind residual files, consider using a third-party uninstaller for a complete cleanup.
Method 03: How to Uninstall Programs on Windows 10 with PowerShell
Some built-in Windows apps don’t offer a standard uninstall option. If you want to remove system apps, PowerShell provides a powerful way to do it. Follow these steps carefully.
Step 1: Open PowerShell as Administrator
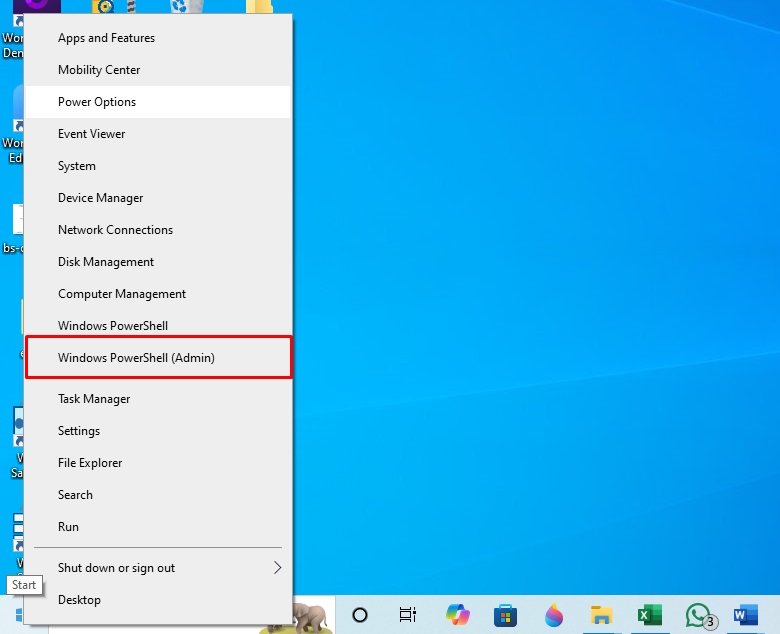
- Press Windows + X and select Windows PowerShell (Admin) from the menu. Click Yes if prompted by User Account Control.
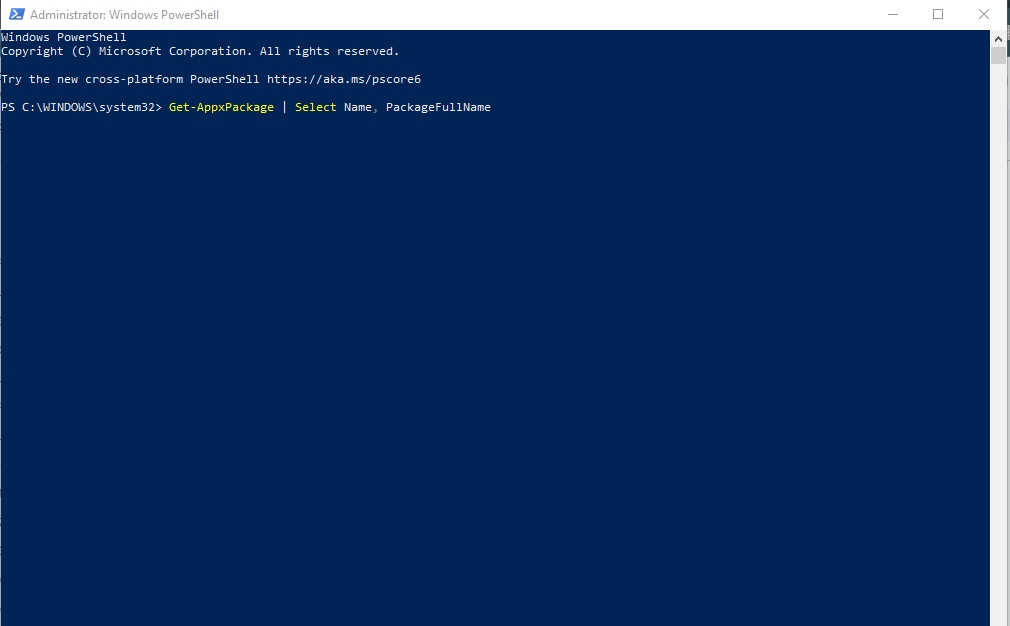
Step 2: List Installed System Apps
- Type the following command and press Enter to view a list of all system apps:
Get-AppxPackage | Select Name, PackageFullName
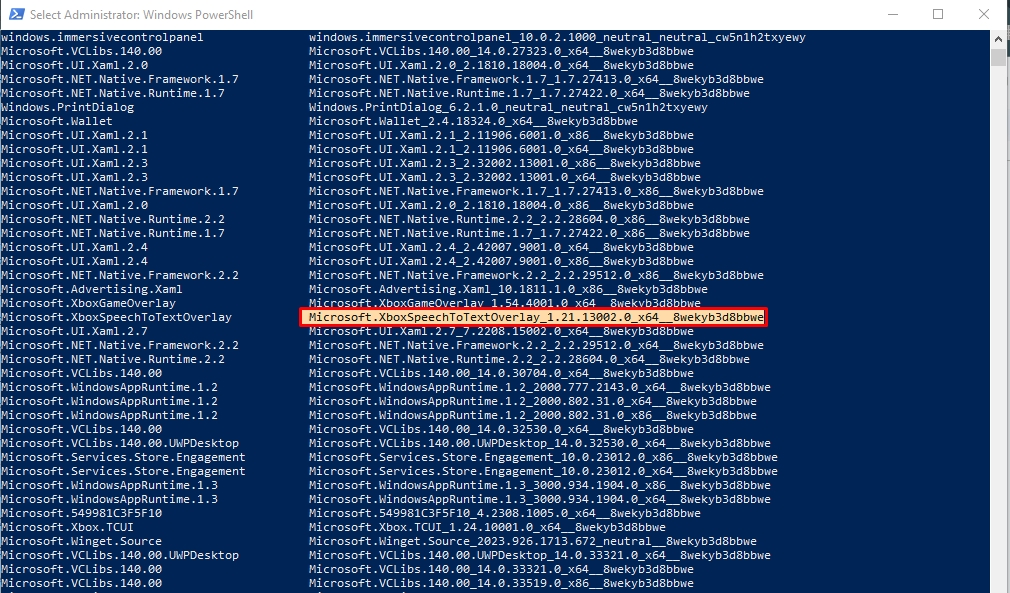
Step 3: Find the App You Want to Remove
- Scroll through the list and copy the PackageFullName of the app you want to uninstall.
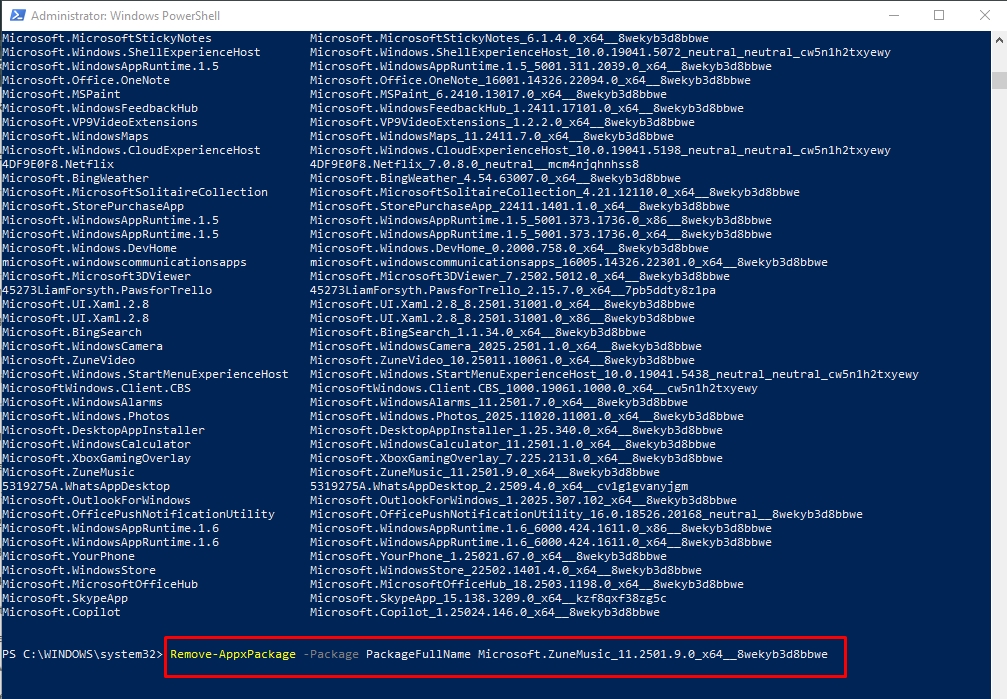
Step 4: Uninstall the App
- Now, run the following command, replacing PackageFullName with the app’s actual name:
Remove-AppxPackage -Package PackageFullName. Press Enter, and Windows will remove the selected system app.
That’s it. The app is now uninstalled. You can reinstall it from the Microsoft Store or use PowerShell commands if you need it.
How to Uninstall Programs with Windows 10 Without the Password
Are you trying to uninstall a program but don’t have administrator access? Some apps require admin privileges for removal, making it difficult to uninstall them without the password. Fortunately, a few workarounds can help, depending on your situation. Here’s how you can remove software without admin rights.
Method 01: Use Safe Mode for Stubborn Apps
Some programs are protected by background processes that prevent uninstallation under normal conditions. Restarting your PC in Safe Mode disables these processes, increasing the chances of successfully removing the app. Here is how it goes.
Step 1: Enter the Safe Mode
- Press Windows + I to open Windows Settings and visit the Update and Security tab.
- Now, click Restart Now under the Advanced Startup.
Img: enter-the-safe-mode.jpg
Alt: delete programs with windows 10 without the password
- Pro Tip: Alternatively, open the Power options from the Start menu, hold Shift, and click Restart to enter the safe mode.
Step 2: Restart the Computer in Safe Mode
- Once you enter Safe Mode, choose Troubleshoot > Advanced Options > Startup Settings > Restart. This will restart the computer.
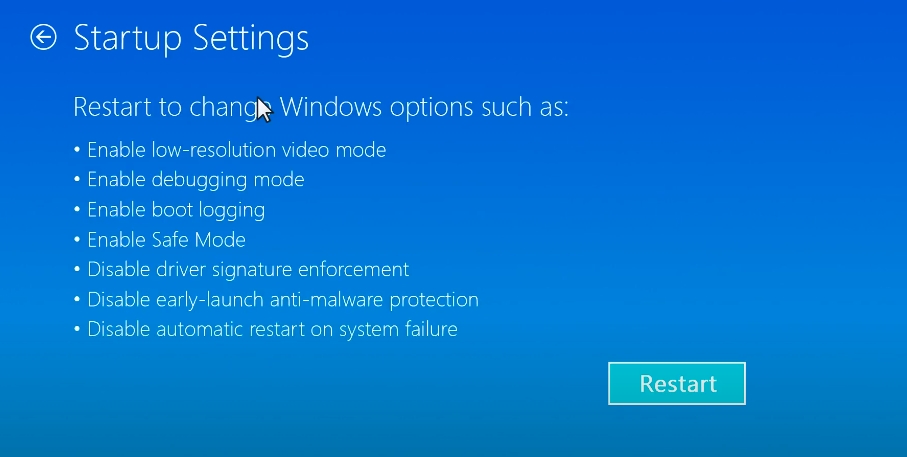
- From the Startup Setting menu, press 4 to restart the computer in safe mode.

Step 3: Delete Programs in Safe Mode
- Once you have booted into safe mode, open the Control Panel from the Start menu. Now, click Programs > Programs and Features.
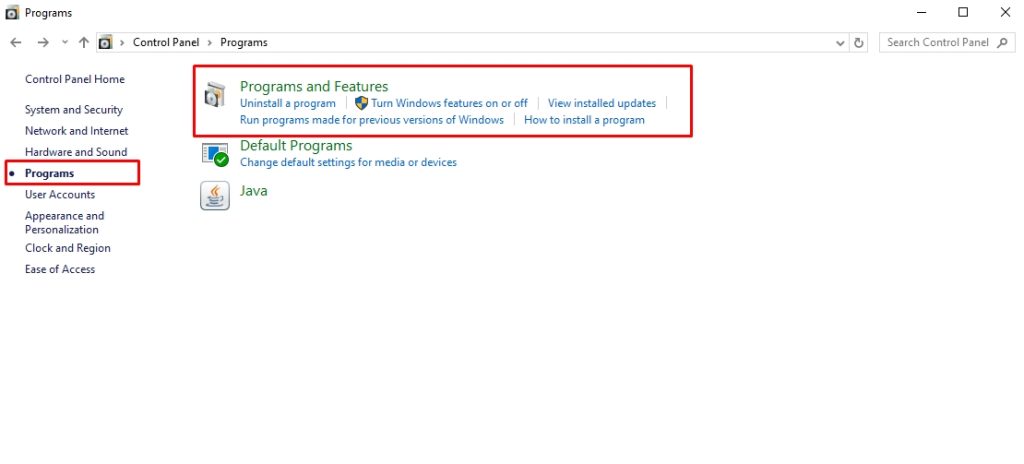
- Locate and right-click the program you wish to delete and select Uninstall. Congratulations, you’ve successfully removed it in safe mode.

Method 02: Create a Temporary Administrator Account
Creating a temporary administrator account might help if Safe Mode doesn’t work. This method works because Windows creates new administrator accounts without requiring the original admin password. Here is how it goes.
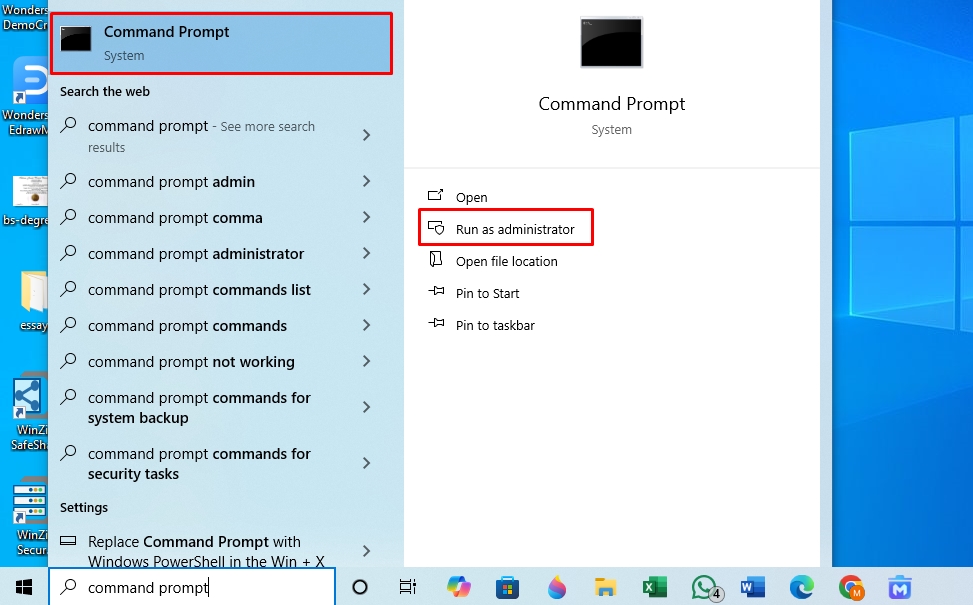
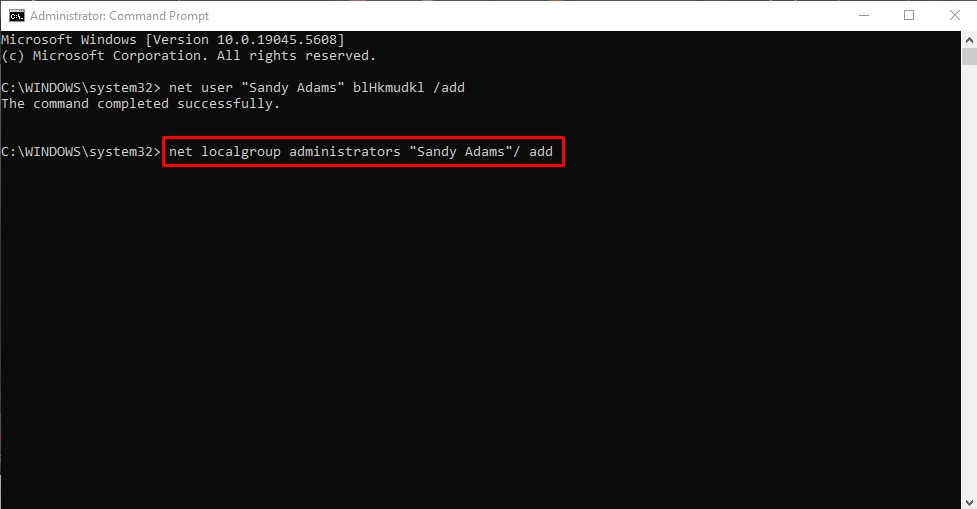
- Visit the Start menu and open Command Prompt as Administrator.
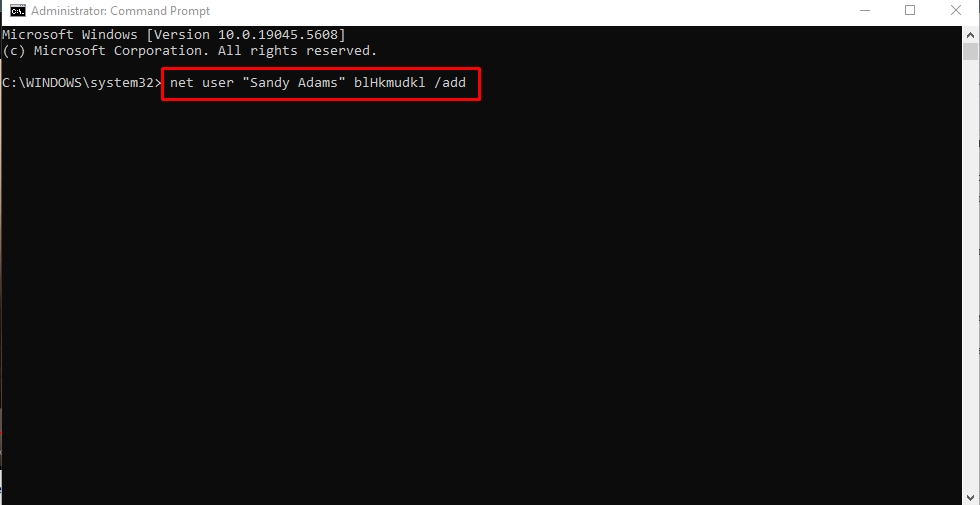
- Once the CMD opens, type the command; net user “TempAdmin user name” password / add
Replace the user name with a new user name and set the password. For instance, net user “Sandy Adams” blHkmudkl /add, and press Enter.
- Now, enter another command, net localgroup administrators user name/ add. Replace the user name in this command, and press Enter.
Now, visit the Start menu and log into the new TempAdmin account. Go to Settings > Apps, and uninstall the program as usual. Once done, you can delete the temporary admin account. This method works well if you have permission to create new accounts on the device.
Method 03: Use Master Uninstaller for Forced Removal
If the program refuses to uninstall through traditional methods, Master Uninstaller can help. This tool removes apps along with all associated files without requiring admin privileges. Open Master Uninstaller, locate the program in the dashboard and click Delete. When prompted, select Automatically Remove Software Remnants and confirm.
The software will force uninstall the program, ensuring no leftover files remain. That’s it. One of these methods should help remove the program without an admin password. If none work, consider resetting your Windows password or contacting your administrator.
How Do I Get to Program Files on Windows 10?
Need to find where your installed programs are stored? Windows organizes applications into two main folders: Program Files for 64-bit apps and Program Files (x86) for 32-bit apps. Here’s how to access them easily.
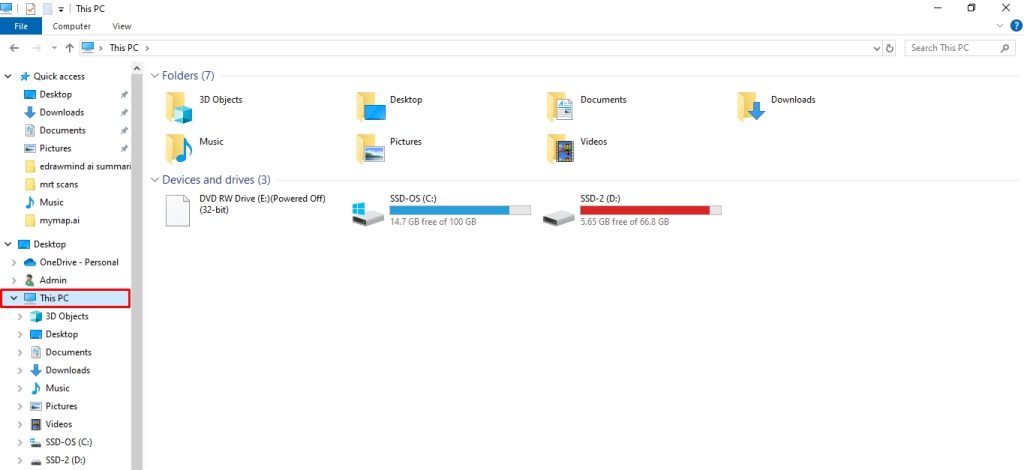
Step 1: Open This PC from File Explorer
- Press Windows + E to open File Explorer, where all your files and system folders are managed. Once there, click This PC from the left panel to view your available drives.
Step 2: Locate the Program Files Folder
- Double-click Local Disk (C:) and locate the Program Files folder. This is where Windows stores most 64-bit applications.
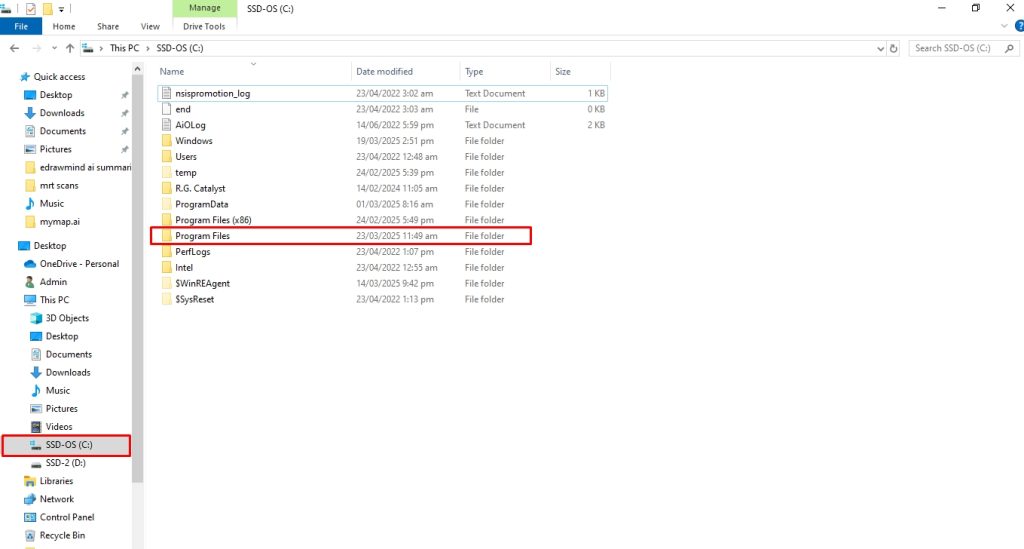
- If you’re looking for a 32-bit program, open the Program Files (x86) folder instead.
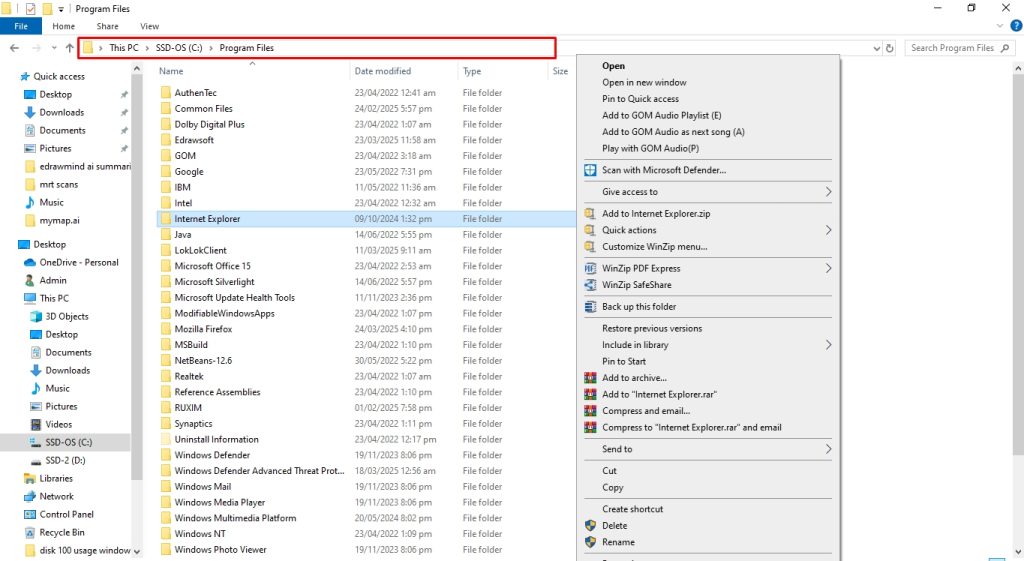
Step 5: Uninstall Programs Accordingly
- That’s it. Now you can access, modify, or delete program folders as needed. Be careful when changing, as deleting the wrong files can affect installed applications.
Why Master Uninstaller is the Best Third-Party Uninstaller for Windows 10?
Knowing how to uninstall programs on Windows 10 with an app gives you the perk of not going through several steps for a simple uninstalling process.
- Once you have downloaded the software, navigate to the All Programs folder and scroll through the app you want to uninstall. Now, click Bin Button > Automatically Remove Software Remnants > Ok.
Here’s why Master Uninstaller stands out among all the other third-party tools!
- Complete Residual Cleaning: Unlike standard uninstallers that leave behind registry traces and system clutter, Master Uninstaller automatically removes background-running processes, system traces, and unnecessary files. This keeps your PC clean and improves its overall performance.
- Easy-to-Navigate Interface: Designed for non-tech users, the straightforward dashboard categorizes apps into sections like preinstalled programs, Windows services, and bundleware. This makes it easy to locate and remove any unwanted software.
- Organized Program Categories: Master Uninstaller simplifies app management by categorizing programs into folders like Windows Services, Bundleware, Large Programs, and Residual Software. This helps you track and remove unwanted software effortlessly.
- Bundleware Uninstallation: Some programs install unnecessary apps without your knowledge. Master Uninstaller detects and lists these unwanted additions, so you can remove them in one go and prevent performance issues.
- Blacklisting Functionality: Ever had a stubborn program that keeps reinstalling itself? With the blacklisting feature, you can block such apps from making unwanted comeback attempts.
FAQs
Q:
How do I uninstall apps that won’t uninstall?
If a program refuses to uninstall, try using Safe Mode, PowerShell commands, or a third-party uninstaller like Master Uninstaller. Some apps protect their files in the background, so restarting in Safe Mode disables these processes, allowing you to remove stubborn software without errors or leftover files.
Q:
Can I reinstall an app after uninstalling it?
Yes, if you uninstall an app, you can reinstall it anytime from the Microsoft Store, official website, or installation file. However, some programs may lose saved settings after removal, so back up important data before uninstalling if needed. For system apps, you may need PowerShell commands to reinstall them.
Q:
What happens if I delete program files manually?
Deleting program files can break functionality, leaving registry entries and background processes behind. This can cause system errors or prevent future reinstallations. Instead, always use the built-in Windows uninstaller or a tool like Master Uninstaller to remove apps, ensuring no leftover files or registry clutter remain.
Q:
How do I remove Windows 10 bloatware?
Windows 10 comes with preinstalled apps that can’t always be uninstalled usually. Use PowerShell commands like Get-AppxPackage to remove them, or try a third-party tool for forced removal. If you want a fresh start, resetting Windows allows you to remove all bloatware while keeping your files.
Q:
Are third-party uninstallers safe?
Yes, but only reputable ones like Master Uninstaller and IObit. These tools ensure the complete removal of apps, including registry traces and hidden files. Avoid random uninstallers from untrusted sources, as they may contain malware or fail to properly remove software, leaving security vulnerabilities on your PC.
Final Words
Proper program removal starts with keeping your Windows 10 PC clean and optimized. Whether you use built-in methods like Settings and Control Panel, advanced tools like PowerShell, or a third-party uninstaller for stubborn apps, choosing the correct method ensures a complete cleanup.
If a program refuses to uninstall, don’t panic. Safe Mode, temporary admin accounts, and Master Uninstaller can help you remove even the most persistent software without leaving behind traces.
Now that you know how to uninstall programs with Windows 10, it’s time to free up space, boost performance, and take control of your system.
Master Uninstaller
-
Simple and Practical: Easily uninstall unwanted software.
-
Thorough Cleanup: Completely remove residual files.
-
Blacklist Protection: Identify and block malware and adware.
How to Clean Registry in Windows 11 | A Complete Guide
The Windows registry is a hidden yet essential part of the computer operating system. Entries are created in the registry whenever you install new hardware or apps. But here’s the catch: the entries aren’t removed even if you uninstall those apps.
Over time, the registry becomes cluttered with numerous obsolete entries. This clutter invites system errors, which can cause the PC to start lagging and decrease the overall user experience. Registry clean-up is a good option to stabilise system performance.
However, the Windows registry is a dangerous place to make changes, and every step should be taken cautiously. In this guide, we’ll explore how to clean the registry on Win 11 safely without disrupting the PC’s regular system.
What is a Windows Registry?
Before discussing the cleaning methods for the Windows 11 registry, it is crucial to understand how it works. The Windows registry is a complex database that stores everything from configuration settings to user preferences.
This database structure is organised in a hierarchical collection of keys, subkeys, and values. At the highest level, it has five main sections called hives. These hives store essential data about how Windows and installed programs work.
Each hive’s backup file is stored on the computer. The only exception is the hive HKEY_CURRENT_USER, which contains settings for the logged-in user. This one is stored in the folder C:\Windows\System32\Config.
Here’s a brief overview of those five hives with their common acronym.
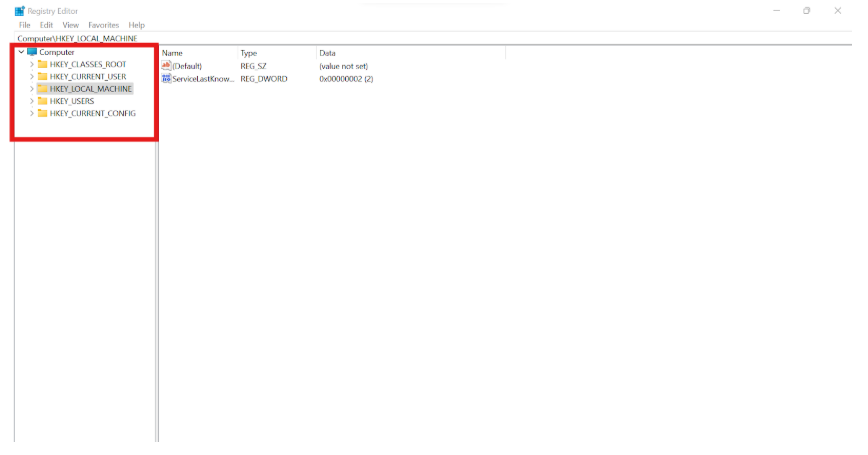
- HKEY_CLASSES_ROOT (HKCR). This hive stores file-type associations. It decides which programs open specific file types, such as PDFs opened with Adobe. It also holds information for particular system components.
- HKEY_CURRENT_USER (HKCU). This hive contains the settings for the user currently logged in. That means it will include everything from desktop preferences, network connections, and installed apps to other personalised settings.
- HKEY_LOCAL_MACHINE (HKLM) contains all information about the computer itself, including hardware, drivers, system settings, security data, and startup configurations.
- HEKY_USERS (HKU) stores settings for all user accounts, including the default user and any guest or Microsoft accounts.
- HKEY_CURRENT_CONFIG (HKCC). This section contains the current hardware setup, including active device settings, drivers, and Windows details.
Precautions to take for Registry Clean-Up
Cleaning the Windows registry can give your PC the much-wanted performance upgrade. However, there are certain dos and don’ts of doing that. A single wrong modification can lead to complex software malfunctions and instability. Here are some of the precautions you need to take before getting started.
- Research the entries before deleting them.
- Use reliable registry cleaners and tools.
- Back up the registry.
Tip: Double-check and note down all the changes you make to ensure your data is safe if troubleshooting is needed later.
How to back up the Registry File?
Before making changes to your Windows Registry, creating a backup is essential to avoid potential system issues. A backup allows you to restore settings if something goes wrong. Follow these quick steps to safely back up your registry before proceeding with any modifications.
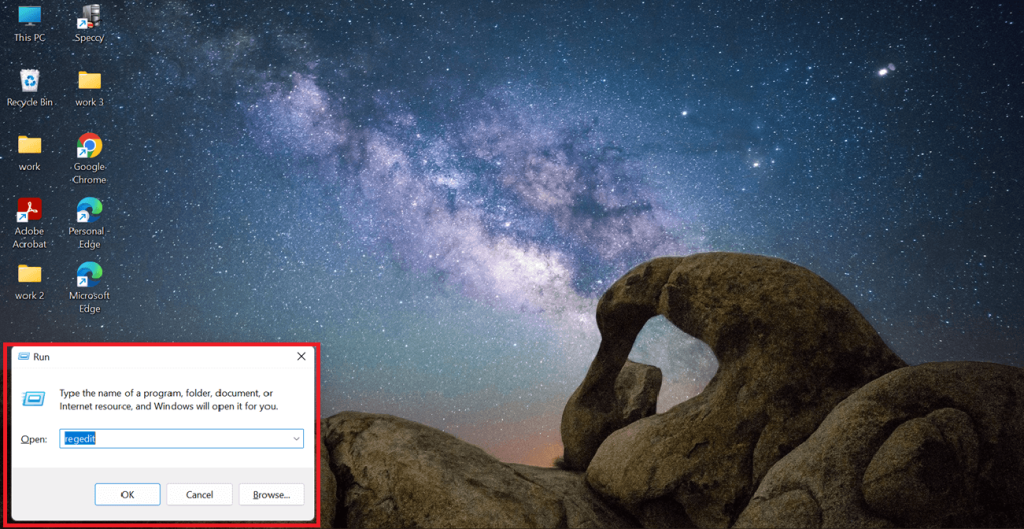
Step 1: Open the Run Dialog Box
- Start by pressing Win + R to open the Run dialogue. Then type regedit and hit Enter.

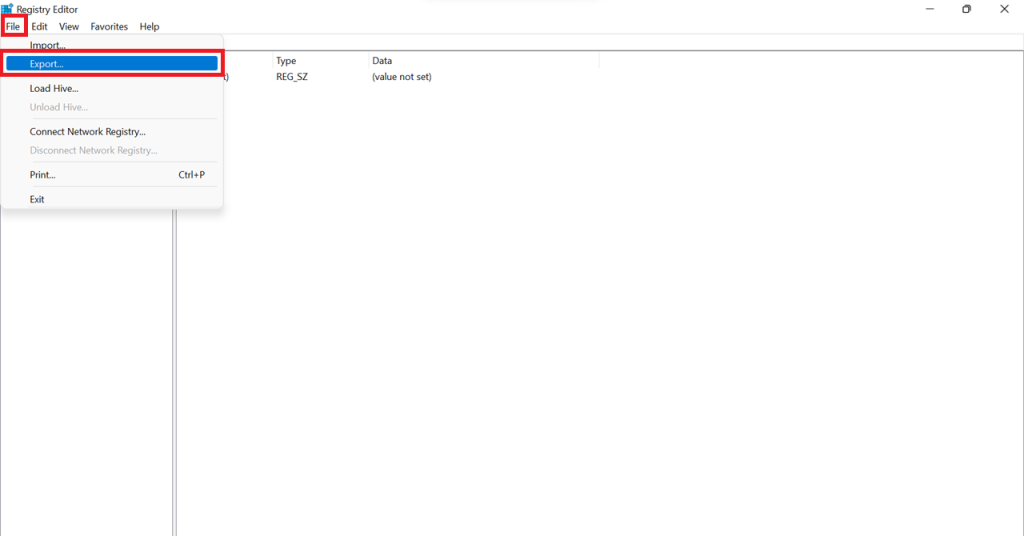
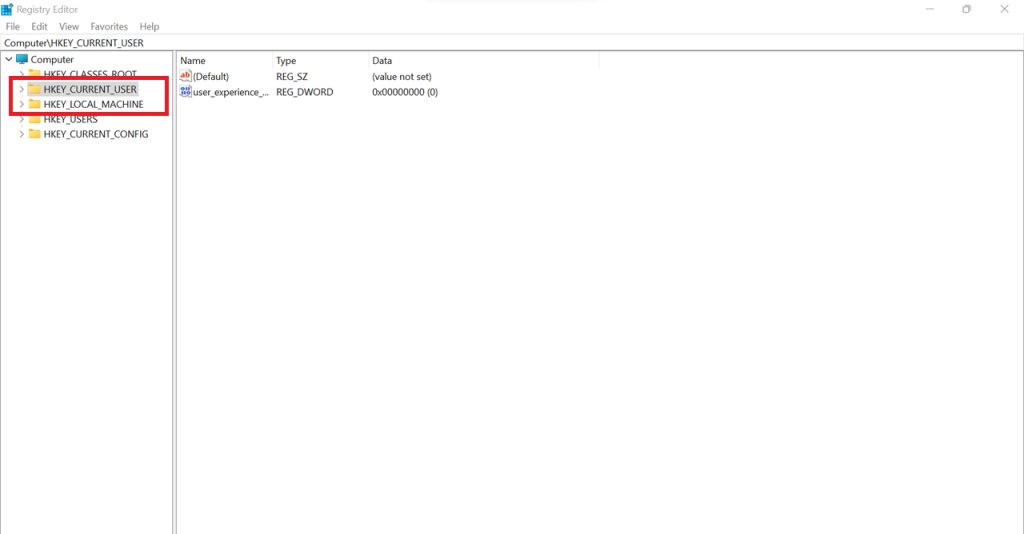
Step 2: Export the Registry File
- The Registry Editor window will open. Select all the hives you want to back up. Click on File in the upper left corner and select Export from the menu.
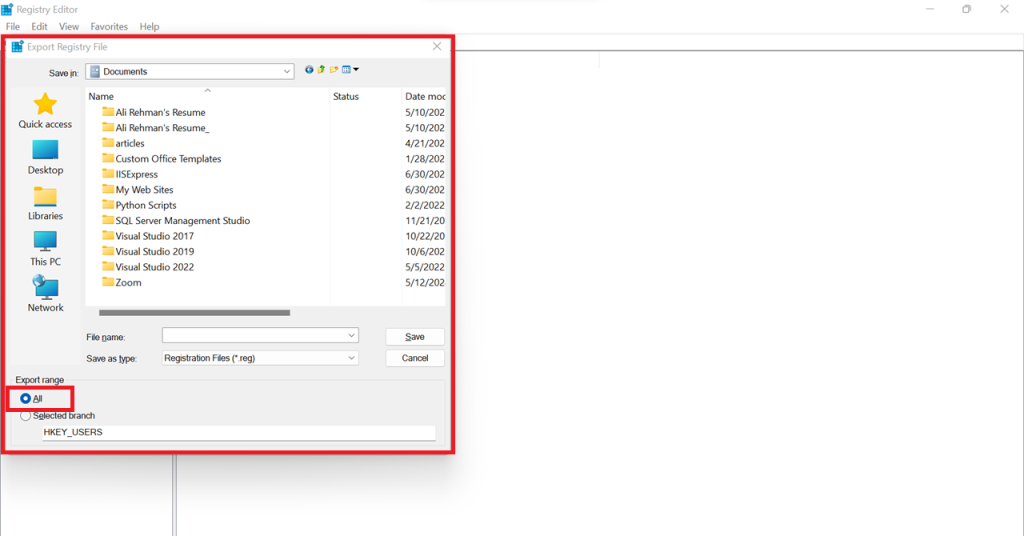
Step 3: Save the Backup Securely
- The Export Registry File dialogue will open. Select a safe location and name the file, for example, RegistryBackupFile. Remember to choose All under the Export range before clicking Save.
Win 11 Registry Cleanup | 4 Quick Methods
Now that you know the necessary preparation, let’s move on to how to clean the Windows 11 registry using four different methods.
Method 1: How To Clean Windows Registry Via Master Uninstaller
If you’re not an expert and have limited knowledge about registry cleaning, third-party uninstaller apps like Master Uninstaller are your best bet. They provide a safer and more efficient alternative to manually cleaning the registry, reducing the risk of accidental system errors. Unlike manual methods, Master Uninstaller automates the process, ensuring a thorough cleanup while saving time and effort.
What makes Master Uninstaller stand out is its one-click software and residual file scan, which allow users to remove leftover files effortlessly. Its beginner-friendly interface makes it accessible to all users, even those with minimal technical experience. Additionally, it helps detect and remove unknown bundleware, freeing up valuable system space. Now, let’s explore how to clean the registry using Master Uninstaller.
Step 1: Access Master Uninstaller
- Start by launching and accessing the Master Uninstaller from your desktop or the Start menu.
Step 2: Search for the Residual Software
- Once there, head to the Residual Software section. Here, you’ll find all the hidden remnant files that may be present on your PC. Select the ones you want to delete and click on Clean on the right.
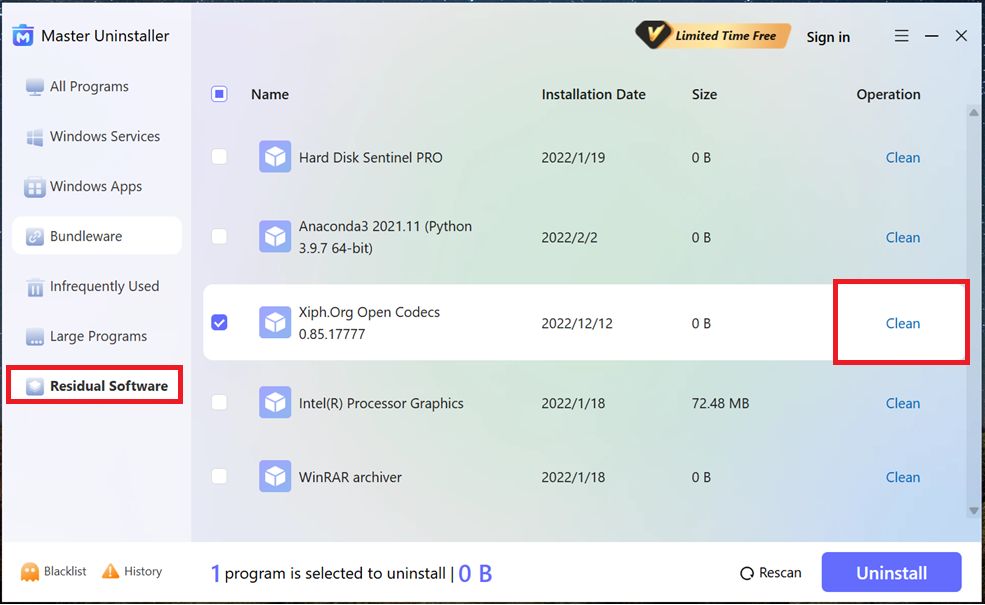
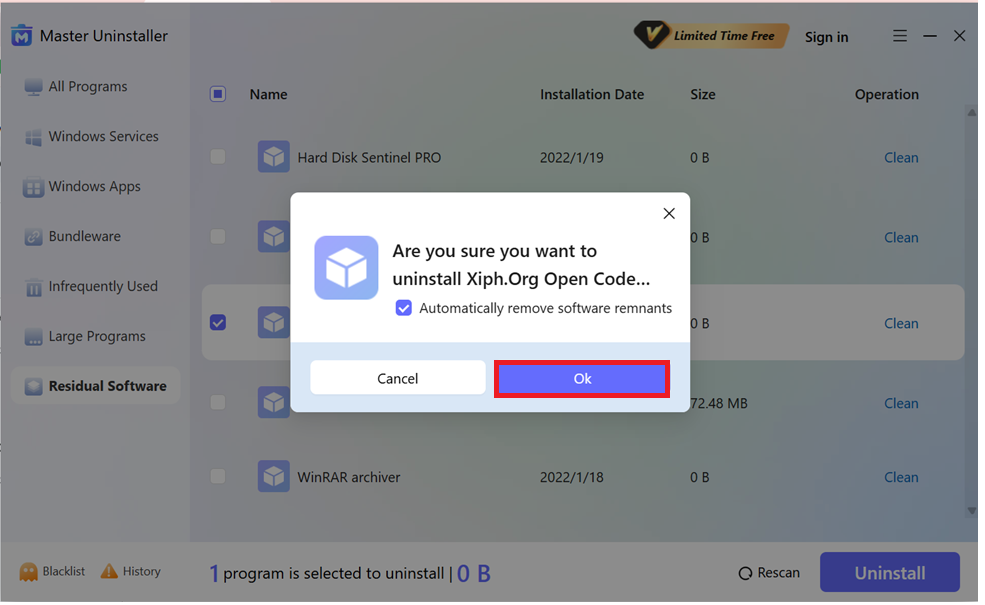
Step 3: Uninstall the Entries
- Once you hit the Bin symbol, a confirmation dialogue will appear. Click Ok to proceed with the cleanup.
And that’s it! Your system is now free of useless registry entries in a few simple steps.
Method 2: How To Clean Windows Registry Via Disk Cleanup
Windows 11 doesn’t have a dedicated tool for registry cleaning, so Disk Cleanup keeps you sorted for that. With Disk Cleanup, you can delete all the files containing unnecessary data. Naturally, when the data is deleted, the related registry entries will also be deleted.
Pretty neat? Follow these steps to do it yourself.
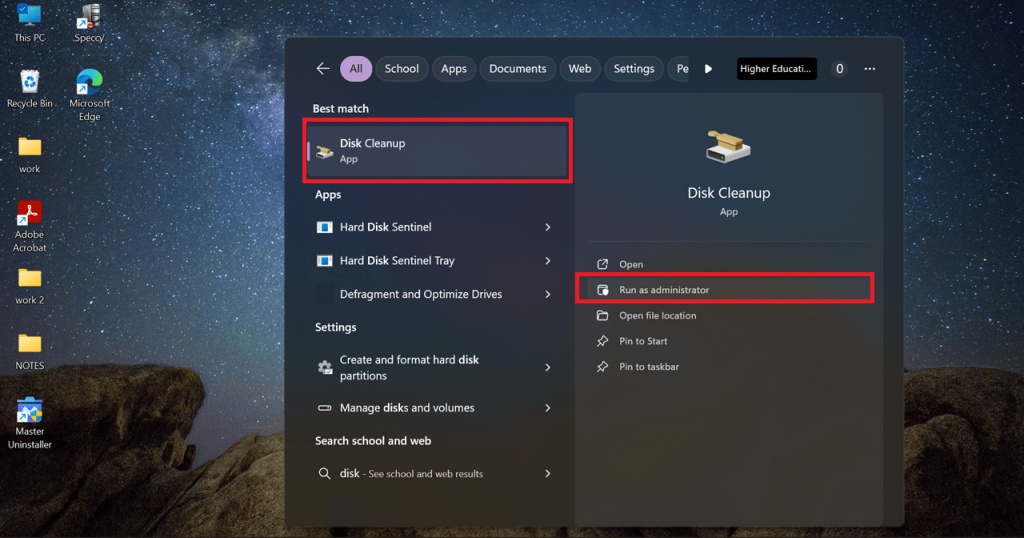
Step 1: Open Disk Cleanup as Administrator
- Press the Win key to open the search bar. Type Disk Cleanup, then choose Run as administrator, and hit Enter.
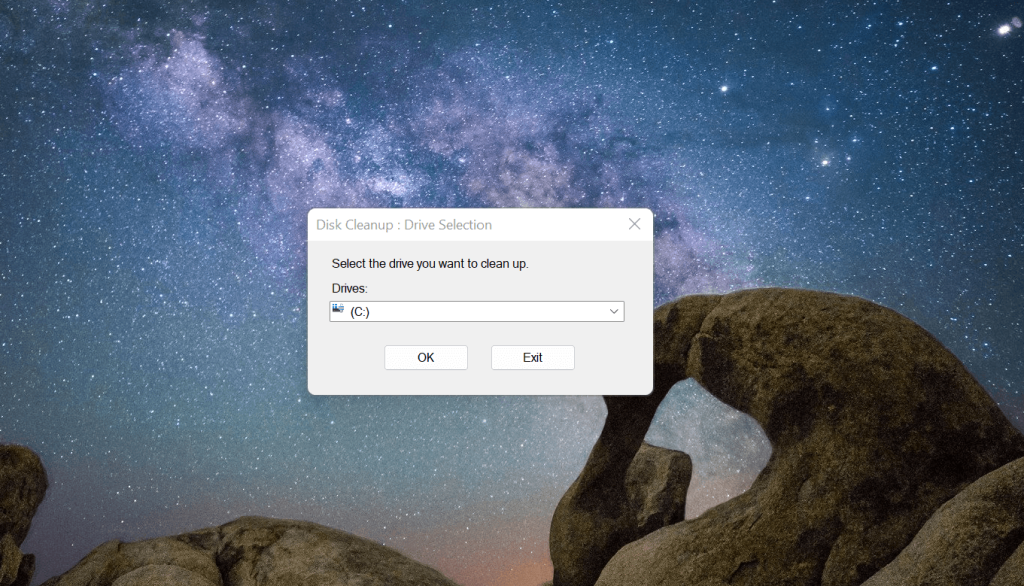
Step 2: Select the System Drive
- Once loaded, the Disk Cleanup dialogue will appear. Then select the system drive you want to clean (usually C:).
Step 3: Choose Files to Delete
- Under Files to delete, you’ll see various files. From there, check options like Temporary Files, System Files, or the file you want to remove.
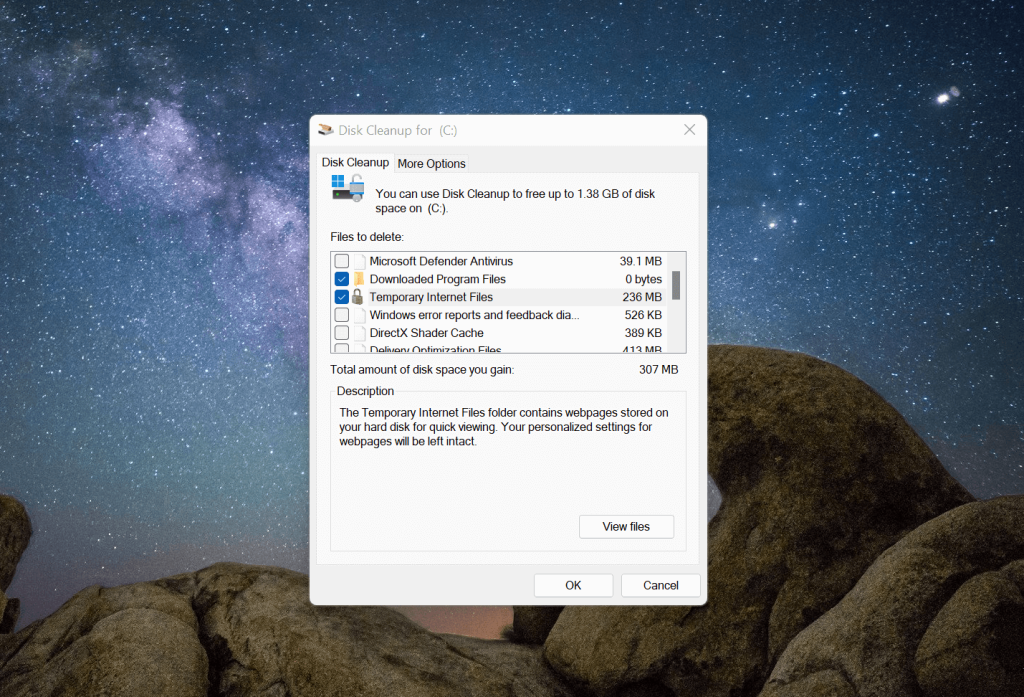
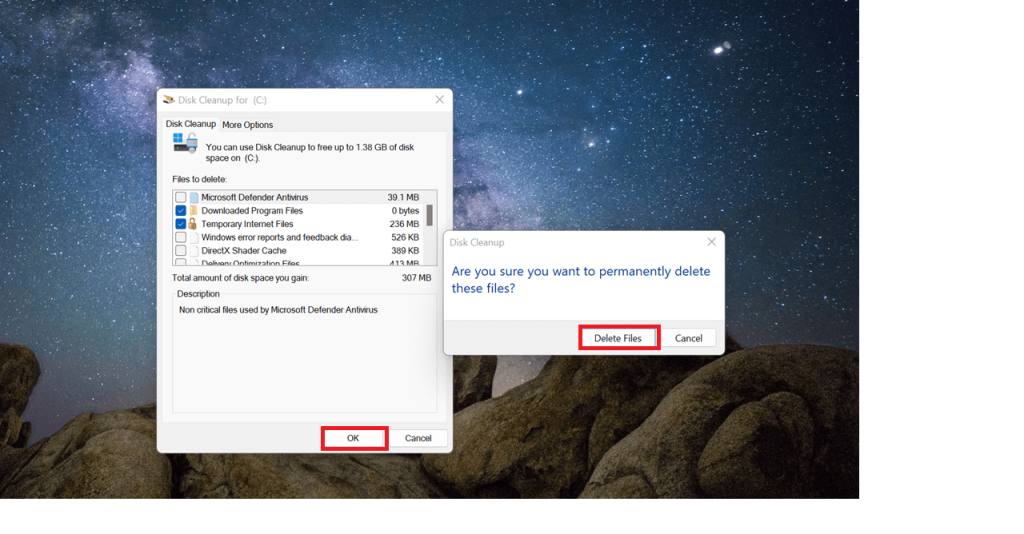
Step 4: Perform Deep Cleanup
- Select Clean up system files for a deeper cleanup. Finally, click OK to delete the selected files.
How To Clean Windows Registry Via DISM tool
Intimidated by using the Registry Editor? DISM tool is another safe method to help you clean the registry. Let’s say you use the DISM tool to repair any corrupted or missing system files. All the registry issues will be resolved automatically since the Windows registry relies on those files.
Here’s how you can use the DISM tool.
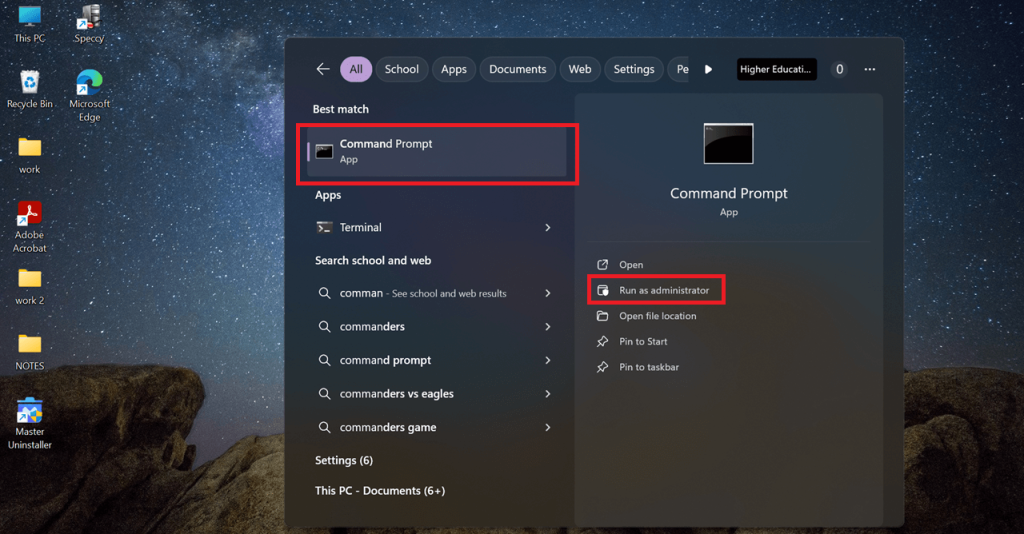
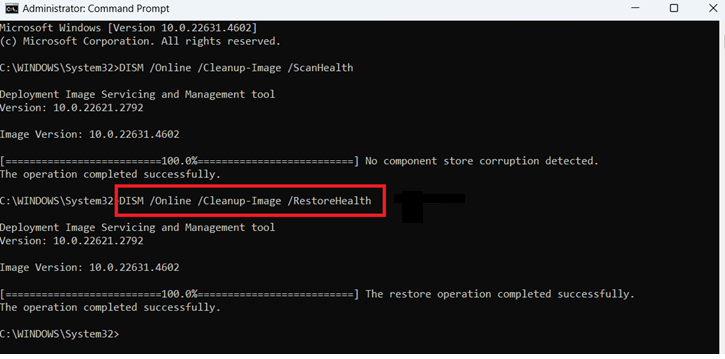
Step 1: Open Command Prompt as Administrator
- Open the Windows search bar and type Command Prompt. Select Run as administrator and double-click to get started.
Step 2: Scan for Issues
- A black dialogue box will appear. Navigate to where the text cursor is blinking and type the command. DISM /Online /Cleanup-Image /ScanHealth. Hit Enter to start the image scan. Be patient because the scanning part takes a few minutes.
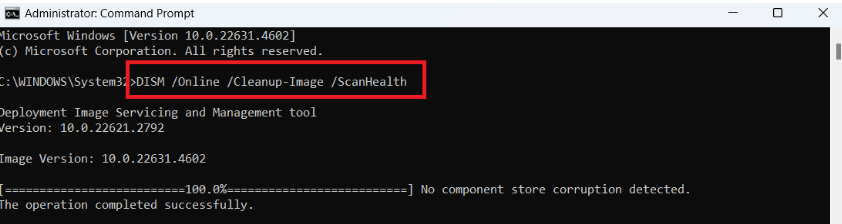
Step 3: Restore and Fix
- Once the scan is completed, run the second command. DISM /Online /Cleanup-Image /RestoreHealth to repair any issues detected.
1. How To Clean Windows Registry Via Registry Editor
This method is for expert users who are confident about tweaking the Registry Editor. However, remember to be careful. One wrong click can mess up the entire registry. Follow our precautions and preparation tips to avoid any mishaps. Let’s see how to clean the Windows 11 registry manually. To clean up deleted apps or software entries, follow the below steps.
Step 1: Open Registry Editor
- Open the Run dialogue by pressing Win + R. Type regedit and hit Enter.

Step 2: Navigate to Uninstall Keys
- The Registry Editor window will appear. From there, navigate to the path below to delete outdated entries.
HKEY_LOCAL_MACHINE\SOFTWARE\Microsoft\Windows\CurrentVersion\Uninstall
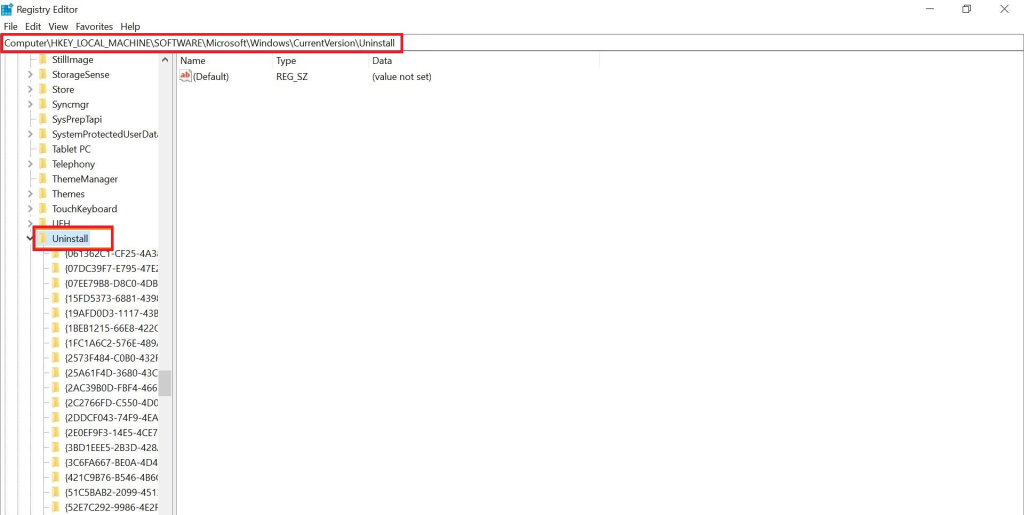
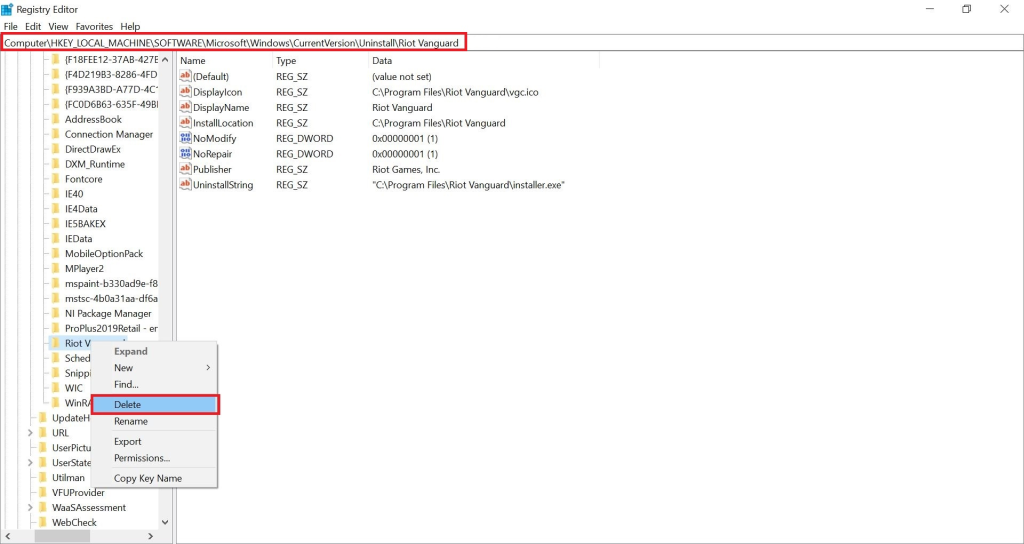
Step 3: Delete Outdated Entries
- Search for the subkeys related to the software you uninstalled and delete it.
Imp: Remember that you’ll have to repeat the process for other hives. For example, if you want to delete entries from the current user hive, you’ll navigate to:
HKEY_CURRENT_USER\Software\Microsoft\Windows\CurrentVersion\Uninstall
Benefits of Cleaning Windows Registry on Win 11
According to Microsoft, even trillions of unused entries wouldn’t slow down your computer that much. However, in the long run, having a clean and up-to-date registry could be beneficial if done carefully. Let’s explore its benefits:
- Fix errors and system crashes. Corrupted system files are the worst. They cause applications to crash or simply fail to run. Registry cleaning helps remove broken links and invalid or outdated keys before they cause more significant problems.
- Improve your system performance. When you fix errors and repair system crashes, it is evident that the PC’s health will also improve. This improvement will help remove any delays in processing requests.
- Free up system resources. Broken registry entries take up a lot of system resources like RAM, storage and processing power. Regularly performing registry cleanup can provide more space and a smoother user experience.
FAQs about Cleaning Win 11 Registry
Q:
Why should I clean my Windows registry?
Cleaning your registry means removing invalid entries. Clearing these redundant entries can free up disk space, improve startup speed, and reduce lag. You should consider doing this, especially after uninstalling a program or in case of specific performance issues.
Q:
What are the common registry issues to avoid?
While it is advised to avoid cleaning unknown registry entries altogether. Some crucial issues that should be avoided at all times are:
1. Deleting or modifying critical Windows components.
2. Over-cleaning, leading to software errors.
3. Using unknown and unreliable tools.
1. Deleting or modifying critical Windows components.
2. Over-cleaning, leading to software errors.
3. Using unknown and unreliable tools.
Q:
Does a registry cleaner speed up my PC?
A registry cleaner can boost system performance in cases like invalid entries affecting response time. But more than that, a registry cleaner is most effective for safely carrying out the cleaning procedure without the usual manual cleaning.
Q:
What to do if an unexpected problem occurs?
If an unexpected error occurs, the first and foremost thing to do is to stop the process immediately. Restart your computer and then use the registry backup that you previously made to undo all the changes.
Keep your PC clean and secure
There you have it. With these registry cleaning methods and tips, you can clean up your Windows 11 registry without hassle. Always make sure you have created a backup file before making any changes. Avoid manually cleaning your registry and opt for built-in tools like Disk Cleanup or third-party registry cleaners like XYZ Cleaner. Tools like this are more risk-free while offering the same level of control. By following our guidelines, you can clean the registry of Windows 11 smoothly and efficiently.
Master Uninstaller
-
Simple and Practical: Easily uninstall unwanted software.
-
Thorough Cleanup: Completely remove residual files.
-
Blacklist Protection: Identify and block malware and adware.
How to Remove Items from Startup in Windows 11 | A Complete Guide
Is your PC taking forever to start? You press the power button and expect it to boot normally, but all you get is waiting as background applications quietly begin. These startup applications automatically load when you start your PC, taking up memory and slowing things down.
The truth is that some startup programs are necessary, but all aren’t. They consume system resources, have a slow starting time, and leave your PC with endless loading time. The good part is that you do not have to tolerate this much.
This article will discuss three different methods for removing items from startup in Windows 11. Whether you prefer built-in settings, the Task Manager, or third-party tools, we have you covered.
What Are Startup Programs?
Startup programs are applications that automatically launch when you turn on your PC. These applications run in the background so that they are immediately available, and the user doesn’t have to find them manually. Some software, like antivirus or cloud storage apps, is essential for startups for security and productivity, while others aren’t.
Many programs enable startups without direct permission. Applications such as messaging platforms, game launchers, and auto-updaters set themselves to run during system startup, which increases background processes. Repeatedly doing this can hinder your system’s load time, consume more memory, and lower the system’s overall performance.
When your PC takes longer than average to boot, you must remove apps from startup in Windows 11. Turning off specific start-up applications can free up system memory and boost speed. Properly managing startup programs enables you to maximize your PC’s performance effortlessly without sacrificing its capabilities.
How to Remove Startup Programs in Windows 11 | 3 Methods
Disabling unnecessary startup programs is a simple yet effective way to boost system performance. However, if not done correctly, some programs may continue running in the background, affecting speed and responsiveness. To help you, we’ve outlined five proven methods to remove programs from the PC startup menu in Windows 11.
1. Disable Startup Programs via Task Manager in Windows 11
If your PC takes too long to boot, unnecessary startup programs might be the cause. Using Task Manager, you can quickly disable unwanted startup apps and improve performance. Follow these steps to manage startup programs in Windows 11.
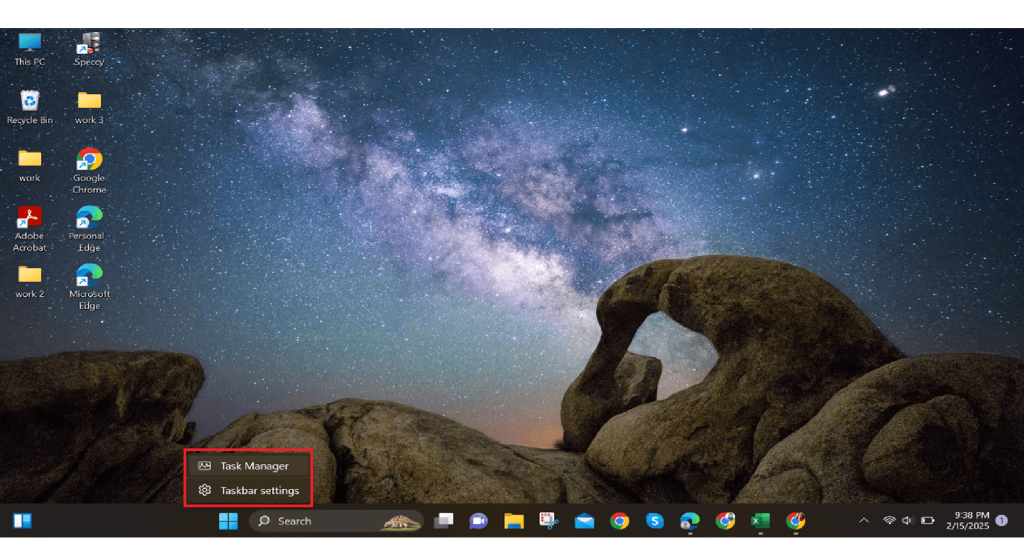
Step 1: Open Task Manager
- Press Ctrl + Shift + Esc to open Task Manager instantly. Alternatively, you can right-click the taskbar and select Task Manager.
Step 2: Navigate to the Startup Tab
- In Task Manager, click the Startup Apps tab from the upper menu. This will display all programs that launch when Windows starts.
Note: Startup App options can also be present on the right-hand side.
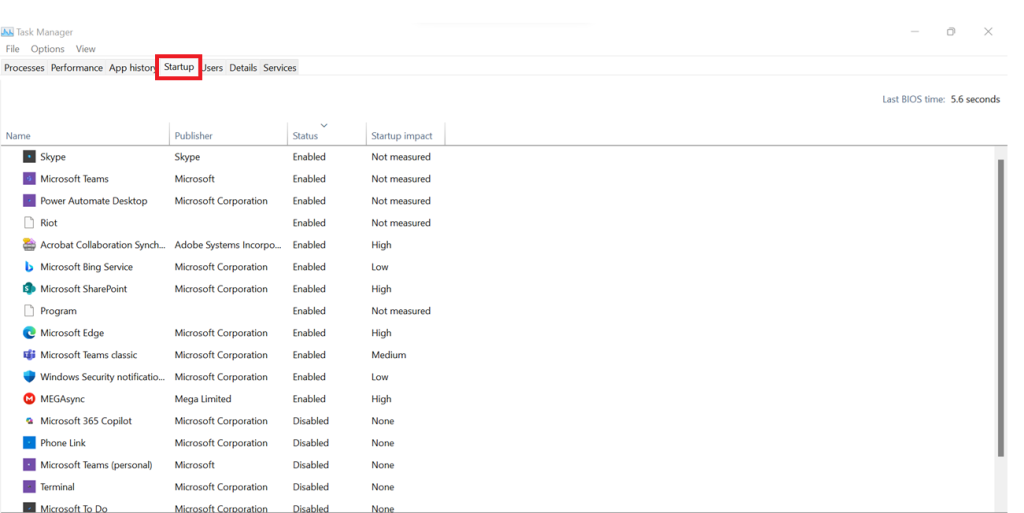
Before you disable programs, consider their Startup Impact, which Windows automatically assigns according to their impact on startup time:
- High Impact: Slows startup significantly. Disable only if required (e.g., antivirus, drivers).
- Medium Impact: Affects startup speed moderately. It is safe to disable unless used very heavily.
- Low Impact: Little or no effect on startup time. Disabling it may not be noticeable.
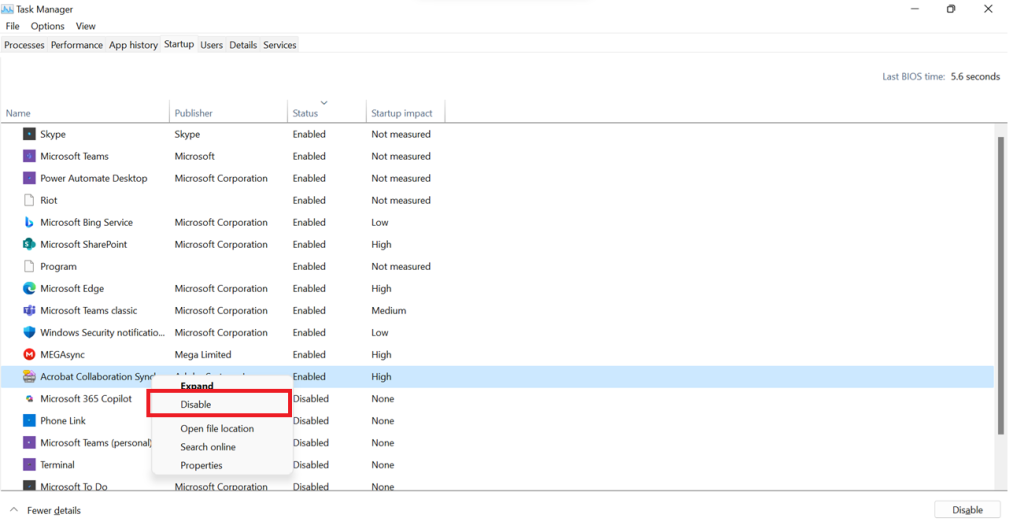
Step 3: Disable Unnecessary Startup Programs
- Scroll down the list and find unnecessary high—or medium-impact apps. Right-click on an app and select Disable. Repeat for all unnecessary apps.
2. Remove Startup Programs via Settings App in Windows 11
Windows 11 lets you control startup programs using the Settings app, providing a convenient method to turn off unwanted applications. Nevertheless, this menu will not find specific applications because of system limitations. To disable startup programs using Settings, follow these instructions.
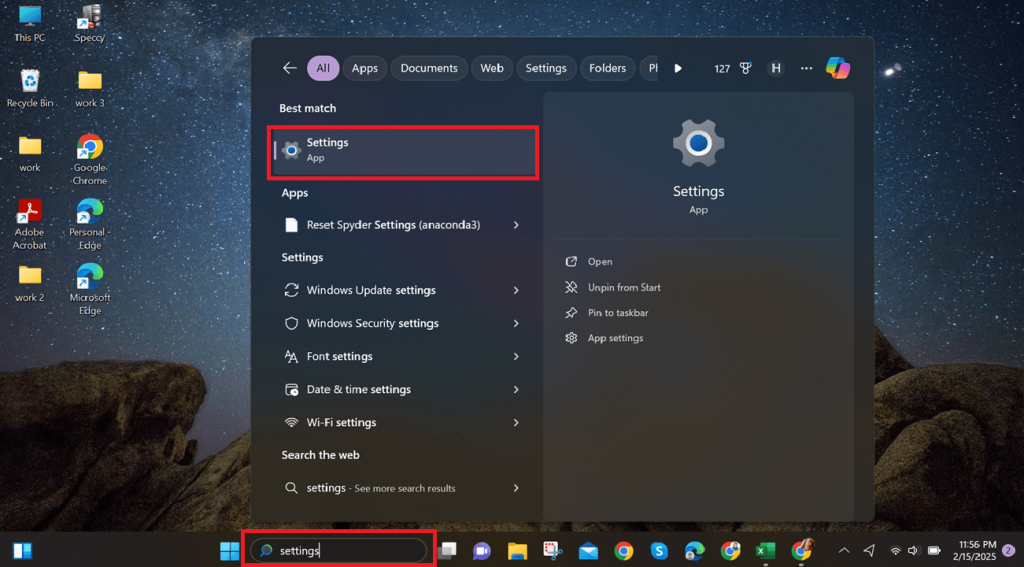
Step 1: Open the Settings App
- Press Win + I to open Settings immediately. Alternatively, search for Settings in the Windows search field and open the app.
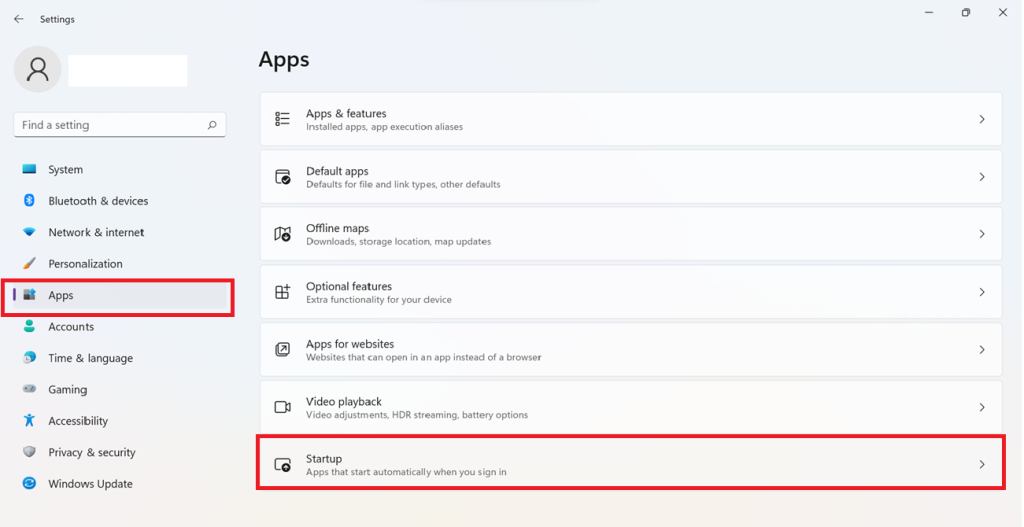
Step 2: Navigate to Startup Apps
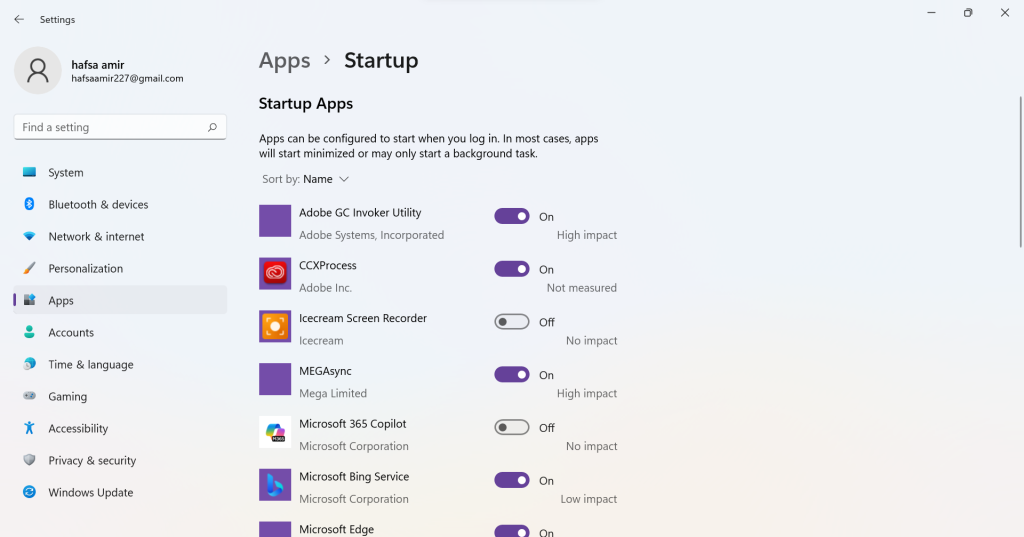
- In the Settings, navigate to Apps > Startup. This will display a list of apps that run at startup and toggles to enable or disable them.
Step 3: Disable Unwanted Startup Apps
- Now, look for apps you do not require at startup. Toggle off to disable them, but be careful of the startup impact.
3. Remove Startup Programs via Windows Registry
If you want complete control over which programs run at startup, the Windows Registry allows you to remove startup entries manually. However, this method is for advanced users since modifying the Registry incorrectly can cause system issues. Follow these steps carefully.
Step 1: Open the Windows Registry Editor
- Press Win + R, type regedit, and hit Enter. Then, click Yes at the User Account Control (UAC) prompt to proceed.
Step 2: Navigate to the Startup Entries
In the Registry Editor, go to the following files locations:
- HKEY_CURRENT_USER\Software\Microsoft\Windows\CurrentVersion\Run
This section contains startup programs for your user account. To manage system-wide startup programs, navigate to:
- HKEY_LOCAL_MACHINE\Software\Microsoft\Windows\CurrentVersion\Run
Step 3: Identify and Delete Unwanted Entries
- Look for programs you don’t want to start automatically. Right-click the unwanted entry and select Delete. Confirm by clicking Yes.

5 Benefits of Removing Unnecessary Startup Programs
An unorganized startup program can significantly decrease the efficiency and speed of your PC. Deleting unused startup programs frees up memory, increases efficiency and gives you a smoother overall experience. Here’s why it is essential:
1. Faster System Startup
If several programs are enabled at startup, it will take for your PC to power up. Waiting can be frustrating, especially if you need to start working immediately. Disabling unnecessary active applications allows for lower Windows 11 load time, improving your experience and running smoothly.
2. Improved System Performance
Even after powering up, programs in the background still consume RAM and CPU power, affecting overall speed and responsiveness. As a result, your system may feel laggy, making multitasking difficult. After removing unwanted startup programs, your PC operates more efficiently and functions at its peak while working, gaming, or browsing.
3. Reduced System Crashes & Freezes
When many apps compete for system resources, the risk of crashing, freezing, or sudden slowdowns increases. This is frustrating and disrupts productivity. Managing startup programs reduces system stress, lowers errors, and keeps your PC running optimally.
4. Better Battery Life
On laptops, startup programs run in the background, consuming power even when you are not actively engaged. Over time, this consumes battery life faster. Disabling unnecessary apps conserves power, allowing your laptop to last longer on a single charge.
5. More Control Over Your PC
Some programs install in the startup automatically without your knowledge, running processes you do not need. This not only slows down your system but also compromises security. By managing startup programs, you decide which apps run in the background, keeping your PC streamlined and secure.
FAQs
Q:
Can I safely disable all startup programs?
Not all startup programs should be disabled. Essential ones, like security software and drivers, should remain enabled. However, disabling non-essential apps, such as messaging tools or game launchers, is safe and helps improve system performance without affecting core functionality.
Q:
Will disabling startup programs speed up my PC?
Yes, disabling unnecessary startup programs can speed up your PC. Fewer programs running at startup reduce system load, leading to a faster boot time and improved overall responsiveness. This helps free up RAM and CPU resources for other tasks, making your PC run smoothly.
Q:
How do I re-enable a disabled startup program?
To re-enable a startup program, open Task Manager, navigate to the Startup tab, find the disabled program, and click Enable. You can re-enable it through Windows Settings > Apps > Startup by toggling it back on. A system restart may be required.
Q:
What if an app reappears in a startup after disabling it?
Some apps automatically add themselves back to the startup. To prevent this, check the app’s settings and disable auto-start options. If the issue persists, remove it from the Task Manager or Windows Settings or use a third-party startup manager to block it permanently.
Final Words
Managing startup programs is one of the simplest yet most effective ways to boost system performance. Disabling unnecessary startup apps can reduce boot times, free up system resources, and prevent lagging issues.
While built-in tools like Task Manager and Windows Settings offer quick fixes, more advanced users can leverage the Registry Editor for more profound control. Regularly reviewing your startup list ensures that only essential apps run at boot, keeping your PC optimized and responsive. Take charge of your system, a clutter-free startup means a faster, smoother computing experience.
Master Uninstaller
-
Simple and Practical: Easily uninstall unwanted software.
-
Thorough Cleanup: Completely remove residual files.
-
Blacklist Protection: Identify and block malware and adware.
Define Uninstall: A Beginner’s Guide to Software Removal
Many people use uninstall and delete interchangeably, leading to the misconception that they have the same meaning. But that’s not true.
While deleting means removing something, we can define uninstall as a process of thoroughly getting rid of unnecessary programs and their associated files. Common situations where users need to uninstall include freeing up space, troubleshooting issues, or removing outdated software, making it crucial for your device’s efficiency and organization.
Here is a quick rundown of the basics of uninstallation and how to uninstall programs from different devices. So, dive right in!
Difference Between Uninstallation and Deleting
Have you ever wondered why simply deleting a program doesn’t free up much space? That’s because deleting and uninstalling meanings are different. Deleting a file or app shortcut removes that specific item but doesn’t erase the actual program. Think of it as throwing away a book cover while it remains on the shelf. However, we define uninstall as completely removing a program and all its associated files and settings, like cleaning up after a guest leaves to ensure nothing is left behind.
If you only delete an app, hidden files, cache, and registry entries might still linger, taking up valuable space and sometimes even slowing down your system. Proper uninstallation removes all software traces, keeping your device clutter-free and running smoothly. To free up storage and avoid unnecessary leftovers, always uninstall instead of just deleting.
How to Uninstall a Program on Different Devices | A Detail Guide
How to Remove a Program on Windows | 3 Quick Ways
Method 1: How to Uninstall Software Using the Control Panel?
As a Windows user, the easiest way to uninstall an app is via the Control Panel. It is intuitive and takes seconds. However, this panel does not show Windows universal apps and leaves behind some leftovers that require further residual cleaning. Here is how this method goes.
Step 1: Access the Control Panel
- Open the Windows Start menu and type Control Panel in the search box.
Step 2: Uninstall the Software
- Once on the panel, select Uninstall a Program under the Programs and Features tab.
- Now, right-click the program you want to delete and click Uninstall.
Method 2: How to Delete a Program Using the Windows Settings?
You can use Windows settings to delete programs that are not available in the control panel. Like the previous method, it is easy to follow, even for a beginner. However, this also does not remove all leftover files and registry entries from the system.
Step 1: Access Apps from Windows Settings
- Press Windows + I to open Windows Settings and visit the Apps tab.
Alt: define uninstall windows settings
Step 2: Uninstall the Program
- Now, select Apps and Features to view the list of installed apps on your computer. Scroll down to locate the desired program and click Uninstall.
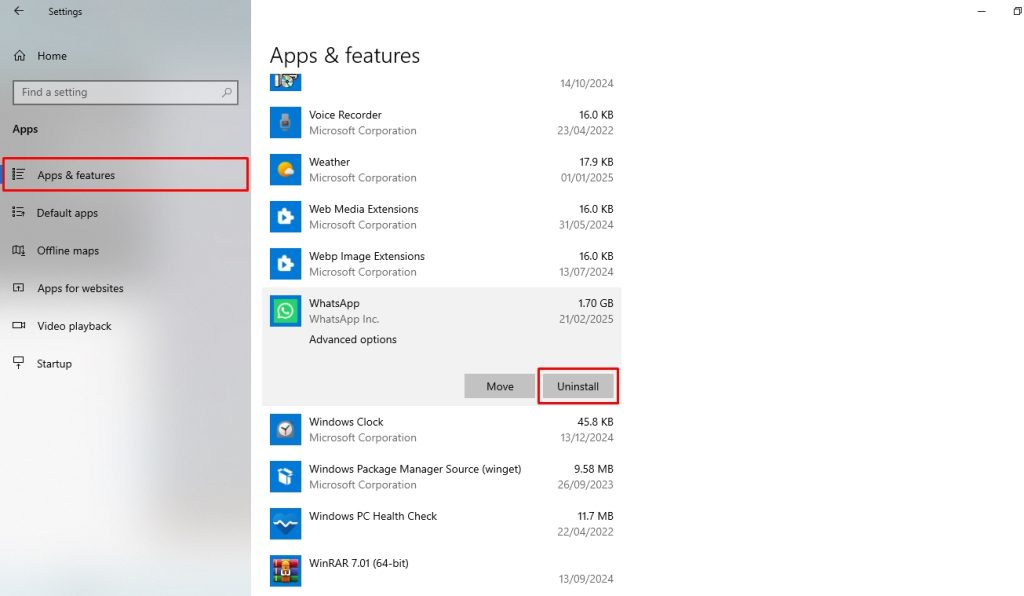
- That’s it; you’ve successfully deleted this app.
Method 3: How to Remove a Program Using the Command Prompt?
When all standard uninstall methods fail, you can use the command prompt to delete a stubborn program. This force-stops a difficult program and thoroughly removes its associated files, except for some registry entries. Follow these simple steps to uninstall software using Windows CMD.
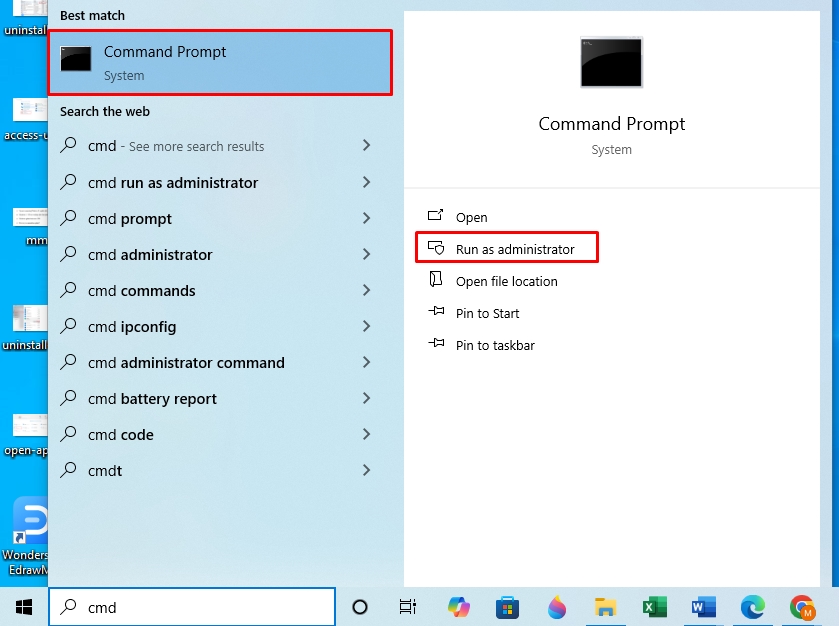
Step 1: Access the Command Prompt
- Type CMD in the Windows Start menu and click Run as Administrator.
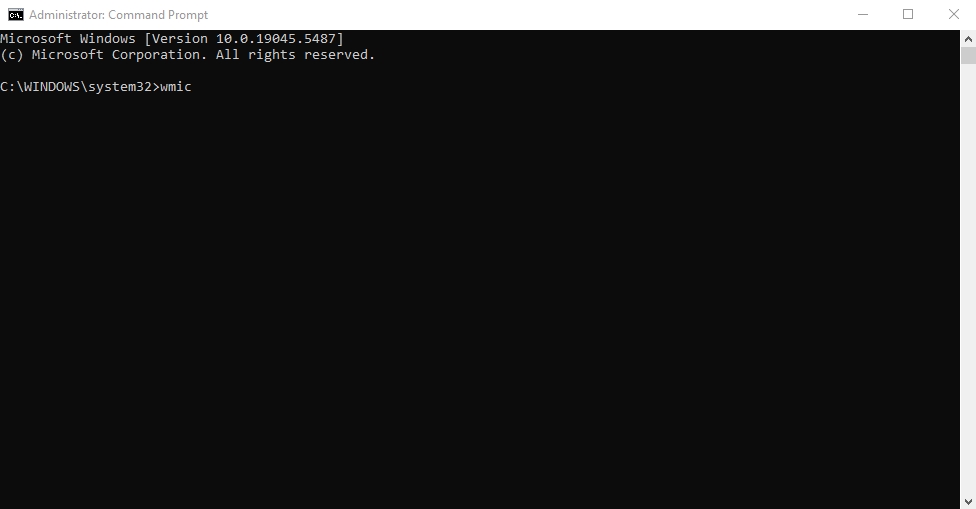
Step 2: Get a List of Installed Programs
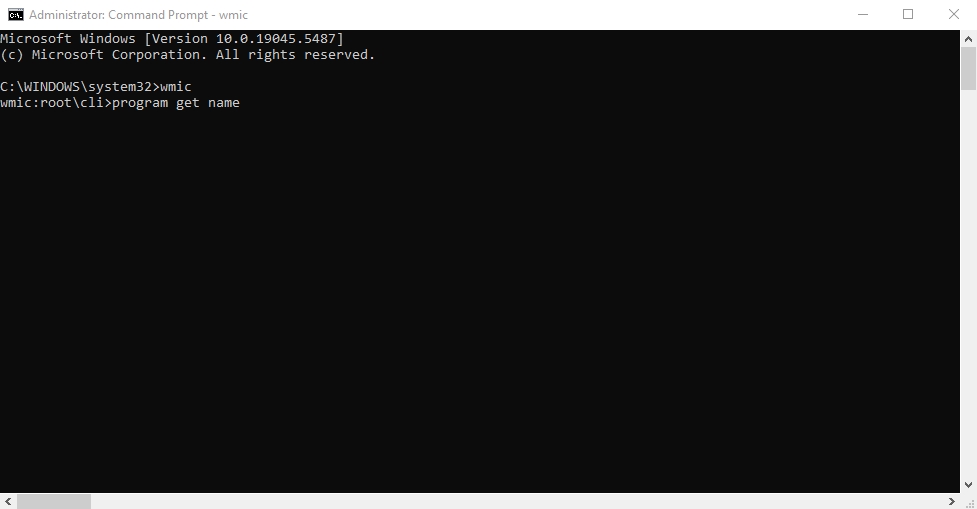
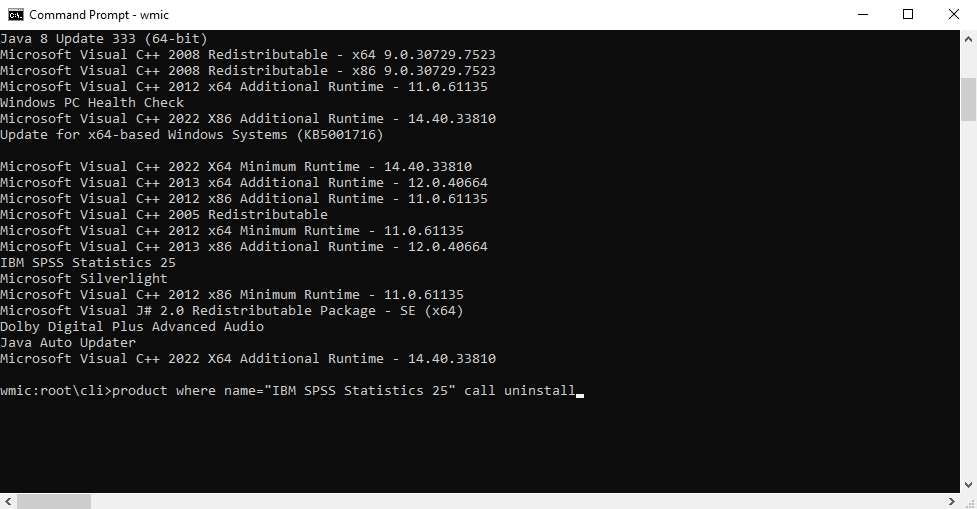
- Once on the command prompt screen, type wmic and press Enter.
- Type product get name, and again press Enter.
Step 3: Uninstall Desired Program
- Now, find the program you want to uninstall and run the following command.
product where name = program name call uninstall.
As shown in the figure, replace the program name with your desired app. For instance, product name where = “IBS SPSS Statistics” call uninstall
- Once it shows an execution command (Y/N?), type Y and press Enter.
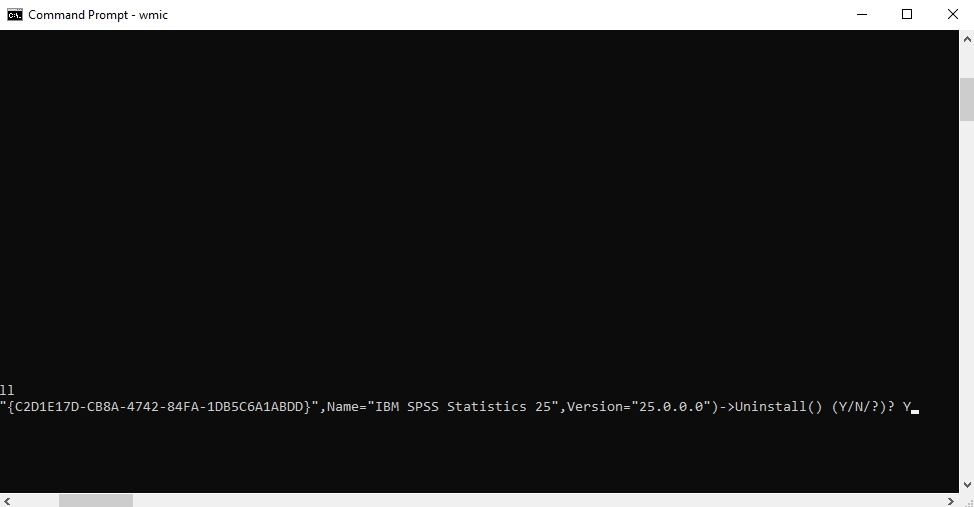
- Ta-da, you’ve successfully uninstalled the Windows program. It will now show a confirmation message, “Method Execution Successful.”
How Do You Uninstall Apps and Programs from Mac?
Method 1: How to Delete an App Using the Launch Pad?
The most common way to delete an app on MacOS is from the launch pad using the jiggling mode. However, this does not show all apps or delete associated files from the system, so you will have to perform additional manual deletion. Here is how you can uninstall an app from the Mac launch pad.
Step 1: Access the Launch Pad
- Click the Launch Pad from the Dock.

Step 2: Uninstall MacOS Programs
- Click and hold the program icon you wish to uninstall until it starts jiggling and click X next to it. This will immediately delete the app from the launch pad.

Method 2: How to Uninstall an App Using Trash?
Another way to uninstall a program on your Mac is to send it to the Trash. However, like the launch pad, this method does not remove the program’s associated files from the system, and you must delete them manually. Follow these simple steps to use the Mac’s trash function.
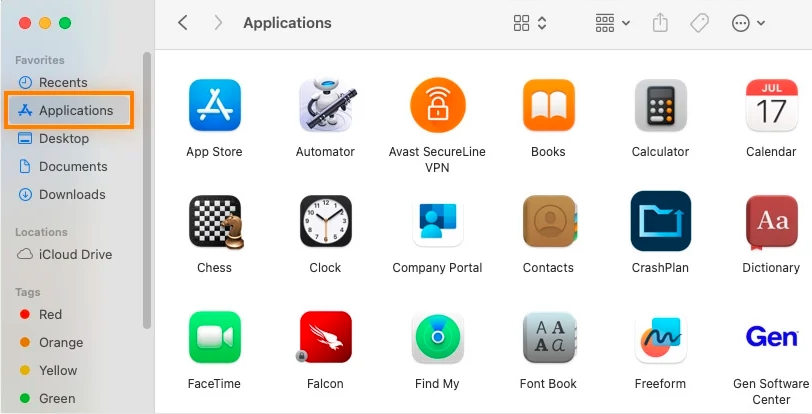
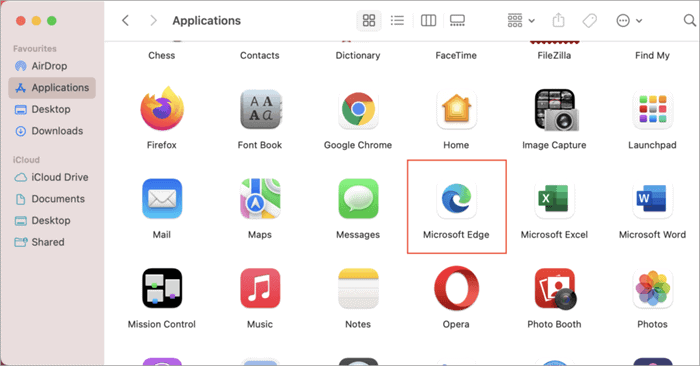
Step 1: Open the Applications Folder
- Access the Finder from the Dock and choose Applications.
Step 2: Uninstall the Program
- Find the app you want to delete and click Move to Trash.
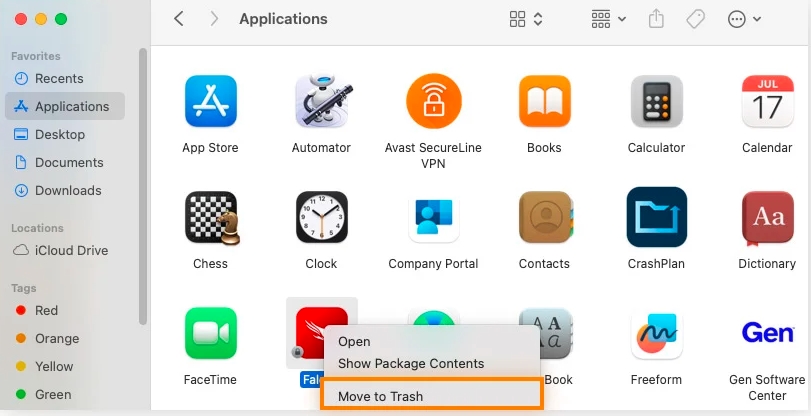
- Finally, empty the Trash, and your desired application is successfully removed.
How to Uninstall Program on Mobile Phones?
Method 1: How to Remove Android Apps?
The easiest way to uninstall an Android app is by long-pressing and deleting it from the home screen. However, not all applications make it to the screen. So, it is better to remove them from the Play Store. Here is how it goes.
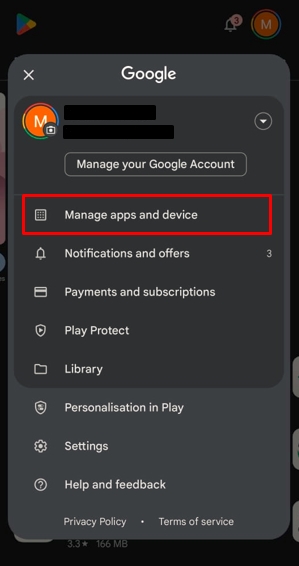
Step 1: Manage Apps and Devices on the Google Play Store
- Open the Google Play Store, navigate to your Profile, and select Manage App and Device.
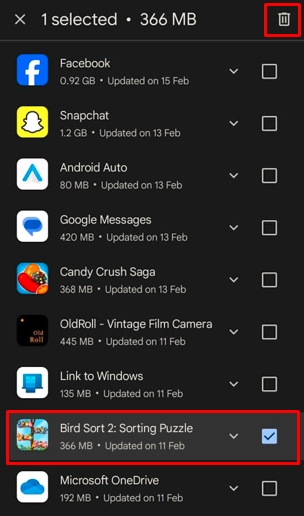
Step 2: Uninstall an Android App
- Now, go to the Manage tab. Select the app you wish to uninstall and click the Delete button from the top-right corner.
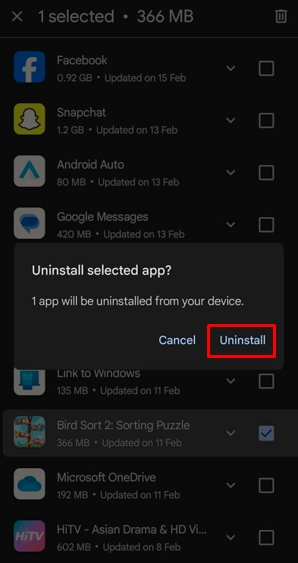
- Click Uninstall from the pop-up menu to confirm, and it will be done shortly.
Method 2: How to Delete an iOS App?
Like Android, simply deleting iPhone apps from the Home Screen does not uninstall them but rather hides them. You must remove them from the App Library to restrict any access. Follow these simple steps on your iPhone to permanently delete an app.
Step 1: Access App Library
- Keep swiping your iPhone screen to access the App Library.
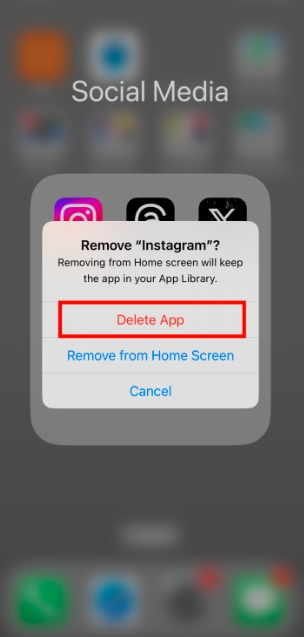
Step 2: Uninstall iOS App
- Find the desired app, hold it until the menu pops up, and click Delete App.

- Press Delete to confirm uninstallation, and that’s it.
The Right Way to Uninstall Software & Keep Your PC Running Smoothly
Unlike deletion, uninstalling software requires a thorough removal of its associated files from the system registries. You must follow some best practices to ensure this. Let’s discuss them in detail.
- Quit Stop Background Processes: Uninstalling a program does not quit its background processes. These processes take system resources and impact performance. Hence, you must always check for any pending processes in the Windows Task Manager or Mac’s Activity Monitor before and after deleting a program.
- Use a Third-Party Uninstaller for Stubborn Programs: Built-in OS uninstallers are insufficient for some stubborn programs. These apps require third-party uninstallers to remove leftover files and system traces completely.
- Remove Leftover Files and Registry Entries: Always prioritize deleting leftover files and registry entries manually, especially if you are not using third-party uninstallers. It will declutter your computer and prevent it from causing performance issues.
- Always Follow Up with a Reboot: Many users neglect this step, but rebooting their computer after uninstalling a program helps reset system settings. Neglecting it can lead to an incomplete removal process and software traces in the system.
Master Uninstaller – A Smarter Way to Uninstall Software
Unlike with pre-installed programs on your computer, your OS’s built-in uninstallers struggle with a few stubborn applications. These apps spread their files throughout the system, populating the registry and making it challenging for a built-in uninstaller to track everything down.
Hence, you must use third-party uninstallers like Master Uninstallers to remove the residual leftovers and system traces thoroughly. By running in the background, Master Uninstallers record all the changes these programs make, so it is easier to clean the system post-uninstallation.
Here is why I like it better than an average uninstaller.
- Complete Residual Cleaning: The Master Uninstaller automatically removes any background-running processes, system traces, and unnecessary apps from your PC registry. This keeps your PC clean and improves its performance.
- Easy-to-Navigate Interface: This uninstaller program is designed for non-tech users. It has a straightforward dashboard with different categories of apps (preinstalled, Windows services, and more) so you can easily track a desired program.
- Fast Operation: The Master Uninstaller takes only a few seconds to complete, even deleting gigabytes of storage from large and bulky programs.
- Bundleware Uninstallation: Harmful programs download unnecessary apps without your notice. This uninstaller detects these apps so you can delete them and maintain your PC’s performance.
- Blacklisting Functionality: The blacklisting function is a great option to deal with stubborn programs that keep on reinstalling themselves repeatedly. You can block such apps from reinstalling attempts by enabling this feature.
How Master Uninstaller Simplifies the Uninstallation Method?
The Master Uninstaller removes your desired program and its associated files with a single-click operation. Here is how it goes.
Step 1: Download and Register
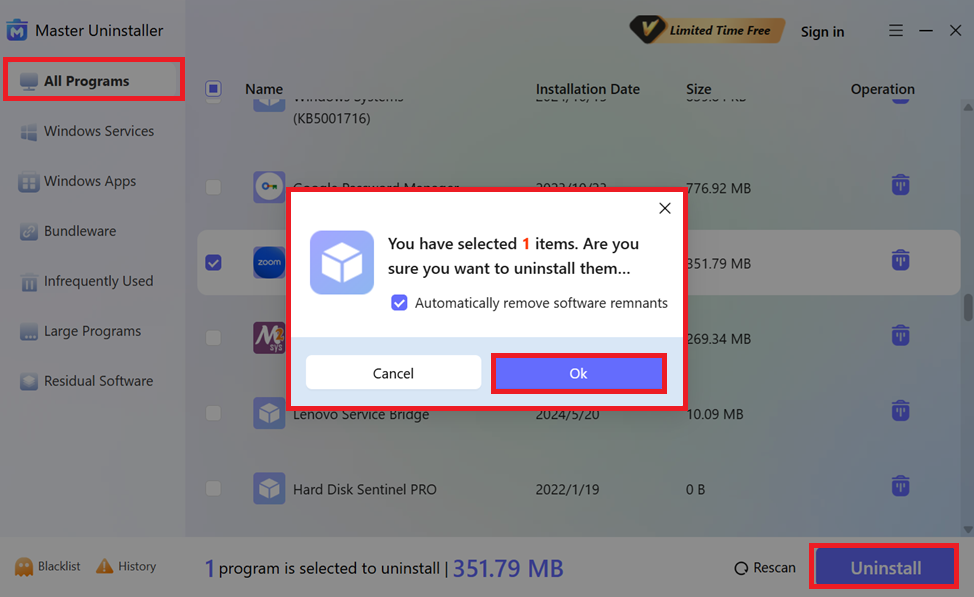
- Download the Master Uninstaller. And register yourself or log in using your email account.
Step 2: Uninstall Software
- Once on the dashboard, find the program you want to remove and click the Delete button next to it.
- Select Automatically Remove Software Remnants and click Ok.
- All done. It will show you a confirmation message that the cleanup is done.
FAQs
Q:
What happens when I uninstall a program?
Uninstalling a program deletes all the files and associated components of that particular program. It also reverts the changes the program made in the system. However, it may leave some registry entries, which require post-uninstallation residual cleaning.
Q:
Can I reinstall a program after uninstalling it?
Yes, you can reinstall a program after uninstalling it. You can recover it from the system or download the program again from the original source.
Q:
Why do some uninstalled programs leave traces?
Some program developers intentionally leave traces in the system for future reinstallations, even though we define uninstall as thorough cleaning. They choose to retain program data and settings to access necessary permissions and help users with reinstallation.
Q:
Are third-party uninstallers safe to use?
Third-party uninstallers, though helpful in removing harmful and stubborn software from your computer, often access your network and may introduce vulnerabilities. Some common issues you might face with third-party apps include unauthorized access and malware attacks.
Keep Your System Clean & Optimized
Most people struggle to understand what does uninstall means and often confuse it with deletion. However, it is only correct to define uninstall as thorough cleaning of the program, from background processes to registry entries and system leftovers.
One part of uninstalling a program is choosing the right uninstaller. Let’s say your built-in uninstaller works great for pre-installed and easy apps. Then, you download a game that refuses to remove its remnants from the system.
This is when you should invest in a quality third-party uninstaller like Master Uninstaller. Its intuitive interface and residual post-uninstallation cleaning ensure a thorough wiping of program entries from the system with minimal effort.
Master Uninstaller
-
Simple and Practical: Easily uninstall unwanted software.
-
Thorough Cleanup: Completely remove residual files.
-
Blacklist Protection: Identify and block malware and adware.
How To Uninstall Microsoft Edge from Your PC Step by Step
If you’re here to learn how to uninstall Microsoft Edge from your computer or laptop, then you’re not alone. A lot of people object to Edge being imposed on them and being unable to remove it after they have used it to install Firefox, Chrome, Opera, or other browsers.
Edge is now deeply ingrained and appears to be unremovable. Additionally, for some jobs, it opens immediately as the default application. And it seems like you’re stuck with it, right?
Not really! There are multiple ways to delete Edge browser from your device completely. We will discuss those ways in detail in this blog.
How To Delete Microsoft Edge: 3 Easy Ways
If you’ve been trying to figure out how to uninstall Microsoft Edge, we have tried-and-tested ways to help you get rid of the browser in minutes.
1. Third-Party Uninstaller
Are you wondering, “can I uninstall Microsoft Edge without leaving behind any files?” The answer is yes, you can. Follow the steps mentioned below to remove Edge from Windows 10:
- Download and install Master Uninstaller on your desktop
- Click on the downloaded file to open the software.
- Allow all permissions to run the software.
- Scroll through the list of apps to find Microsoft Edge.
- Check the box next to Microsoft Edge.
- Click Uninstall, and all the files related to Microsoft Edge will be deleted completely.
2. Windows Settings
Let’s begin by presuming that Edge was manually installed on your computer. To uninstall Microsoft Edge from settings, take the actions listed below:
- Start Menu and tap the Microsoft Logo located in the lower left corner of your screen.
- Navigate to Settings, select Apps, and then select Apps & Features.
- All of the installed apps on your computer will be visible to you. Locate and choose Microsoft Edge by scrolling down.
- There will be two choices: Uninstall and Modify. If you tap the Uninstall option, Microsoft Edge should be deleted.
3. Powershell Command
The Uninstall button for Microsoft Edge will be grayed out if you downloaded it via a Windows update. Command Prompt will be useful in this case to forcefully remove Edge. Here is a detailed guide to learn how to uninstall Edge from your computer.
- Open File Explorer directly or press Win+E.
- Press Enter after typing or pasting this into File Explorer’s address bar: C:\Program Files (x86)\Microsoft\Edge\Application
- With a numerical name, open the most recent folder modification.
- Select Copy as the path when you right-click the Installer folder.
- Launch PowerShell by opening Terminal as an administrator. Insert the path you copied in the previous step after typing cd.
- The CD command will run in Windows PowerShell.
- To execute the command and switch the working directory to that folder, press Enter.
- Copy this command: \setup.exe -uninstall -verbose-logging -system-level -force-uninstall
- Right-click to paste it into PowerShell.
- Wait for the command to execute after pressing Enter. You will be able to uninstall Edge browser easily.
Be mindful that there may be unexpected repercussions when removing system apps like Microsoft Edge. Important data should be backed up before continuing. Additionally, keep in mind that using this approach will remove Microsoft Edge from your user account only. If you want to learn how to uninstall MS Edge for all accounts, you’ll have to follow the above method individually.
How To Uninstall Microsoft Edge from Mac
In 2019, Microsoft released the Edge browser for Mac. The new Edge browser, which is based on Chromium, functions well on Mac. However, customers have the option to remove it. Here’s how to do that.
- Launch your Mac’s Finder. At the bottom of the screen, on the far left side of the Dock, is the Finder icon.

- Locate and open the Applications Folder in the Finder. It will show up in the Favorites section.
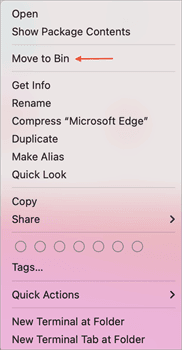
- All of your installed apps are located in this folder. Locate Microsoft Edge, select it, and then use the right-click menu to bring up a context menu.
- Select Move To Bin from the menu options. As an alternative, you can relocate the Microsoft Edge icon to the Trash by selecting it and pressing the command+delete key.
- Once Microsoft Edge has been moved to the trash. Locate and open the Trash icon on the Dock’s far right side.
- In the Trash folder, tap the Empty option.
- To remove Microsoft Edge from Bin, a last tap on Empty Bin will be required.
How To Disable Microsoft Edge
If you’re using Windows 10 or 11 Pro or Enterprise, you can disable Microsoft Edge through the Group Policy Editor. While this method doesn’t completely uninstall Edge, it effectively prevents it from running on your system.
- Press Win + R, type gpedit.msc, and hit Enter.
- Go to Computer Configuration > Administrative Templates > Windows Components > Microsoft Edge.
- Find Allow Microsoft Edge to be pre-launched and Allow Microsoft Edge to start and load the Start and New Tab page at Windows startup and each time Microsoft Edge is closed.
- Set both to Disabled to prevent Edge from running in the background.
- Restart your computer. This will stop Microsoft Edge from launching automatically.
How To Prevent Microsoft Edge From Reinstalling
Microsoft wants Edge to be the default browser for all Windows users. Thus, there is a good probability that it will reappear with further Windows upgrades, even if you used a command prompt to forcefully remove it. However, you can prevent it from reinstalling by taking the actions listed below:
- Find the Registry Editor app by typing “regedit” into the search bar.
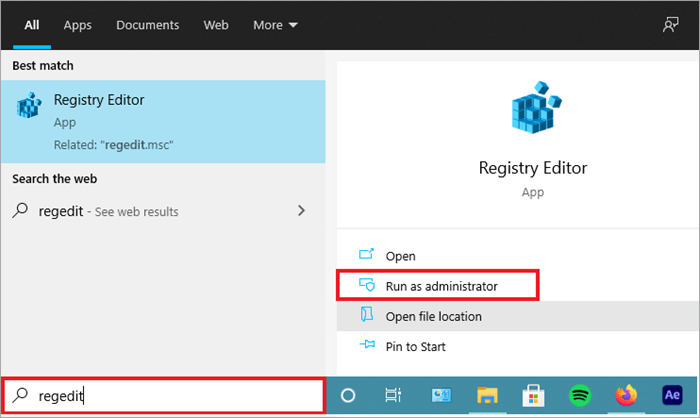
- Choose the software that shows up as the best fit, then run it as administrator.
- Once the Registry Editor application has launched, copy and paste the key (HKEY_LOCAL_MACHINE\SOFTWARE\Microsoft) into the address bar. Another option is to navigate to the same key.
- Right-click on the Microsoft folder in the left pane.
- Select New > Key and name it EdgeUpdate.
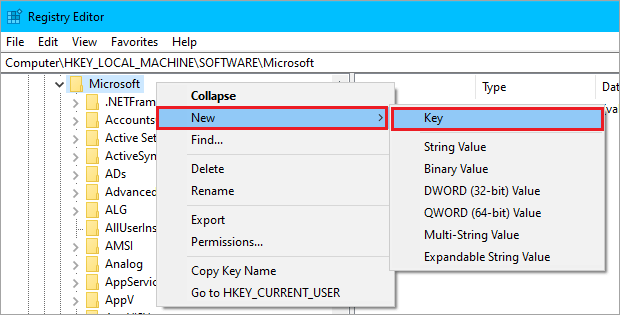
- Inside the EdgeUpdate key, right-click on the right pane and select New > DWORD (32-bit) Value.
- Name this new value DoNotUpdateToEdgeWithChromium.
- Double-click the newly created value and set its Value Data to 1.
- Close Registry Editor and restart your computer to apply the changes.
Conclusion
There are undoubtedly many advantages to using Microsoft Edge. The integrated reader feature allows you to read information without the typical advertising clutter, the privacy options are straightforward, the speed is competitive, and the interaction with Windows 10 is seamless. However, if you have decided to remove it, you can use any of the above-mentioned methods to uninstall it.
Master Uninstaller
-
Simple and Practical: Easily uninstall unwanted software.
-
Thorough Cleanup: Completely remove residual files.
-
Blacklist Protection: Identify and block malware and adware.
Frequently Asked Questions
Q:
Why am I unable to remove Microsoft Edge?
You cannot uninstall Microsoft Edge from the settings if it was installed as part of a Windows update. There will be a grayed-out Uninstall option. However, this does not exclude you from removing Microsoft Edge from your computer. You can use a third-party uninstaller like Master Uninstaller to completely delete Microsoft Edge from your device.
Q:
How to uninstall Microsoft Edge on particular releases of Windows 10?
If you’re on the Dev, Beta, or Canary channel releases of Windows 10, there is actually a simple method for getting rid of Microsoft Edge. Follow these steps to learn how to uninstall Microsoft Edge:
1. Launch the Windows 10 Settings app.
2. Select Apps.
3. Next, locate the Microsoft Edge version in the list of programs.
4. Click the Uninstall button after selecting it.
5. This will delete Microsoft Edge from your computer.
However, the default version that comes pre-installed on Windows 10 cannot be removed using this method.
Q:
How to proceed if the next Windows upgrades don’t work?
On computers that have deleted Microsoft Edge, there have been problems with installations of some of the most recent Windows updates failing. Fortunately, there is a simple solution if you encounter this problem.
Locate the ‘Microsoft’ folder by navigating to the ‘Program files (x86)’ folder on your C: disk. Launch this and remove any Microsoft Edge-related folders. You can now try installing your Windows update once more, and it ought to finish without any problems.
Locate the ‘Microsoft’ folder by navigating to the ‘Program files (x86)’ folder on your C: disk. Launch this and remove any Microsoft Edge-related folders. You can now try installing your Windows update once more, and it ought to finish without any problems.
How to Uninstall McAfee from Your PC or Laptop Easily
McAfee is a well-known antivirus program that frequently comes pre-installed on new PCs. Despite its usefulness, you might find that it’s no longer serving its purpose and taking up space on your desktop. So, you go on to learn how to uninstall McAfee. However, even after deleting it, some residual data files are left behind.
We have created a list of tried and tested methods of McAfee security scan plus removal. You can select the way that best suits your needs because each one offers a varying degree of completeness. Let’s begin.
3 Ways To Uninstall McAfee Livesafe Windows 11
Antivirus software often embeds itself deep into the system for security reasons, which makes it difficult to uninstall. Users often wonder, “How do I get rid of McAfee on my computer?” But don’t worry, we have the best ways to help you learn how to uninstall McAfee from your laptop or PC.
1. Using Third-Party Uninstaller Software
You can easily solve the “McAfee won’t uninstall” problem using third-party uninstaller software with just a few clicks. We’re going to take Master Uninstaller as an example in this case.
Follow these steps to learn how to remove McAfee remnants from computer Windows 11 without a long process:
- Go to the Master Uninstaller website and download the software.
- Click on the application icon to launch it and allow it to make changes to your computer.
- A list of all the applications on your device will pop up.
- Scroll down to find the McAfee application and check the box next to it.
- Select ‘Uninstall’ in the bottom right corner.
- Click on Ok to uninstall McAfee.

2. Using the Programs and Features Tool
The Programs and Features window should be your go-to solution for the “unable to uninstall McAfee security scan plus” problem. One of the greatest and simplest ways to locate and get rid of practically every downloaded application on your device is to use this tool.
Follow these steps to learn how to uninstall McAfee:
- Launch the Run command dialog box by pressing Win + R.
- Type appwiz.cpl and hit Enter.
- Next, find the application you wish to delete, then right-click on it and choose Uninstall.
- Follow the instructions on the screen.
3. Using Windows Settings
You must be familiar with the Windows settings. If not, you can just type in settings in your search bar and the page will open. Just adhere to the guidelines provided below to solve the problem of “cannot uninstall McAfee Security Scan Plus”.
- Go to Settings after clicking Start.
- To locate your McAfee product, select Apps and then navigate through the list of installed applications.
- Choose Uninstall after left-clicking the McAfee entry.
- To finish the removal procedure, adhere to the on-screen instructions.
- You might need to restart your computer when the uninstall is finished.
Note: Certain McAfee Security products, such as McAfee WebAdvisor, can be left behind after the Windows uninstall process. We would advise employing a third-party tool to remove the app completely.
4. Using MCPR Software
If none of the above steps work, utilize the MCPR tool.
Now, follow these steps to solve your “cannot remove McAfee” problem.
- Download the MCPR tool from the McAfee official website.
- Click MCPR.exe twice.
- According to your Windows version, click Yes, Proceed, or Run if a security warning appears.
- Click Next on the McAfee Software Removal screen.
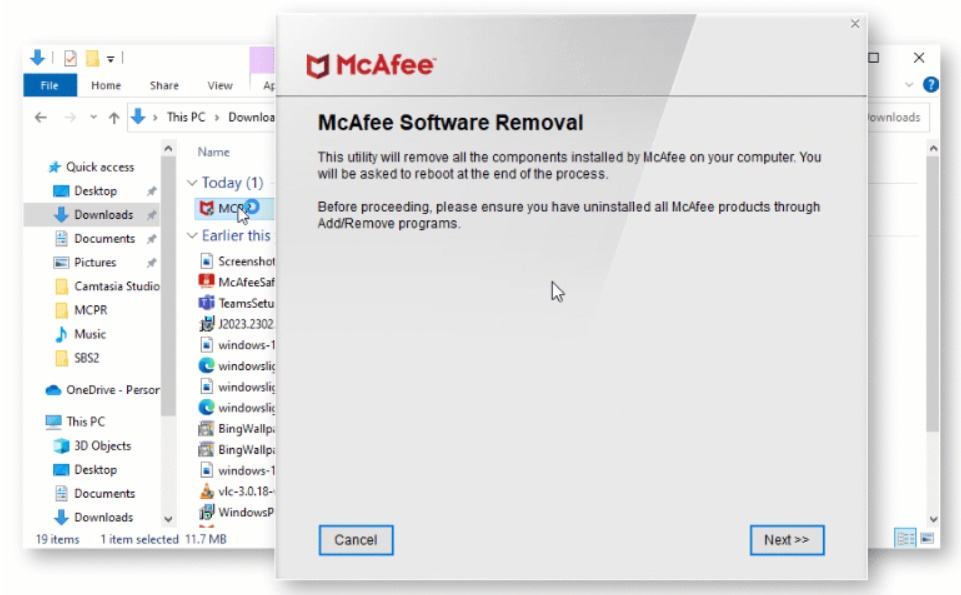
- Agree to the license agreement.
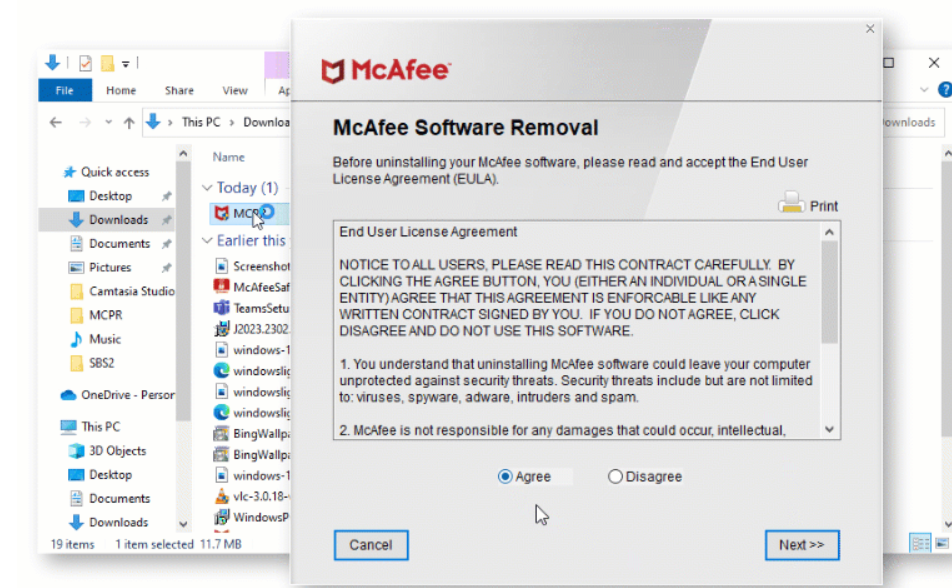
- Enter the characters just as they appear on your screen in the Security Validation screen. Validation is sensitive to case.
- Press Next. By doing this, the unintentional use of MCPR is avoided.
- Await the completion of the MCPR tool. Depending on the kind of PC you have, this could take twenty minutes or longer.
- The MCPR tool has successfully finished when Removal Complete appears. For the eradication process to be finished, restart your computer.
If the cleanup is unsuccessful, restart your computer and repeat the process again. If it fails this time as well, it’s time to contact customer support.
Advanced Ways To Remove McAfee From Your Computer
Unable to uninstall McAfee security scan plus? You may need to activate the Super Administrator account if the above methods are unable to completely uninstall your program. The removal has a higher chance of success when the Super Administrator is involved.
To activate the Super Administrator account, take the actions listed below. Don’t forget to shut off the Super Administrator account after deleting the McAfee software.
- Open the command prompt:
- For Windows 8 and above, click Search next to the Start Start symbol in the lower left corner of your desktop.
- After that, type cmd.exe into the search bar.
- Right-click Command Prompt in the search results, then select Run as administrator.
- Enter the following at the prompt and hit Enter: /active:yes for the net user administrator
- Shut down the command prompt.
- Together, hold the Ctrl+Alt+Del keys.
- To shut down Windows, click Log out.
- Click Administrator on the sign-in screen and log in. The sign-in process may take longer than usual.
- Try deleting your McAfee program using the MCPR tool.
If the removal process was successful, you’ll have to disable the Super Administrator account by following the instructions below. Get in touch with Customer Service if you are still having trouble uninstalling your McAfee program.
- Hold down the Ctrl+Alt+Del keys.
- Log out of the administrator account.
- Use your regular account to log in.
- As an administrator, open a command prompt:
- After selecting Start, type cmd.exe into the search bar.
- Right-click Command Prompt and select Run as administrator.
- Enter the following command and hit Enter: /active:no net user administrator
- Shut down the command prompt.
- You will have disabled the Super Administrator account.
Conclusion
Uninstalling McAfee LiveSafe from Windows 11 requires more than just a basic uninstall. You need to know different ways on how to uninstall McAfee from your PC or laptop. While Windows settings or Control Panel can remove the main software, using the Master Uninstaller tool ensures complete removal. Cleaning up startup programs, services, and leftover files will help prevent any interference with your system’s performance.
Master Uninstaller
-
Simple and Practical: Easily uninstall unwanted software.
-
Thorough Cleanup: Completely remove residual files.
-
Blacklist Protection: Identify and block malware and adware.
How to Remove Junk Files and Boost Your Computer’s Performance
Clutter tends to accumulate in areas that are disorganized and dirty. Your PC is no exception to this rule. Your computer accumulates more trash the more you use it. Junk files can cause your operating system to lag severely on slower drives, including conventional hard disks. Therefore, regular cleaning might help them work better. Most junk files can be removed by Windows 10’s built-in utilities, but they might leave behind residual files. This article helps you learn the best ways on how to remove junk files.
What are Junk Files?
Junk files are the temporary files that are no longer needed but were made so your phone or computer could complete certain activities. Since operating systems, apps, and programs must create temporary files in order to do computer activities, temporary files were useful at one point. However, these files turn into worthless trash after they have served their role.
We use our phones and desktops for many different purposes, such as opening documents, web browsing, and photo viewing. Computers employ temporary files to do all of these activities, which are then rendered worthless after the task is finished.
However, issues may occur when these unnecessary files build up on your hard drive. These files take up a lot of storage and slow down your computer’s performance. So, how to clear temp files? Let’s find out.
How To Clear Temporary Files From Your Computer
Your computer will accumulate junk files the longer you use it. This is particularly true if you don’t clean the junk files regularly. We have curated a list of the best ways on how to delete temp files from Windows 11 C drive.
1. Empty The Recycle Bin
All of the files you have removed from your computer are kept in the Recycle Bin. If you inadvertently delete any files, you can recover them, making it a useful tool. It can, however, gather gigabytes of files that consume up your storage space if it is not cleaned regularly.
Thankfully, the Recycle Bin is simple to clean. You can either empty them all at once or choose which files to permanently delete. Here’s how to delete temp files by emptying the recycle bin:
- From the desktop, open the Recycle Bin. In the absence of a desktop shortcut, type Recycle Bin into the Windows search box and select the most appropriate result.
- Examine the deleted files. Right-click and select Restore if you wish to restore any.
- Right-click within the folder and select Empty Recycle Bin to remove everything.
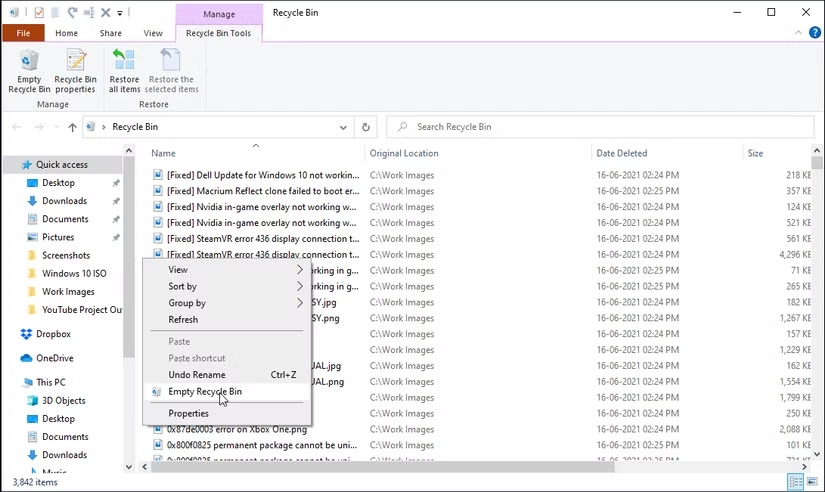
- This activity can also be carried out directly from the desktop. Select Empty Recycle Bin by right-clicking on the Recycle Bin shortcut. To confirm the action, click Yes.
2. Run Disk CleanUp
Windows 11 comes with a built-in utility called Disk Cleanup that is excellent at removing unnecessary files such as program files, transient internet files, caches, and thumbnails. You wouldn’t typically consider deleting these items, but it’s easy to do so to make room and make the experience snappier overall.
You may also use this to remove temporary files and empty the Recycle Bin. Follow these steps to solve the problem of how to remove temporary files.
- Find and launch Disk Cleanup.
- After choosing Clean up system files, give Windows a few seconds to determine how much storage you could save by removing these unnecessary items.
- Check the box next to the item in the list you wish to remove, then click OK.
- Select Delete Files.
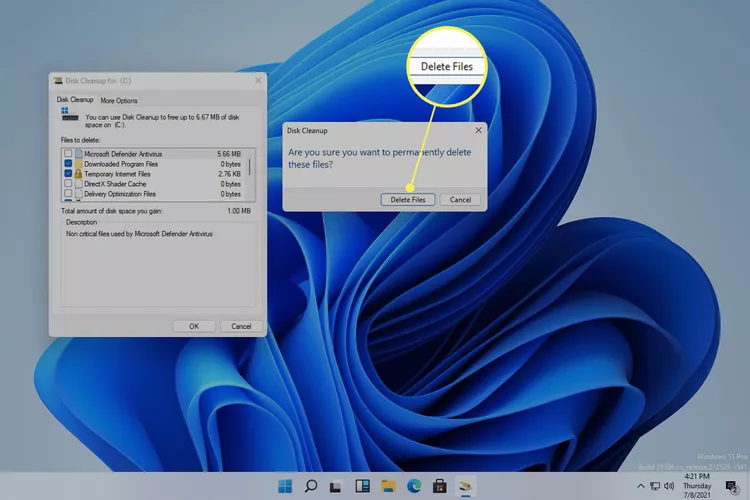
3. Use Command Prompt
Temporary files are automatically created in the background by your Windows 10 system and some apps while it is completing tasks. These files are only used temporarily. The system does not automatically remove temporary files when they are no longer required. As a result, you must manually remove these unnecessary files. People always wonder, “How do I delete temporary files?“.
Follow these steps to solve the problem of how to get rid of temporary files.
- Launch the Command Prompt as an administrator in step one.
- Press Enter after typing del/q/f/s %temp%\*. All temporary files will be removed via Command Prompt, with the exception of those that the system is actively using.
- You’ll be able to solve your problem of how to remove junk files.
4. Use Storage Sense
Another feature included in Windows 10 is Storage Sense, which lets you configure your computer to automatically remove unnecessary files. Take the actions listed below for clearing temp memory.
- Press Win + I to open Settings. Next, select the System option from the main page.
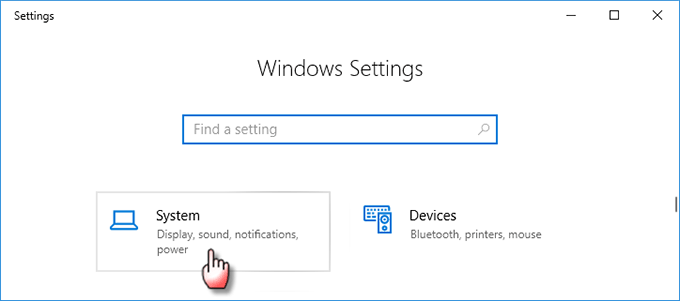
- On the left pane, choose Storage. Click “Change how we free up space automatically” after turning on the “Storage sense” option on the right pane.

- You can select how frequently you want Storage Sense to automatically delete files that aren’t needed on the following page. To have StorageSense automatically remove system temporary files, Recycle Bin files, and unnecessary items from the Downloads folder, click the Temporary Files checkbox.
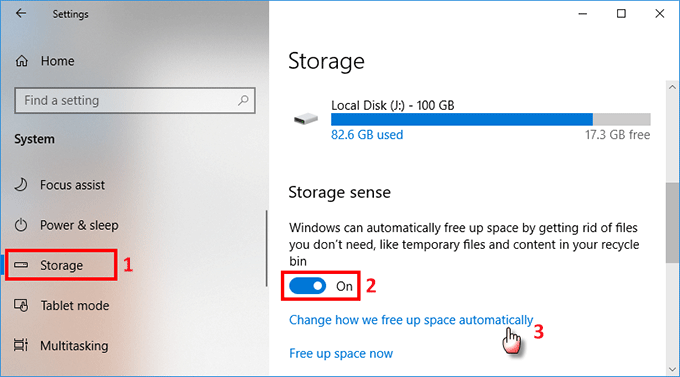
5. Clean Up Restore Points
Restoring points for the system can save your life. But if you have an excessive amount of them, your storage drive may get overly crowded. Although Windows doesn’t display the amount of space used by the system restore, you can increase the amount of space by deleting previous restore points.
The Disk Cleanup tool can be used to clean up restore points. Only the most recent restore points will remain after a restore point clean-up. Here’s how to remove junk files using system restore.
- Select the Cleanup system files option in the Disk Clean program.
- To start the scan, choose a drive and click on OK.
- The More Options menu will then open.
- Hit the Cleanup button under System Restore and Shadow Copies.
- To confirm the operation, select Delete.
As an alternative, you can designate how much disk space restore points will use. beneficial if you don’t want to deal with regularly erasing the restore points.
To set the Restore Point’s disk usage space:
- Type “Restore Point” into the Win key.
- The System Properties window will pop up when you select the Create a restore point option.
- Click the Configure button in the Protection Settings section of the System Protection tab.
- To define disk utilization space, move the Max utilization slider in the pop-up dialog.
- To save the modifications, click Apply and then OK.
Do System Junk Files Need to Be Deleted?
Doesn’t it make sense? Junk files are just that—junk. Either your computer is no longer using them, or deleting them is safe.
System junk files are common for your computer to generate and you don’t necessarily need to remove them constantly. However, there are a number of reasons why getting rid of these files from your computer is a smart idea:
- Make storage room: As you’ll quickly discover, junk files eat up a lot of computer space. If your disk space is getting low, think about clearing off some extra space by removing files that aren’t needed.
- Boost system speed: A computer that must continuously handle superfluous files must expend additional energy to keep them up to date. Eliminating unnecessary files may speed up virus checks, enhance streaming performance, and accelerate downloads.
- Remove malware: Although it’s not the most typical location for viruses to hide, malware can reside among files deemed trash; therefore, removing them may even aid in the removal of harmful files.
However, removing unnecessary files can potentially have unintended consequences if you’re not careful. Web browser cookies, for instance, may be seen as rubbish if you don’t want your computer to store them, yet deleting them will remove you from the associated online accounts.
Depending on the technique you employ, deleting easy clean out files can also erase your current surfing session, destroy log files that may be useful for troubleshooting PC issues, and delete anything stored in the clipboard.
There shouldn’t be any surprises, though, if you carefully read what you’re going to remove.
Conclusion
Junk files can affect the performance of your system and are not a beautiful sight. To keep your system clean, you can either manually clear up clutter or use Disc Cleanup on a regular basis.
You can even more storage space if you get rid of other unnecessary programs from your computer using Master Uninstaller. This third-party app will remove all the apps you no longer use and even clean out every residual file that takes up space on your computer.
Master Uninstaller
-
Simple and Practical: Easily uninstall unwanted software.
-
Thorough Cleanup: Completely remove residual files.
-
Blacklist Protection: Identify and block malware and adware.
FAQs
Q:
Where do junk files come from?
Junk files quickly amass because they are produced as results of many computing processes. The digital remnants of the various activities your computer performs when you launch applications, surf the web, or perform any other job on your computer are the trash files that accumulate in your system.
Q:
How to remove unwanted apps from the PC?
You can remove unwanted apps from your PC using a third-party uninstaller app like Master Uninstaller. Here’s how to use Master Uninstaller to get rid of a program:
1. Download the program from the official Master Uninstaller website.
2. Start the Master Uninstaller application.
3. Click the box next to the app’s name to select which of the installed programs on your computer you want to uninstall.
4. After selecting Uninstall, watch for the app to be deleted.
1. Download the program from the official Master Uninstaller website.
2. Start the Master Uninstaller application.
3. Click the box next to the app’s name to select which of the installed programs on your computer you want to uninstall.
4. After selecting Uninstall, watch for the app to be deleted.
Q:
Is removing unnecessary files safe?
Yes, deleting trash files is quite safe. Once these files have fulfilled their intended function, they are no longer useful and only occupy space on your hard drive. In addition to being secure, deleting unnecessary files can make your computer run faster by clearing out disc space and cleaning your drive.
Q:
How do I get rid of unnecessary files in Windows 7?
Launch a Run dialog box and press Windows key + R. Then, type %tmp% and select OK. To select all, use Ctrl + A. Then, on your keyboard, press Delete. By doing this, Windows 7’s temporary files are eliminated.
How to Delete a Shortcut from Desktop in Windows
Do you have too many shortcuts on your desktop? Do you have trouble finding the files you need because of all those icons? Although shortcuts are useful for instant access, they can become somewhat cumbersome over time. Shortcuts are essentially icons that make it simple to click on folders and programs. Despite their small size, they can visually overpower your desktop. It’s time to eliminate some shortcuts when your desktop becomes overly cluttered. This post will show you quick and simple ways how to delete a shortcut from desktop. You’ll discover how to quickly select several icons in bulk and remove them with a single click.
How To Remove App Shortcut from Desktop Windows 11
Shortcuts are typically represented by the icons that show an arrow on your desktop. To gain fast access to various files, people frequently make shortcuts. Some shortcuts are created automatically when you install a program. Your desktop can become congested, and it may get hard to find important files. But it is easy to delete these shortcuts.
Since deleting shortcuts can result in the loss of important files, most people ask “how to get rid of a shortcut on my desktop”. Deletion ensures that the shortcut is being removed and not the original file.
1. Drag The Shortcut to the Recycle Bin to Remove It.
Dragging a shortcut to the bin is the first way to get rid of it from the desktop. The icon will vanish in a second if you drag it. Use these simple steps to learn how to remove desktop shortcuts Windows 11.
- Step 1: First of all, you have to turn on your Windows system.
- Step 2: Position your mouse on the desktop shortcut you want to delete.
- Step 3: Press the left mouse button and continue holding it.
- Step 4: The selected icon will remain in place. Click the shortcut and drag it to the Recycle Bin icon by holding down the mouse’s left button while the icon is chosen. Make sure the Recycle Bin icon is exactly where you drop the icon.
- Step 5: The computer will display a confirmation message if there is a program shortcut. To remove the shortcut, confirm.
By doing these actions again, all the desktop shortcuts will be removed, creating room for other important shortcuts.
2. Select Delete from the Options
If for some reason you are unable to remove a shortcut from your Windows desktop, try using the application options. This is a thorough procedure that most users use to eliminate unnecessary desktop shortcuts. These are the quick actions you must take in order to remove it from alternatives.
- Step 1: Turn on your computer.
- Step 2: Move the mouse pointer to the shortcut you want to delete.
- Step 3: Left-click on the shortcut to select it.
- Step 4: Now right-click on it, and you will see a list of options appearing on the screen.
- Step 5: Use your mouse to click “Delete” which is listed there when you right-click.
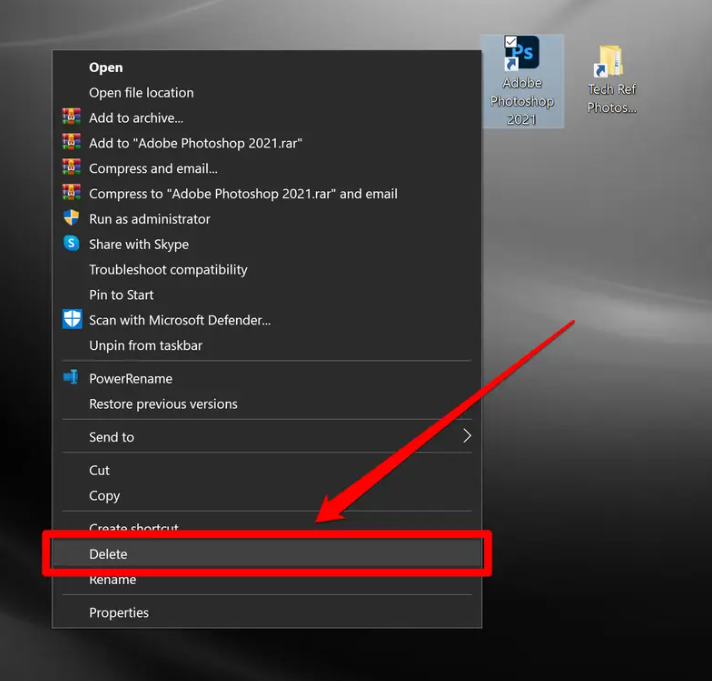
- Step 6: Confirm it in the dialog box that appears for confirmation.
Repeat these steps and your “how to delete a shortcut from desktop” problem will be solved for all the shortcuts.
3. Press the Delete Button on the Desktop
A keyboard shortcut can also be removed from the desktop using this manner. This approach saves you the bother of sorting through possibilities and requires the least amount of time. All you need to do is ask your keyboard’s “Delete” button for assistance. Isn’t it incredible? Repeat these instructions to remove shortcuts using this method.
- Step 1: Turn on your computer first.
- Step 2: Locate and left-click the shortcut you wish to remove. It will be chosen.
- Step 3: Click the “Delete” button in the upper right corner of your keyboard.
- Step 4: You will receive a confirmation message as normal. Your shortcut will be removed once you confirm the procedure.
Your “how to delete a shortcut from desktop” issue will be resolved for every shortcut if you follow these steps again.
How to Delete All Desktop Icons on Windows
One of the greatest and simplest methods to optimize and speed up your Windows desktop is to remove the icons. But, how to delete a shortcut from desktop with all the other shortcuts?
With a few mouse clicks, you can quickly remove any desktop icon in Windows. Simply choose Delete from the popup menu that appears when you right-click the icon on your Windows 10 desktop.
You can also drag desktop icons to the Recycle Bin icon, which should also be on the desktop, to remove them.
Do you want to remove every Windows 10 desktop icon at once? You can highlight them altogether by moving the mouse pointer over each icon. After they are all highlighted, you can either drag them to the Recycle Bin or right-click on one and choose Delete.
How Can I Get Rid of My Desktop Icon Without Erasing It?
You have a few choices if you want to move files or shortcuts out of the way while working on your Windows 10 desktop without erasing them.
The first choice is to make the icons invisible. To accomplish this, right-click on your desktop, choose View, and then uncheck the box next to “Show desktop icons.”
For people who enjoy the look of their Windows 10 desktop icons but don’t want to view them constantly, this is a fantastic option.
Repeat the previous steps to restore your desktop icons’ visibility.
Moving the icons to a different spot on your Windows device is your second choice. You may rapidly accomplish this by dragging the icons to a different folder location.
Another option is to right-click the icons, choose Cut, and then right-click in the target folder and choose Paste.
How can I remove an app that refuses to uninstall?
You can remove an app that refuses to uninstall by using the control panel to delete the app. However, there may be remaining files even after uninstallation. If you want to completely remove an app from your pc, you need to use a third-party app uninstaller like Master Uninstaller. You just download it on your desktop and launch it. Select the app you want to remove and click on “Uninstall”.
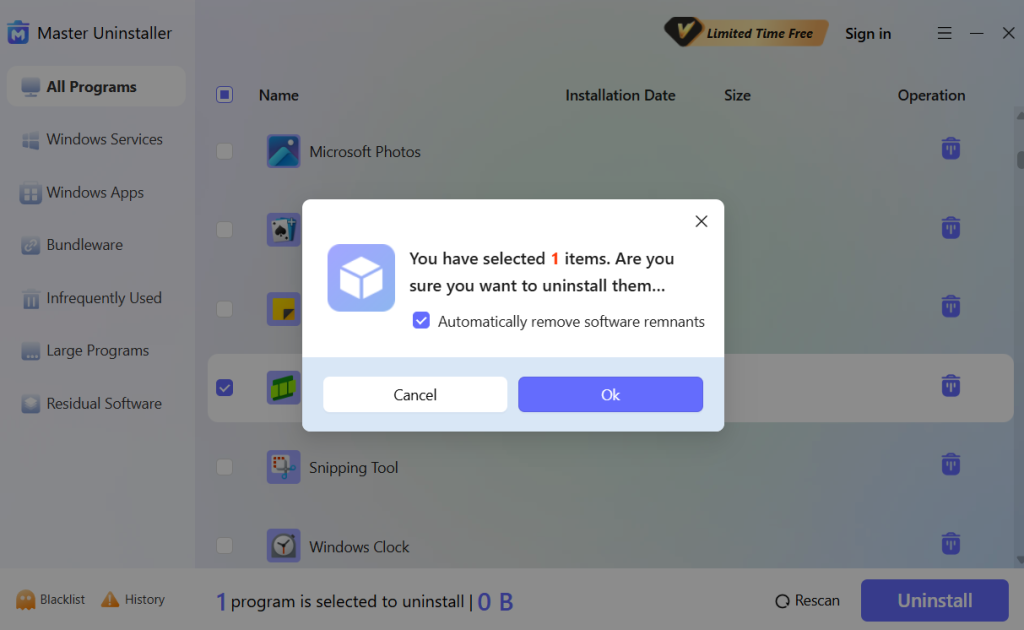
Conclusion
Icons and desktop shortcuts can occasionally overcrowd your desktop. You must so find it challenging to separate the relevant files from the rest of the crowd. However, it’s not a huge concern because this post has helped you with simple ways on how to remove icons from desktop Windows 11.
Master Uninstaller
-
Simple and Practical: Easily uninstall unwanted software.
-
Thorough Cleanup: Completely remove residual files.
-
Blacklist Protection: Identify and block malware and adware.
FAQs About How To Remove Shortcuts from Desktop
Q:
How do I get rid of desktop icons that won’t go away?
Occasionally, users come upon a shortcut, folder, or file icon that refuses to be deleted. An error message such as “File in Use” or “File Access Denied” could appear. This problem can be troubleshooted in a number of ways. Try restarting your computer first, then attempting to remove the icon once more. Verify that the file or folder is open and in use if you see a “File in Use” notification; if it is, close the program. If a file’s permissions prevent you from deleting it, right-click on it and choose Properties > Security > Advanced. Try removing the icon, file, or folder once more after entering the username you wish to be the file’s owner. Another alternative is to attempt deleting the troublesome file after restarting in Safe Mode.
Q:
What is the process for deleting icons from a Mac desktop?
Q:
If I have Windows 7, how can I get the icons off my desktop?
Just as on a Windows 10/11 desktop, you can right-click and choose Delete to get rid of icons on a Windows 7 desktop.
Q:
How can checkmarks be eliminated from desktop icons?
The checkboxes that appear when you pick a file or folder in Windows 10 can be easily removed if you don’t like them. Open File Explorer, then choose View. Uncheck the box next to the Item check boxes in the Show/Hide section.