


-

Simple and Practical: Easily uninstall unwanted software.
-
Thorough Cleanup: Completely remove residual files.
-
Blacklist Protection: Identify and block malware and adware.
How to Uninstall Windows Apps: Step-by-Step Guide
Did you ever feel like your Windows computer is more cluttered than a teenage bedroom? Most of the time, we download a lot of unnecessary apps and programs and then regret it because they fill up a lot of computer space. Windows is very flexible in most aspects, and with Microsoft’s ongoing efforts, we found the OS to be very functional. However, it can get frustrating to learn how to uninstall Windows apps.
So, below, we outline the most efficient ways for uninstalling apps on your Windows system.
Efficient Ways To Delete Windows Apps
You could wonder that removing specific folders will make uninstalling an application simple. However, this is incorrect because a Windows application has numerous files dispersed throughout the registry and other places. Windows will leave unnecessary directories or files on the computer even after deleting the apps. So, how to remove Windows app in programs file?
Using a Third-Party Uninstaller
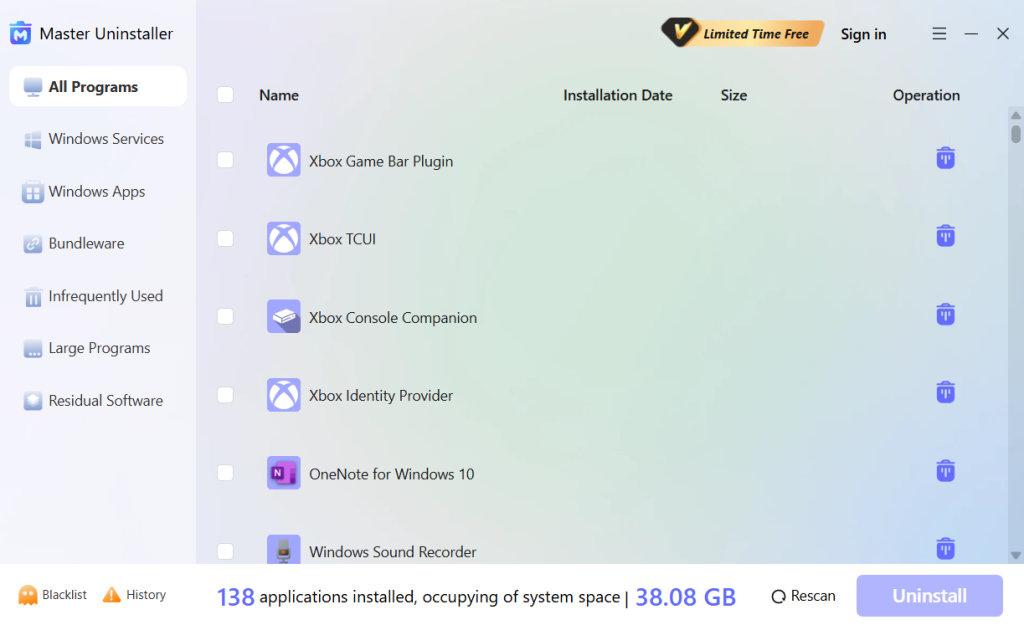
When Windows’ built-in features can’t get rid of an application, third-party apps can be employed. Using Master Uninstaller is among the safest and fastest ways. It can let you remove programs from your computer in a secure and correct manner.
Here’s how to uninstall Windows apps using Master Uninstaller:
- Download the program from the official Master Uninstaller website.
- Start the Master Uninstaller application.
- Click the box next to the app’s name to select which of the installed programs on your computer you want to uninstall.

- After selecting Uninstall, watch for the app to get deleted.
With the Start Menu
The majority of desktop and UWP applications that are installed on your device are listed in the Windows Start menu. Here’s a detailed tutorial on how to delete Windows apps using the start menu.
- Find and click the Star button which has the Windows logo on it. This will bring up the Start menu.
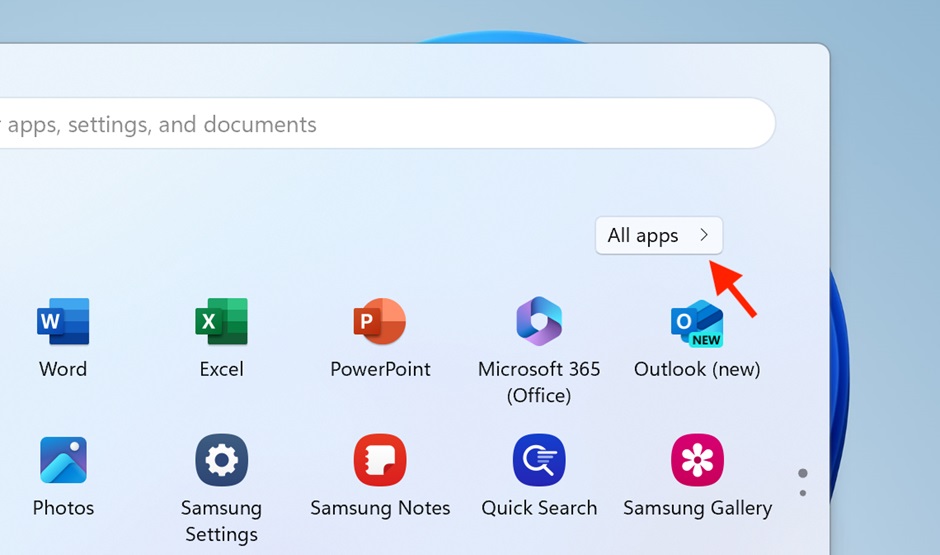
- Locate the “All apps” option once the Start menu has opened. A thorough list of all the desktop and UWP programs that are installed on your computer will be displayed when you click on “All apps.”
- Choose the application you want to delete from your computer as you browse through the list. On it, perform a right-click and a context menu will show up.
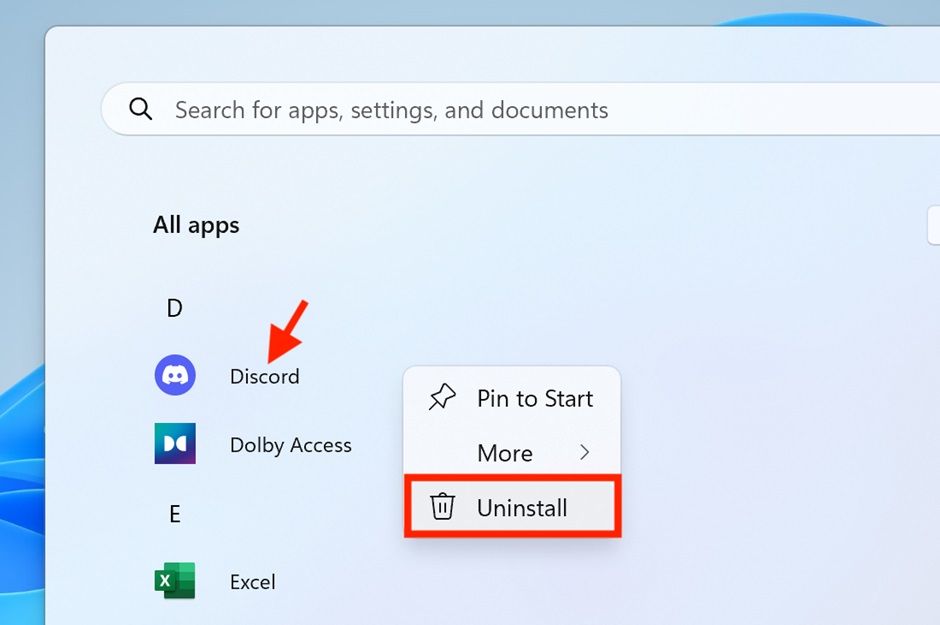
Image name: uninstall-app-from-start-menu
Alt-text: Uninstall button in start menu
- Choose “Uninstall” from the list of alternatives. By doing this, Windows is prompted to start the chosen software’s uninstallation procedure.
- Clicking “Uninstall” will bring up the Installed Apps pane. To make accessing the Uninstall option more accessible, switch to the grid view.
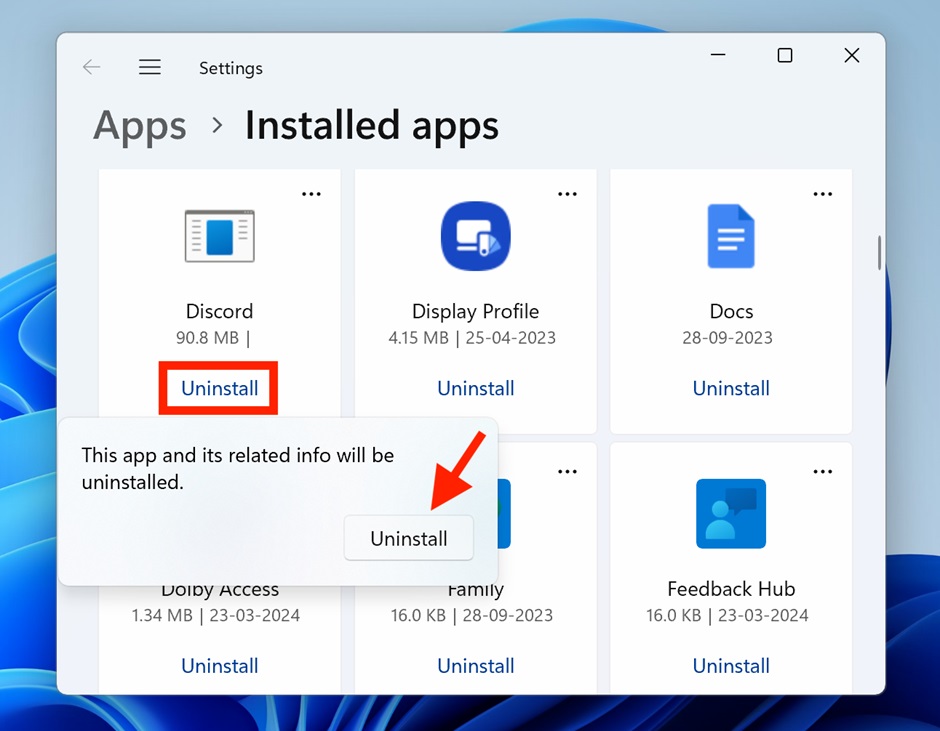
- To confirm the selection, click the Uninstall button once again after selecting the app’s blue “Uninstall” link.
- Next, locate the particular program you want to delete, right-click on it, and select “Uninstall” from the context menu that displays.
Using the Settings App
Since practically all programs can be downloaded and installed from the Microsoft Store, uninstalling them through Windows Settings has become the standard procedure. The main reason for this is that these apps are Universal Windows Platform (UWP) apps, which are more tightly linked into the Windows operating system because they are made to function on a variety of Windows devices.
Here is a detailed guide on how to remove Windows apps using Settings menu:
- Start by going to your Windows device’s Settings menu. Press the Windows and I keys (Win + I) for a shortcut.
- Choose the “Installed apps” option after finding and clicking on the Apps tab in the left pane.
- A list of all the installed software on your device will now be displayed to you. There is a direct Uninstall button in this display.
- Locate the program you wish to remove, then click the “Uninstall” button. For confirmation, hit the Uninstall button once again. This will start the process of uninstalling the app.

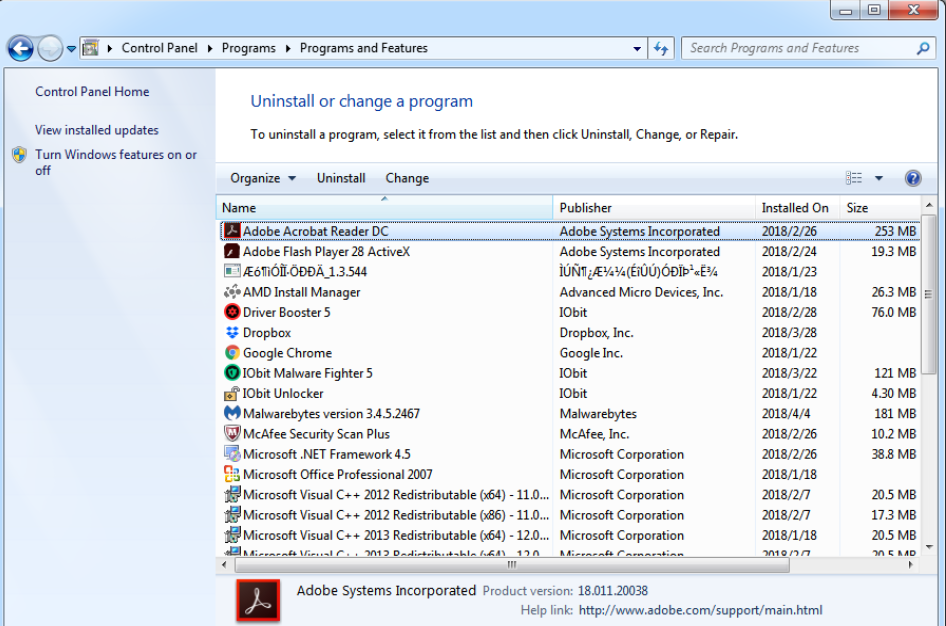
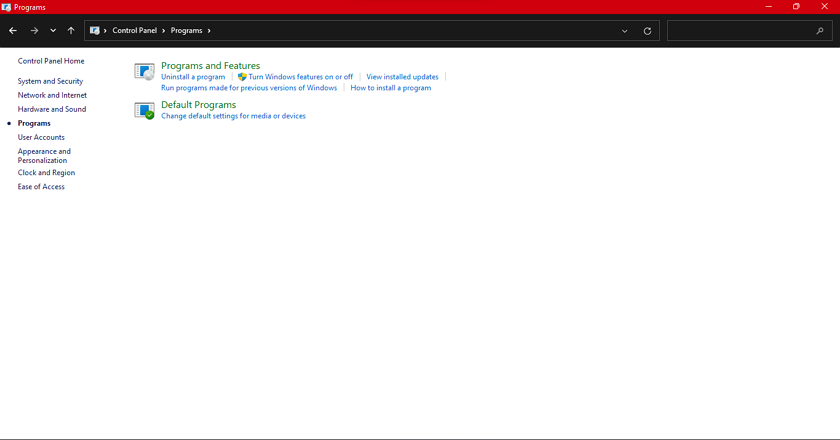
Uninstall with Control Panel
The applet “Programs and Features” is found in the Control Panel and serves as a vital means of removing any desktop programs that are running on an x86-based PC. However, it is important to remember that “Programs and Features” is becoming less and less relevant, especially when compared to some of the third-party uninstallers that are available in the market today.
However, since it does not fully get rid of all traces of the uninstalled program—folders, files, and registry entries- there is a downside. Furthermore, this applet’s usefulness is limited in some situations because Microsoft has not updated it to handle Universal Windows Platform programs.
“Programs and Features” is still a helpful tool for removing conventional desktop apps in spite of these drawbacks. Here is a detailed tutorial for total novices on how to uninstall Windows apps with the Control Panel:
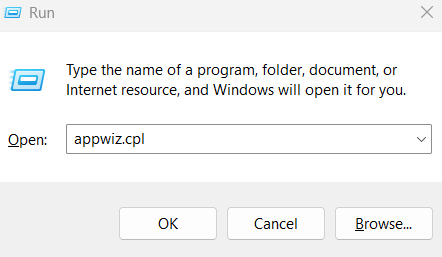
- To start the Run utility application, press the Windows + R key arrangement on your keyboard. Enter “appwiz.cpl” (without quotes) in the text field of the Run dialog box and hit Enter. The “Programs and Features” window can be opened directly with this command.
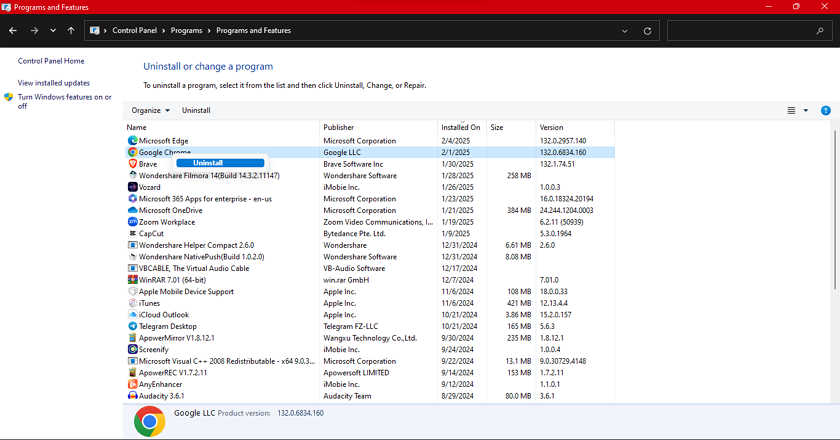
- Check the list of applications in the “Programs and Features” box to locate the one you wish to uninstall.
- Click on the software and find the “Uninstall” button and click it. This button is usually found either by right-clicking on the chosen program or by looking at the list of installed programs.
- An uninstaller wizard for the chosen software may show up after completing the aforementioned steps. The wizard will guide you with the remaining uninstallation steps.
With the Registry Editor and Run
Many people do not often think of using the Registry Editor to remove software packages. But when it comes to software that has issues during uninstallation, this approach can be quite useful.
You may manually get rid of obstinate software from your computer by using the Registry Editor’s capabilities in conjunction with the Run application.
Here’s a detailed tutorial on how to uninstall Windows apps using registry editor:
- We must first open the Windows Registry Editor in order to begin. To accomplish this, type “Registry Editor” into your Windows search box and select “Run as administrator.”
- The regedit command is also available in the Run dialog box. To enter the Run dialog, just press Windows key + R. Then, type regedit and hit Enter.
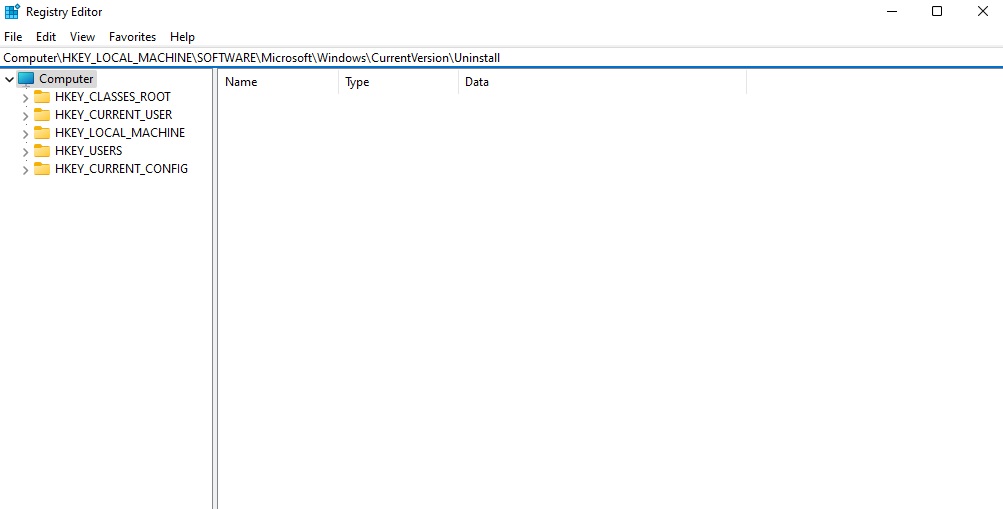
- You must locate the area where software uninstallation data is kept after the Registry Editor is launched. To access the following path, use the panel on the left: Computer\HKEY_LOCAL_MACHINE\SOFTWARE\Windows\CurrentVersion\Remove it. The keys for every piece of installed software on your computer are located in this path.
- Find the key that matches the program you want to remove by scrolling down the list.
- Once you have identified the appropriate key for the program you want to delete, double-click the UninstallString entry in that key.
Conclusion
Uninstalling Windows apps and programs should be simple with these pointers, or at the very least, not as tough as removing that pie stain from your couch. Keep in mind that maintaining your PC is more important than having free space. It’s about making sure it operates smoothly and safely. With this guide on how to uninstall Windows apps, you’re sure to make some extra space for the important programs.

Master Uninstaller
Frequently Asked Questions
Q:
Q1. Is it possible to reinstall an app after removing it?
You can. Reinstalling the software is simple as long as it is still accessible through the Microsoft Store or the original developer.
Q:
Q2. What happens if I uninstall an important program by mistake?
You can reinstall the majority of essential programs. The Microsoft Store is where you can find Windows-native apps.
Q:
Q3. Will my PC perform better if I remove apps?
It may, particularly if the programs you’re removing use a lot of resources or operate in the background.
Q:
Q4. How can I get rid of Windows 11 programs forcefully?
Depending on the cause, you may need to remove certain programs. If the program you are attempting to remove is not a system application, it is most likely doing so because it is operating in the background. Hit Ctrl + Shift + Esc to launch Task Manager and verify this. Check to see if the app is running there. If so, end the task after selecting the application. You should now be able to delete the program after closing it.
You will need to use more technical tools like the Command Prompt, Windows Terminal, PowerShell, or Windows Registry to seek assistance if the software is a system application.
You will need to use more technical tools like the Command Prompt, Windows Terminal, PowerShell, or Windows Registry to seek assistance if the software is a system application.
Windows 10 Force Remove Program: 7 Effective Methods
Do you have programs on your computer that you don’t want or use anymore? To clear your Start menu and free up storage space, you can simply remove them. However, the built-in installers leave behind leftover folders that keep running in the background and obstruct the uninstallation process. So, how can we solve the “Windows 10 force remove program” problem? Let’s take a look at some of the most effective strategies.
Windows 10 Force Remove Program: 7 Ways
Program uninstalling is something we try occasionally. However, when you try to uninstall anything, you get an error and the uninstallation fails. You have the option to forcefully uninstall during such circumstances. We’ll walk you through the process of forcibly uninstalling apps on Windows 10 with these effective methods.
1. Use Third-Party Uninstaller
Third-party applications can be used when Windows built-in features are unable to remove an application. One of the quickest and most secure methods is to use Master Uninstaller. It can assist you in safely and correctly removing apps from your computer.
Here’s how to remove a program Windows 10 using Master Uninstaller:
- Go to the official Master Uninstaller website and download the software.
- Launch the Master Uninstaller.
- Choose which of the installed apps on your computer you wish to remove by clicking on the box next to the name of the app.

- Click on Uninstall and wait for the app to get removed.
2. Use Control Panel
This is possibly one of the oldest techniques that you can use. It’s easy to attempt and removes the unwanted app in most cases. Here’s how to force uninstall software Windows 10 using the control panel:
- To open the Run box, use the Win + R keys.
- After typing appwiz.cpl, hit Enter.
- Find the software you want to uninstall when the programs and features window opens.
- To uninstall it, right-click on it and choose Uninstall.
- To finish the installation, follow the on-screen directions.
3. Use Registry Editor
Windows has a tool called Registry Editor. Although it is a little complex, it can also assist in uninstalling Windows 10/11 programs that are refusing to uninstall. It is advised to take the actions listed below for Windows 10 force remove program fix:
Note: Please use caution when operating as improper registry changes may result in system faults or crashes.
- The Run window can be opened by pressing “Windows” + “R”. Press Hit “Enter” after typing regedit to launch the Windows 10 Registry Editor.
- Go to HKEY_LOCAL_MACHINE/SOFTWARE>Microsoft>Windows>CurrentVersion
- Locate the desired program. Click the “Delete” option after right-clicking and choosing the application.

- In order to confirm that you wish to remove the current software, click “Yes”.
To apply the modifications, restart your computer. Lastly, see if this Windows 10 force remove program solution has fixed the problem.
4. Use Safe Mode to Uninstall The Program
The uninstall procedure may be interfering with third-party processes if you are unable to remove an application from Windows 10. Booting your Windows 10 PC into Safe Mode and then removing the targeted program there is the solution.
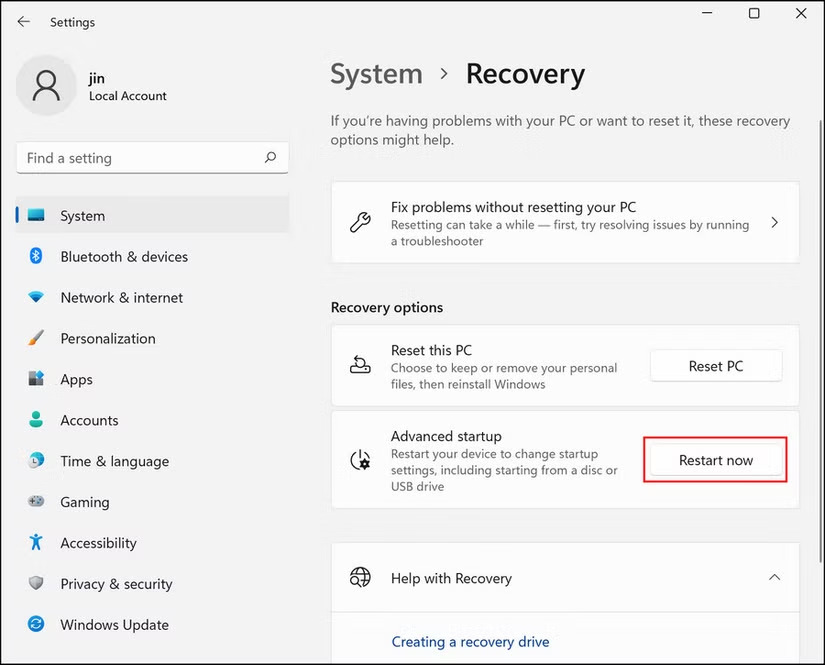
- Access Settings by pressing “Windows” + “I”.
- Select “Update & Security” (Windows 10) or “System” (Windows 11) > “Recovery.”
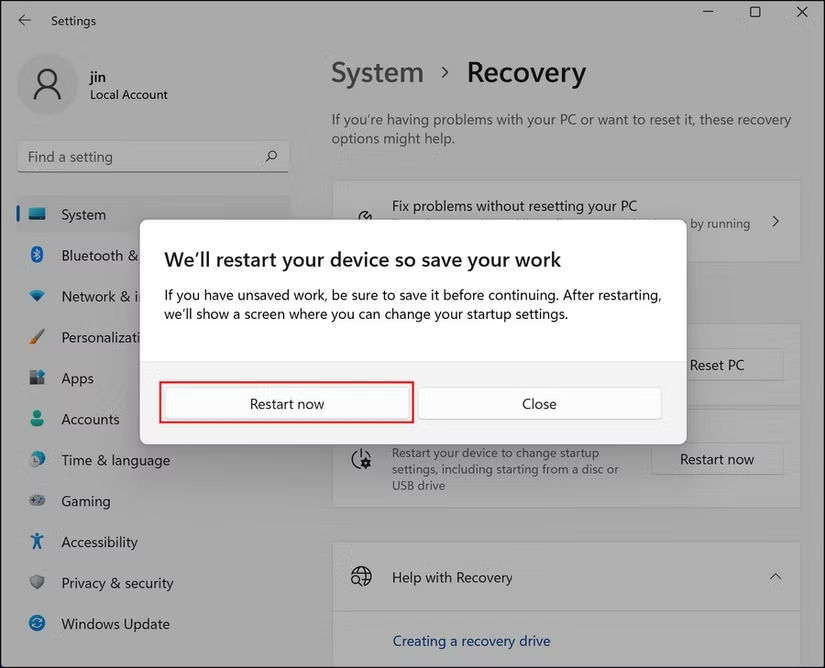
- Select “Restart now” under Advanced Startup.
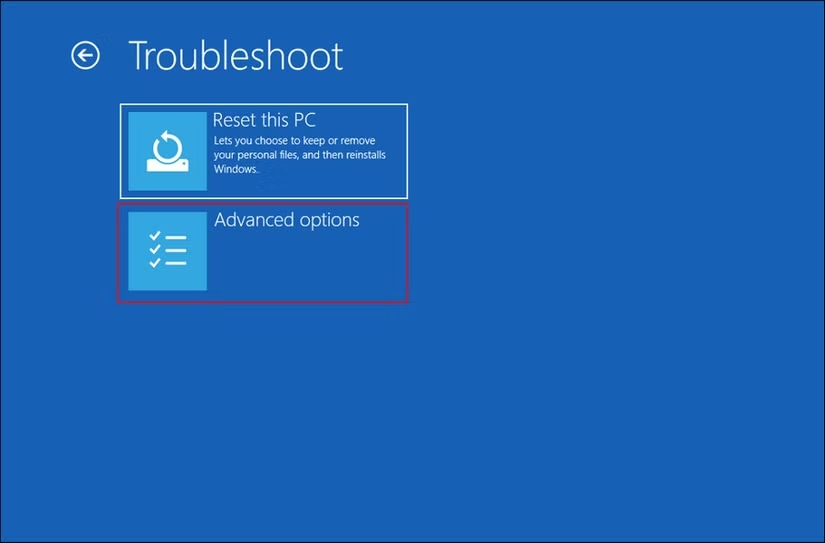
- After your computer has restarted, choose Troubleshoot
- Click on Advanced options
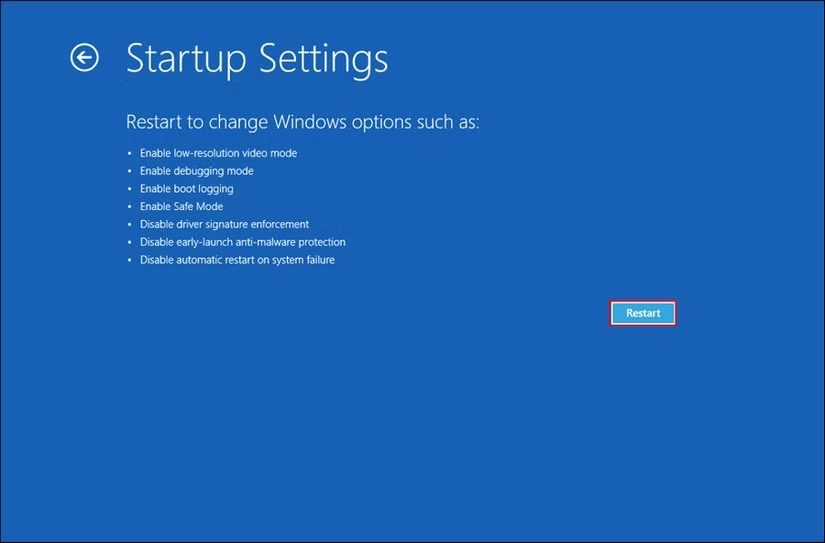
- You will be redirected to Startup Settings
- Click on Restart and see if the Windows 10 force remove program is completed.
5. Use the Install and Uninstall Troubleshooter for Microsoft Programs.
Microsoft offers a free application installation and removal troubleshooter. You can attempt the following actions if you want a solution to Windows 10 force remove program problem:
- Install and launch the Microsoft Troubleshooter.
- Click Uninstall when the message “Having trouble installing or uninstalling a program?” appears.
- A list of your computer’s installed programs will appear in the pop-up window.
- Click “Next” after selecting the programs you won’t be uninstalling the traditional way.
- After that, click “Yes, try uninstalling” to begin the process of removing the desired program.
You should be able to remove programs that Windows 10 does not allow you to remove using this method.
6. Utilize the built-in Uninstaller
You may also use the application’s built-in uninstaller to remove programs. The majority of third-party software comes with an integrated uninstaller. It is often found in the root folder of the application. Observe the guidelines below:
Open File Explorer and find the installer’s directory. To find out where the target software is located, right-click on its icon and choose “Properties” if you’re unsure.
Next, locate the executable file in the directory with the name uninstaller.exe, uninstall.exe, or a similar name.
To successfully uninstall the present software, double-click it to launch the uninstaller.exe and then follow the instructions.
7. Execute a System Restore
You can set your Windows 10 PC back to the default settings and uninstall any new programs immediately. Just remember to backup all important data on the computer before doing a system restore.
- Type “System Restore” into the search bar and click on “Create Restore Point.”
- Hit the “System Restore” button to set the system back to default and follow through with the prompts.
- Once all the updates are reversed, the program can be uninstalled using any of the above methods.
How Do I Completely Remove Leftover Files After Uninstalling a Program?
Even after you uninstall a program some files and folders and entries in the registry may remain on your system. These leftover files can take up storage space and sometimes cause conflicts when you reinstall similar software. Here’s how to make sure you remove all residual files after uninstalling a program in Windows 10:
1. Check and Delete Leftover Program Files
- Open File Explorer (Win + E) and check these places:
- C:\Program Files
- C:\Program Files (x86)
- C:\Users\YourUsername\AppData\Local
- C:\Users\YourUsername\AppData\Roaming
- Look for folders related to the uninstalled program and delete them manually.
- If you can’t delete a folder, restart your PC and try again.
2. Remove Leftover Registry Entries
- Remove Leftover Registry Entries (For Advanced Users)
- Press Win + R, type regedit and hit Enter to Open Registry Editor.
- Go to HKEY_CURRENT_USER\Software and also to HKEY_LOCAL_MACHINE\SOFTWARE. Look for the folder that contains the application you want to get rid of.
- Be careful as deleting the wrong registry entry can cause system problems. It’s a good idea to first create a backup (File > Export).
3. Use an Uninstaller Tool
You can also choose Master Uninstaller to get rid of that unwanted application. It provides deep scanning for residual entries in the registry and hidden files.
4. Clear Temporary Files
- Press Win + R, type %temp%, and then Enter to access the temp files folder.
- Delete all the files in this folder.
- Run Disk Cleanup to delete unnecessary system files. Apply these Windows 10 force remove program fixes to check whether all the unwanted apps are removed.
These steps will make sure that no traces left of the program uninstalled on the Windows 10 system.
Conclusion
It should be relatively easy to unistall a program on a Windows PC. However, you can use one of the six methods in this guide to force uninstall any programs that won’t uninstall in your Windows 10 device if you are unable to do it from the Control Panel or Start menu.
Master Uninstaller
-
Simple and Practical: Easily uninstall unwanted software.
-
Thorough Cleanup: Completely remove residual files.
-
Blacklist Protection: Identify and block malware and adware.
FAQs
Q:
How can I get rid of an application that prevents Windows 10 from being uninstalled?
If you try these steps, it’s an easy job:
1. Launch the Start Menu > Select Apps from the Settings menu.
2. From the menu, choose Features & Apps.
3. Choose whatever app you wish to remove. Under the chosen software or app, click the uninstall button.
1. Launch the Start Menu > Select Apps from the Settings menu.
2. From the menu, choose Features & Apps.
3. Choose whatever app you wish to remove. Under the chosen software or app, click the uninstall button.
Q:
Why is it impossible to remove certain apps?
An application cannot be uninstalled for a variety of reasons. Here are the specifics:
1. The software is running. The machine is unable to uninstall applications while it is running. The program must be closed before it can be uninstalled.
2. There is damage to the software. Software may become damaged by computer viruses or an accident during the downloading process, making it impossible to delete routinely.
3. Mistake in operation. Some users unintentionally erase crucial software files without being careful, which prevents the program from uninstalling properly.
4. Registry issue. One crucial part of the Windows system is the registry. It keeps track of system information and software installation details. The software won’t uninstall normally if spyware or improper actions alter the registry.
5. Difficulty with administrator rights. Administrator rights are required to uninstall certain software. If those rights are not in order, the software will not get removed.
Q:
How Do I Uninstall a Program in Windows 10 forcefully using CMD?
You must first launch Command Prompt as administrator in order to use it to remove a program or application:
1. Type cmd in the search box and select the Command Prompt program. Select “Run as administrator.”
Type wmic and hit Enter.
2. To view a list of installed programs on your computer, just type the product name and hit Enter.
3. Every software and app will be visible. To remove the targeted program, execute the following command: uninstall product where name=”program name” call.
4. Windows will then prompt you to decide if you wish to run the command or proceed. Press Enter after typing Y to confirm your action.
Troubleshooting Guide: What to Do When a Program Won’t Uninstall
The windows software installation and uninstall process are not always that user-friendly. More often than not, it becomes quite a headache for users trying to get rid of specific applications from the system. Numerous factors, including a corrupted or disabled Windows Installer service or issues with the operating system, can cause this. So, what to do when a program won’t uninstall? Let’s find out.
Why an App Won’t Uninstall Windows 10
Removing software from a Windows system should, in theory, be an easy process – but it’s not always so. There can be dozens of reasons why this happens, causing additional hassle, especially for those wanting to free up some space or get rid of a particular piece of software. Here are some of the most common causes of the “software won’t uninstall” dilemma.
Corrupted or Missing Uninstallation Files
A lot of programs come with their own uninstaller, but if the necessary files are damaged or there is some other reason for their absence, the uninstallation process fails. This usually happens due to an incomplete installation, system crash, or accidental deletion of some required files.
The Application is Still Running in the Background
Some programs do not close completely. Their processes are active and they stop Windows from making changes to their files during such instances. Even after the application has been closed, processes or services in the background related to this software will run and therefore create conflict during uninstallation.
Windows Installer Service Issues
The Windows Installer service handles the installation and removal of software. If this service is disabled or stuck or not functioning properly, uninstallation cannot be completed as some programs cannot be removed.
Insufficient User Permissions
Some applications can be uninstalled only with administrative privileges. In the absence of the required permissions, Windows may block the uninstallation process. This happens quite frequently with system utilities, security software, and enterprise applications.
Leftover Registry Entries and System Files
Many programs leave behind registry entries and files on the system even after uninstalling. If these remnants are not properly cleaned up, the program might still appear on the system or cause trouble when you try to uninstall it.
Malware or Stubborn Software
There are some programs, PUPs and malware in particular, that are intentionally designed to be hard to remove. They either come without a regular uninstaller, use misleading ways to hang around, or manage to reinstall themselves after being deleted.
6 Ways To Force Uninstall a Program That Won’t Uninstall
Having trouble removing a stubborn program from your computer? We have a few tried-and-tested methods that can help you solve the problem of “program won’t uninstall”.
1. Use Third-Party App Uninstaller
If a program does not uninstall through Windows’ built-in ways, you can try a third-party uninstaller. These tools are supposed to help remove stubborn programs that can include leftover files and registry entries that standard uninstallers often leave behind. Master Uninstaller is an efficient software that removes even the most persistent programs.
To use Master Uninstaller to fix the “program won’t uninstall” problem:
- Download and Install Master Uninstaller from the official website.
- Launch the Software and scan for installed programs.
- Select the Problematic Program from the list.
- Click Uninstall, and the Master Uninstaller takes off the program along with leftover files.
2. Restart the Windows Installer
The Windows Installer service is essential to the uninstallation process even though it would seem like it solely deals with software installation on Windows. If Installer service is either deactivated or malfunctioning, you may have difficulties when removing apps from the system.
Restarting the Windows Installer service will be the first step in our troubleshooting process because it is usually the cause of uninstallation difficulties. We’ll attempt re-registering Windows Installer and see if that helps if restarting doesn’t work.
Here’s how to remove program that won’t uninstall:
- Press Win + R.
- Click Open after entering services.msc in Run.
- Locate and right-click the Windows Installer service in the window that appears.
- From the context menu, select Properties.
- Click the Stop button in the Properties tab, wait for a few seconds, and then click the Start button.
- Verify that Automatic is selected as the Startup type.
- For the changes to be saved, click Apply > OK.
Now you can check if it works by trying to uninstall an application. If the program still won’t remove, try re-registering the service.
- Click Run as administrator after typing cmd into Windows search.
- Select Yes.
- To run the command, put msiexec /unreg into the Command Prompt and press Enter.
- Following the execution of the command, run msiexec /regserver.
- Now, try deleting the program that was causing the problem by closing the Command Prompt.
3. Terminate The Application’s Process in Task Manager
If the program’s process is active in the Task Manager, you might not be able to uninstall it. An error will result from this procedure interfering with the uninstalling process.
If this is the case, you can try removing the software after terminating its execution in Task Manager.
Here’s how to remove program that won’t uninstall using the task manager:
- Click Open after typing Task Manager into Windows search.
- Locate the program you wish to remove by selecting the Processes tab in the window that appears.
- Select End task with a right-click.
- After finishing, exit Task Manager and see if the specified program can now be uninstalled.
To resolve the problem, you can alternatively attempt to restart the Windows Explorer process within the same window. Just find Windows Explorer and give it a right-click. Choose Restart and watch the magic unfold.
4. Uninstall the App in Safe Mode
As previously stated, you may also encounter the problem of “cant remove program” if the background-running application obstructs the uninstallation procedure. It turns out that the removal process may also be hampered by other programs on your computer.
We need to boot into Safe Mode to resolve this issue because it is hard to identify which specific application on your operating system might be the cause. Windows is launched in Safe Mode with the bare minimum of necessary drivers and applications.
As a result, the mistake will be fixed during the uninstallation process and background apps won’t interfere.
Here’s how to solve the “program won’t uninstall” fix:
- To access Windows Settings, press Win + I simultaneously.
- Navigate to the Recovery area on the right side of the window after selecting System from the left pane.
- Click the Advanced Startup button labeled “Restart now.”
- Press Restart once more.
- In the following window, select Troubleshoot > Advanced options.
- Click Restart after selecting Startup Settings.
- To enter Safe Mode in the window that appears, press 4.
- Try deleting the targeted program once the computer has successfully booted into Safe Mode.
With any luck, this method will allow you to successfully uninstall it. After you’re finished, restart your computer to get out of Safe Mode to see if the program won’t uninstall problem is fixed.
5. Make Use Of the Default Uninstaller
The uninstaller that comes with many apps performs a good job of uninstalling them. This uninstaller can be found in File Explorer’s official application folder.
Double-clicking the uninstaller will launch it. To use the uninstaller, navigate to the folder location in File Explorer. You can look for an uninstaller on the official manufacturer’s website if you are unable to locate one in File Explorer. Consider using free third-party solutions to remove apps in bulk if you wish to uninstall several programs at once.
6. Take Out the Registry Keys
If the software won’t uninstall even after all these methods, there’s a possibility that a Registry problem is preventing you from uninstalling the program. When you uninstall the program, the Registry keys linked to it should ideally be deleted automatically.
If that doesn’t work, though, you can manually delete the program’s Registry keys. Before using this procedure, make sure you are logged into Windows as an administrator. It ought to resolve the issue permanently.
Conclusion
You can delete an application completely from your computer if you no longer need it in order to make room for better and more recent options. Should you encounter any difficulties throughout this procedure, the aforementioned techniques ought to assist you in quickly resuming the uninstallation. The “program won’t uninstall” problem takes quite a simple approach to solve.
Master Uninstaller
-
Simple and Practical: Easily uninstall unwanted software.
-
Thorough Cleanup: Completely remove residual files.
-
Blacklist Protection: Identify and block malware and adware.
How To Uninstall a Program That Refuses To Uninstall
Your computer will operate more quickly and with fewer issues if you remove any unnecessary apps and programs. Nevertheless, some programs and applications do not uninstall or leave behind undesirable elements of themselves. This comes down to:
- Programs and applications that have developed bugs
- Programs and applications that exchange files with other programs and applications
- Entries that run at a level that prevents the average user from affecting them and that write themselves into other programs and apps
We’ve compiled a list of some of the most effective techniques on how to uninstall a program that refuses to uninstall.
How To Uninstall a Program That Won’t Uninstall
Installing the required programs on Windows is usually a smooth process. You might, however, run into a situation where the installed program seems difficult to uninstall. If so, don’t be concerned.
You can quickly remove software that won’t uninstall from your device by using a few easy and quick techniques. Continue reading to learn more and address the problem of “how to remove a program that won’t uninstall“.
1. Using Free Program Uninstaller
A third-party application uninstaller is another quick and simple solution. Master Uninstaller is a great program that can help you remove any unwanted app. This program helps get rid of programs that aren’t uninstallable in a matter of seconds.
Here’s how to uninstall a program that won’t uninstall using Master Uninstaller:
- Download the Master Uninstaller using this link: https://uninstaller.ipcmaster.com/
- Click on “Free Download” in the upper right corner.

- Launch the application and give all the required permissions
- You will see a list of all the applications on your device

- Tick the box next to the application you want to uninstall
- Click on Uninstall in the bottom right corner.
- Click on Ok to uninstall the app.
2. Use the Control Panel
Take advantage of the uninstaller that comes with Windows 10 and 11.
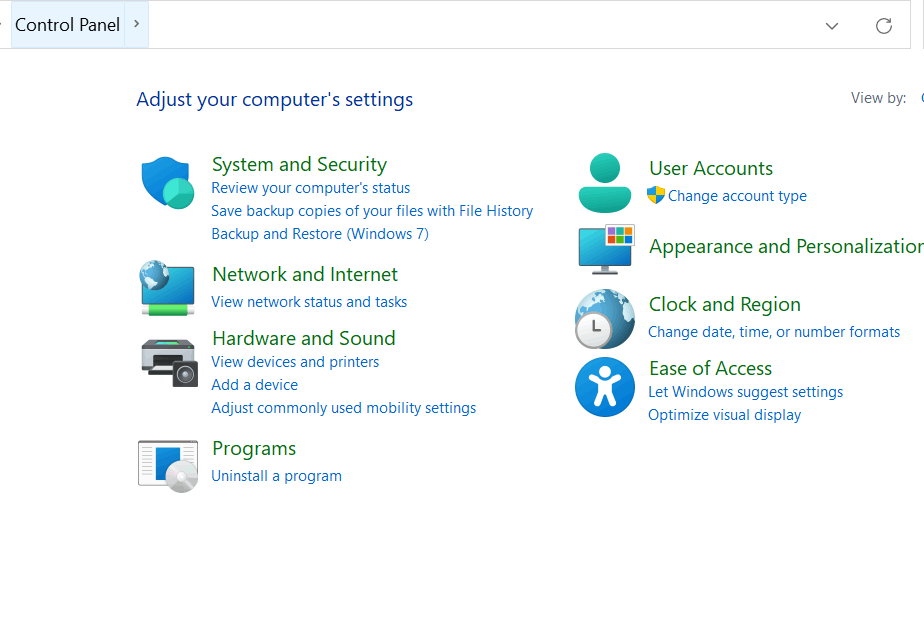
- Get the Start Menu open in the Control Panel.

Image name: control-panel-open
Alt-text: How to uninstall a program that refuses to uninstall using the control panel
- Select Programs.

- From the menu on the left, choose Apps & Features.
- Pick the program or application you wish to remove.
- Click the uninstall button.
- To finish the removal, adhere to the on-screen directions.
3. Uninstalling via Settings on Windows 10/11
Windows 10 and 11 offer a straightforward way to uninstall programs through the Settings menu. This method works for most installed applications, including Microsoft Store apps and traditional desktop programs. Follow these steps on how to uninstall a program that refuses to uninstall using Settings:
1. Open the Settings App
- Press Win + I to open the Settings window.
- Click on Apps and then select Apps & Features from the left sidebar (Windows 10) or Installed Apps (Windows 11).
2. Locate the Program
- Scroll through the list or use the search bar to find the program you want to remove.
- Click on the program’s name to expand the available options.
3. Uninstall the Program
- Click Uninstall, then confirm the action when prompted.
- If the program has its own uninstaller, follow the on-screen instructions to complete the process.
4. Restart Your Computer (If Needed)
- Are you still stuck on how to uninstall a program that refuses to uninstall? Some programs require a restart to fully remove all files. If prompted, restart your PC to complete the uninstallation.
- If the Uninstall button is unavailable, the program may be a system app or have missing files. Try other methods, such as using Control Panel, Command Prompt, or a third-party uninstaller, to remove it.
4. Using Task Manager
Once the application or program has been closed in Task Manager, you can easily uninstall it.
- To launch the Task Manager, simultaneously press the CTRL + SHIFT + ESC keys.
- You will be redirected to the processes tab.
- From the list under processes, pick the program or application you wish to remove.
- Choose End Task with a right-click on the program or application.
5. Remove Problem Updates
How to force remove a program if the program does not get uninstalled even with all the above methods? You need to get rid of all the recent updates that are not compliant with the app. As with any program or application, you can remove recent Windows update files from the Control Panel’s Apps & Features tab.
Forcing Uninstall via Command Line Methods
When a program refuses to uninstall using standard methods, the Command Prompt, PowerShell, or Terminal (for Mac) can help force its removal. These methods bypass graphical uninstallers and remove stubborn software directly from the system.
Forcing Uninstall via Command Line Methods
When a program refuses to uninstall using standard methods, Command Prompt, PowerShell, or Terminal (for Mac) can help force its removal. These methods bypass graphical uninstallers and remove stubborn software directly from the system. Learn how to uninstall a program that refuses to uninstall using command prompts.
- Using Command Prompt (Windows)
Windows provides two command-line tools to uninstall programs: WMIC (Windows Management Instrumentation Command-line) and MSIEXEC (Microsoft Installer Executable).- Open Command Prompt as Administrator by pressing Win + R, typing cmd, and pressing Ctrl + Shift + Enter.
- Type a command to list all installed programs.
- Identify the exact name of the program and enter the command to uninstall it.
- Confirm if prompted.
- Restart your PC for the deletion to take effect.
- Some applications are installed with MSI-based installers which can be uninstalled from Command Prompt.
- Open Command Prompt with elevated privileges.
- Enter a command that applies to the unique identifier of the application you want to uninstall.
- Confirm and restart your computer if required.
- Using PowerShell (Windows)
PowerShell provides advanced control over installed applications, particularly over Microsoft Store apps and stubborn programs.- Open PowerShell as Administrator from the Win + X menu.
- Type in a command to list installed apps.
- Note down the app’s name and enter another command to remove it.
- Using Terminal (Mac)
Some stubborn applications on the Mac leave behind hidden files that can be manually removed through Terminal.- Open Terminal from Spotlight Search.
- Change the directory to the Applications folder.
- Type in a command to force delete the app.
- To remove leftover files:
- Navigate to the Library folder.
- Enter a command to delete any remaining data.
When to Use Command-Line Methods
- The program is missing an uninstaller.
- The uninstall button is grayed out in Settings.
- The program keeps reappearing after uninstalling.
- You’re dealing with a pre-installed app that won’t uninstall normally.
If these methods don’t work, consider booting into Safe Mode or using a third-party uninstaller for complete removal.
Manually Deleting Program Files and Registry Entries
Still can’t uninstall app windows through traditional methods? Manual deletion of its files and registry entries ensures complete removal. This method comes in handy when software leaves remnants that might interfere with system performance or reinstallation.
Here’s the steps on how to remove a program that won’t uninstall:
Deleting Program Files
- Open File Explorer and navigate to the installation folder, typically located in C: \Program Files C: \Program Files (x86)
- Locate the folder associated with the program and delete it.
- Empty the Recycle Bin to remove files permanently.
Some files might be locked by the system. If you get an error, restart your computer in Safe Mode and try again.
Removing Registry Entries (Windows)
The Windows Registry is a place where configuration settings for all installed programs are stored. Deleting leftover registry entries will ensure that no problems will arise from improper uninstalls. Here’s how to uninstall a program that refuses to uninstall from the registry:
- Press Win + R, type regedit, and press Enter to open the Registry Editor.
- Go to the following paths and look for folders related to the program:
- HKEY_LOCAL_MACHINE\SOFTWARE
- HKEY_CURRENT_USER\SOFTWARE
- HKEY_LOCAL_MACHINE\SOFTWARE\Microsoft\Windows\CurrentVersion\Uninstall
- Right-click the program’s registry entry and select Delete.
- Close the Registry Editor and restart your computer.
Caution: Modifying the registry can impact system stability. Always create a backup before making changes.
Checking for Leftover Files
After deleting registry entries, search for any remaining files in:
- C:\Users\YourUsername\AppData\Local
- C:\Users\YourUsername\AppData\Roaming
Deleting leftover data ensures that the program is fully removed from your system.
Conclusion
You will know what to do the next time you encounter a “how to uninstall a program that refuses to uninstall” problem. Depending on the origin of the problem, any of the techniques covered in this article can be beneficial. Furthermore, choosing a quick repair is always necessary, and Master Uninstaller’s smart capabilities are a huge help in this regard.
Master Uninstaller
-
Simple and Practical: Easily uninstall unwanted software.
-
Thorough Cleanup: Completely remove residual files.
-
Blacklist Protection: Identify and block malware and adware.
FAQs
Q:
1. How can I get rid of every trace left by removed programs?
You can use either of the following techniques to completely delete uninstalled apps from your Windows computer:
1. After the removal procedure, manually delete any remaining software files.
2. Use a third-party application to eliminate the last traces.
1. After the removal procedure, manually delete any remaining software files.
2. Use a third-party application to eliminate the last traces.
Q:
2. Is it possible to uninstall Office 365?
Depending on the installation type, Office 365 can indeed be swiftly uninstalled. The two most popular kinds are Microsoft Windows Installer and Click-to-Run. In this instance, the Control Panel is where Office 365 may be removed.
Q:
3. Is it possible to remove your hidden apps?
You can completely remove hidden apps from your Windows device by looking for the necessary app in the Control Panel and choosing it from the list of installed applications.
How To Uninstall League of Legends: Step-By-Step Guide
League of Legends frequently turns into one of the most brutal competitive games, making you want to remove it right away. It’s not shocking that you would occasionally wish to get rid of the game because the fan base typically has a love-hate connection with it.
Even though it’s not that difficult, some members of the community are a little perplexed about how to uninstall League of Legends from your device. Some gamers might choose to clear off their computer space or take a vacation from gaming. Others may be having technical difficulties or just want to test out new games. Whatever the reason, this guide will help you understand how to uninstall League of Legends so that you don’t have any leftover files.
3 Ways on How to Delete League of Legends
For those wondering how to delete League of Legends, there are three simple ways to do so, including using a third-party uninstaller, manual uninstallation via Riot Client, and Windows settings. We’ll go through each of these methods in detail to help you delete all the files from your device.
Using a Third-Party Uninstaller for League of Legends
Third-party uninstaller software is a great option if you want a comprehensive uninstallation. League of Legends and any remaining files on your computer can be fully deleted with the use of these tools. As an example, we are going to use Master Uninstaller to uninstall League of Legends. Follow these steps:
- Download and Install Master Uninstaller
Visit the Master Uninstaller official website. Download and install the latest version of the software.
- Launch Master Uninstaller
Open the Master Uninstaller application. Wait for the software to scan and display all installed programs.
- Locate League of Legends
Select the game from the list of installed applications. You can scroll down to find the game and select the checkbox.
- Uninstall the Game
Click the “Uninstall” button. A confirmation prompt will appear. Confirm by clicking “Ok”.
You can also use Master Uninstaller to uninstall Valorant in an identical manner. All you have to do is search for “Valorant” instead of League of Legends, execute the very same procedure, and there you have it – a clean uninstallation of the game. Using Master Uninstaller is a safer way to uninstall League of Legends and other titles from Riot Games so that there are no files left behind that can gunk up your system.
Manual Uninstallation via Riot Client
How many of you have used third party apps to uninstall League of Legends and then gone to Google to type in “cannot uninstall league of legends riot client is still running”? If you’re in the same boat, here’s how to remove the Riot Client and League of Legends from a Windows computer:
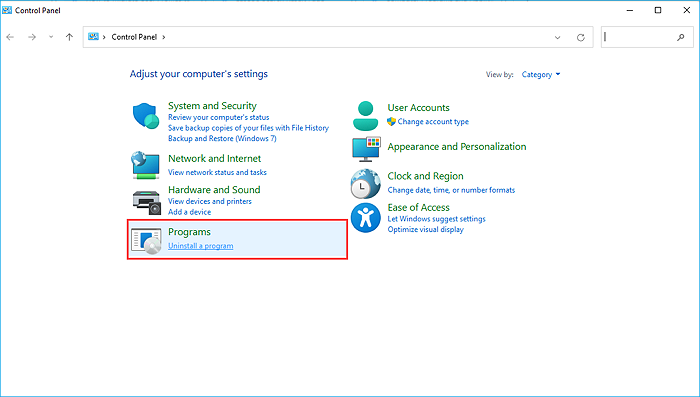
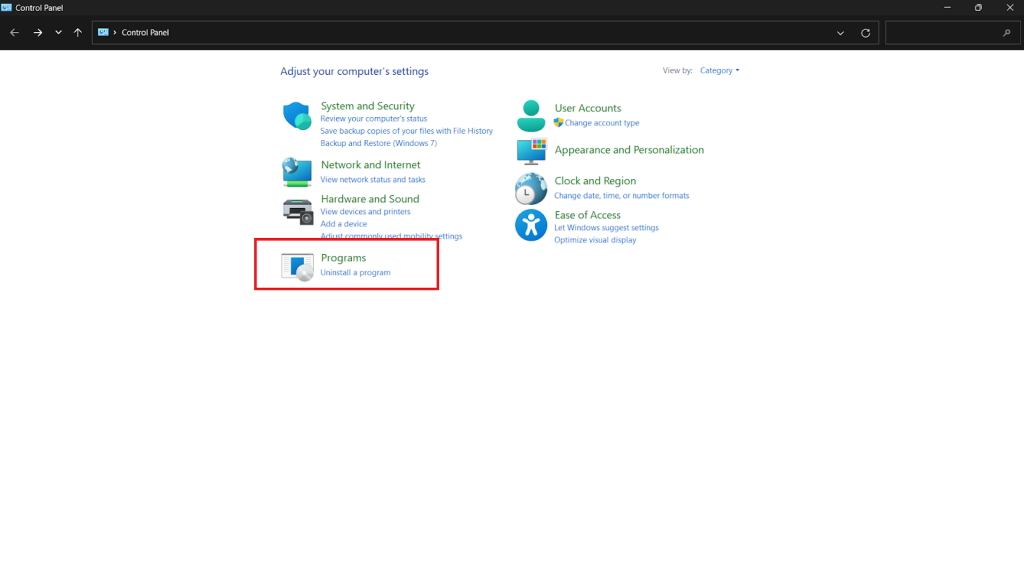
- Navigate to the Control Panel from the Windows Start Menu. You can use the Windows search bar to type Control Panel if you’re having trouble finding it.
- Here, you must choose “Program and Features,” which will display a list of the installed programs on your computer.
- You need to find Riot Client in the list, click on it, and then uninstall it. Removing the Riot Client from your system will prevent you from accessing other Riot Game IPs like League of Legends, Teamfight Tactics, Valorant, and Legends of Runeterra.
Now, you have to make sure that there are no more leftover files. To do that:
- Go to the Riots Game folder. This is typically located in the C:/ or D:/ drive except in cases where you selected a specific folder during the installation.
- Right-click on the folder and click on delete to remove all the leftover files.
Uninstalling League of Legends on Windows 11
Now, for those wondering how to uninstall League of Legends on Windows 11, this part is for you. You can also completely remove LOL from the Windows 11 Control Panel, though there might still be leftover files that allow you to play the game later. To learn how to delete lol, follow these steps.
- If you are playing League of Legends, save the process and quit.
- Use the taskbar search box to find the Control Panel utility, then click on it to start it.
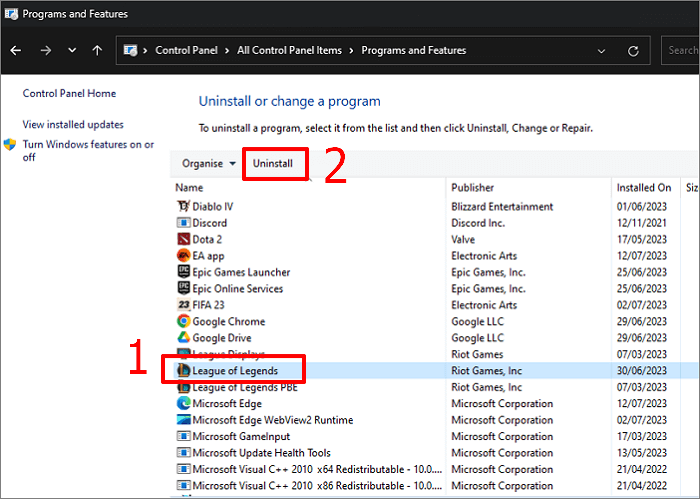
- Select “Programs and Features” or “Uninstall a Program” from the Program tab.
- Find League of Legends, click on it, and then choose “Uninstall.”
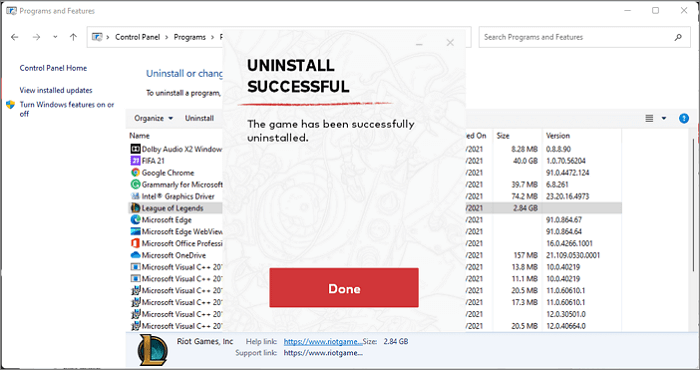
- Hit “Uninstall” in the confirm window that appears.
- Click “Done” after the procedure is complete. The uninstallation process for Valorant is very similar since both games are managed by Riot Games.
Troubleshooting Common Problems
1. League of Legends Doesn’t Appear in the Installed Apps List
- Check if it was installed using the Riot Games Client:
- Open File Explorer (Win + E) and go to:
C:\Riot Games\League of Legends
- If the folder exists, manually delete it and any related files.
- Open File Explorer (Win + E) and go to:
- Try uninstalling through the Riot Games Client itself.
2. Why Can’t I Uninstall League
- Run the uninstaller as an administrator:
- Go to C:\Riot Games\League of Legends\Uninstall.exe, right-click it, and select Run as administrator.
- Use the Control Panel method:
- Open Control Panel > Programs > Programs and Features
- Locate League of Legends, then click Uninstall.
3. Leftover Files After Uninstallation
- Delete the following folders manually:
- C:\Riot Games\League of Legends
- C:\Users\YourUsername\AppData\Local\Riot Games
- C:\Users\YourUsername\AppData\LocalLow\Riot Games
- C:\Users\YourUsername\AppData\Roaming\Riot Games
- Use a third-party cleaner like CCleaner to remove registry leftovers.
How To Ensure Complete Uninstallation of League of Legends
You think you have completely mastered how to uninstall League of Legends but it’s time to confirm. To fully remove League of Legends from your system, you need to delete leftover files and registry entries after the standard uninstallation.
Check for Leftover Files
- Open File Explorer (Win + E).
- Navigate to the following directories and delete any League of Legends or Riot Games folders:
- C:\Riot Games\
- C:\Users\YourUsername\AppData\Local\Riot Games
- C:\Users\YourUsername\AppData\LocalLow\Riot Games
- C:\Users\YourUsername\AppData\Roaming\Riot Games
Remove Registry Entries
- Press Win + R, type regedit, and press Enter.
- Navigate to these paths:
- HKEY_LOCAL_MACHINE\SOFTWARE\Riot Games
- HKEY_CURRENT_USER\Software\Riot Games
- Right-click and delete any Riot Games-related folders.
Since Valorant also uses the Riot Client, completely uninstalling League of Legends may not remove the Riot Client. If you want to remove Valorant, follow similar steps but also uninstall Vanguard (Riot’s anti-cheat software) separately.
Confirm Uninstallation Success
To make sure that League of Legends has been completely deleted from your PC, check whether it can still be found through Settings > Apps > Installed Apps. If you see it here, try again to uninstall it or use a third-party uninstaller such as IObit Uninstaller to clean it up further. Then, to double-check for any remaining files, open File Explorer and search under the C:\ drive for any files related to “League of Legends” or “Riot Games.” Delete any folders that might still be hanging around manually to avoid further problems in the future.
Furthermore, open Task Manager (Ctrl + Shift + Esc) and verify whether some League of Legends-related processes like, for example, RiotClientServices.exe are still open; if so, finish them yourself. To get rid of registry traces, go to the Registry Editor (Win + R and type regedit) and delete leftover entries from HKEY_LOCAL_MACHINE\SOFTWARE\Riot Games and HKEY_CURRENT_USER\Software\Riot Games.
Bonus Tips for a Smooth Uninstallation Process
Now that you understand how to delete all corrupted files riot games, we have some bonus tips to help you with a smooth uninstallation process. Make sure the game is not running by the time you uninstall League of Legends. Hit Ctrl + Shift + Esc so that Task Manager can launch and then look for any processes related to Riot and stop them in their tracks; this will avert errors during the removal process.
Even after following the steps from our guide on how to uninstall League of Legends if the uninstallation does not go through from the Settings app, then try running the uninstaller as an administrator. Simply right-click on Uninstall.exe in the game’s folder and choose Run as administrator.
After the uninstallation finishes, you have to restart your computer. This is very much desirable for the prevention of reinstallation-related problems. Reinstalling the game at some point can be a troublesome step since it leaves some traces behind.
Make sure to delete all existing League of Legends or Riot Games folders, if any remain, from your system by going in and manually checking them in C:\ and so-called hidden AppData folders. Doing this helps avoid any hiccup during uninstallation and will completely clear everything out.
FAQs
Q:
How to uninstall Valorant on Riot Client?
Use these steps to fully uninstall Valorant:
1. Turn off Vanguard.
2. Remove Riot Vanguard.
3. The Valorant client should be removed.
4. Eliminate any leftover files.
5. Registry cleanup is an optional step.
6. The Riot Games folder should be deleted with registered entries.*
1. Turn off Vanguard.
2. Remove Riot Vanguard.
3. The Valorant client should be removed.
4. Eliminate any leftover files.
5. Registry cleanup is an optional step.
6. The Riot Games folder should be deleted with registered entries.*
Q:
Can I reinstall League of Legends after uninstalling?
Yes, you can absolutely reinstall League of Legends after uninstalling it. Simply go to the official League of Legends website and download the latest installer to begin the reinstallation process on your computer. If you have leftover files on your device, you may even be able to restore the game to its previous state.
Q:
Does uninstalling League of Legends affect other Riot games?
The Riot Client, which comprises all the Riot games, won’t be deleted when League of Legends is uninstalled. You must uninstall the Riot Client separately if you wish to get rid of all Riot Games software from your computer.
Q:
How to completely uninstall Valorant?
Launch the “Settings” application or the Control Panel. Go to the “Apps and Features” or “Programs” space. Look for “Valorant” in the checklist. With a right-click, choose “Uninstall.”
Conclusion: How To Simplify the Uninstallation Process for League of Legends
With all these detailed steps, we are sure that you have learned how to uninstall League of Legends. Make sure the game is not running in the background so that there are no errors during the uninstallation process. It is recommended to use third-party uninstallation tools to make the uninstallation process easy. Once you have uninstalled the game, you’ll have a clean system on your device that will avoid performance issues.
Master Uninstaller
-
Simple and Practical: Easily uninstall unwanted software.
-
Thorough Cleanup: Completely remove residual files.
-
Blacklist Protection: Identify and block malware and adware.
How To Force Uninstall a Program on Windows 11
Uninstalling programs on Windows 11 is not only a straightforward process but also serves users with various benefits, including freeing up space and enabling lag-free system running. However, sometimes getting rid of software becomes a nightmare for Windows 11 users when the program doesn’t delete even after multiple attempts. This can happen for several reasons, such as corrupted software files, malware, or more. Worry not— as we have got you a solution to this problem.
You can always force uninstall applications on Windows 11 through various methods, such as using a third-party uninstaller or force removal via the command line tool. This guide will explore all the possible methods to try when dealing with the program that won’t uninstall errors on your PC. Let’s explore how to force uninstall a program on Windows 11!
Force Removal vs Uninstall in Windows 11
Before you proceed with the force removal methods on your Windows 11 PC, let’s understand the difference between the standard uninstallation procedure and force removal. Standard uninstall means removing the software by using Windows’s built-in tools. The standard uninstallation procedure involves no technical complications and can fully delete software without leaving any residual files and folders in your system.
However, if the software becomes stubborn and cannot get deleted with the built-in tools or functionality, the force remove application method comes. This method removes stubborn applications using various advanced techniques to bypass uninstallation errors and eliminate such software.
You can use the force uninstall application methods when the standard uninstallation fails, the software or application doesn’t show up in the Control Panel, or the residual files become stubborn and go away even after uninstallation is complete.
Here’s a table that compares force removal vs uninstall in Windows 11:
| Aspect | Uninstall | Force Removal |
| Definition | The standard process to remove programs is using Windows tools. | Aggressive methods to remove stubborn programs. |
| When to Use | Ideal for programs that can be removed normally without issues. | Used when a program refuses to uninstall or leaves residual files. |
| Risk Level | It is low-risk and usually safe, with no major side effects. | A higher risk could lead to system instability if not done carefully. |
| Typical Reasons for Use | Normal uninstalls work fine. | The program is stuck, unresponsive, or has corrupt files preventing removal. |
4 Ways to Force Uninstall a Program on Windows 11
Third-Party Solutions: Your Best Bet for Force Uninstalling Applications
Sometimes, the standard installation procedure fails, and the files become too stubborn to go away. No worries! That’s where third-party uninstallers come in handy. One such great choice is Master Uninstaller, which comes with a straightforward process for removing applications. This 1-click uninstall software helps you to get rid of unwanted software in no time.
Moreover, Master Uninstaller has a sleek and simple interface that is easy to use for beginners as well as professionals. The uninstaller not only cleans the system memory by removing the unwanted program but also gets rid of all the registry entries and residual files. Moreover, it comes with smart space-optimizing technology that can scan, clean, and optimize the system.
Key Features
- Remove junk and residual files from the system to prevent low memory and crashes.
- Removes all types of unwanted and stubborn software alongside associated files and folders.
- Scan for any stubborn and lingering data and eliminate the files and folders that slow down your system.
Step-by-step guide to use Master Uninstaller
Here’s a simple step-by-step guide to using Master Uninstaller for how to force uninstall a program on Windows 11:
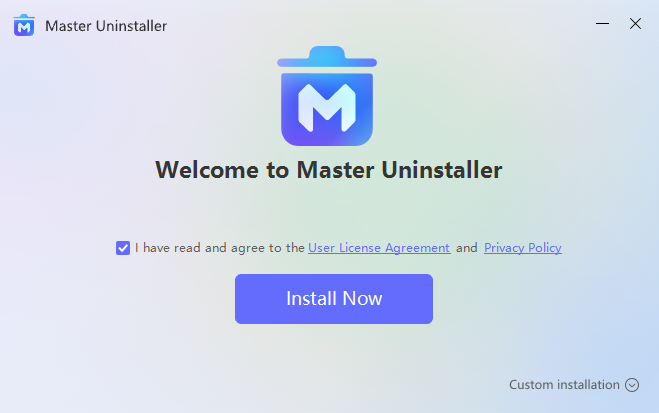
Step 1. Download and Install Master Uninstaller
Download the Master Uninstaller from the official website. Once done, install and launch the software on your Windows 11.
Step 2. Quick Remove Applications
Click on “All Programs” from the menu on the left side. Choose a specific program from the list that you wish to force uninstall. Click on “Uninstall” to proceed.
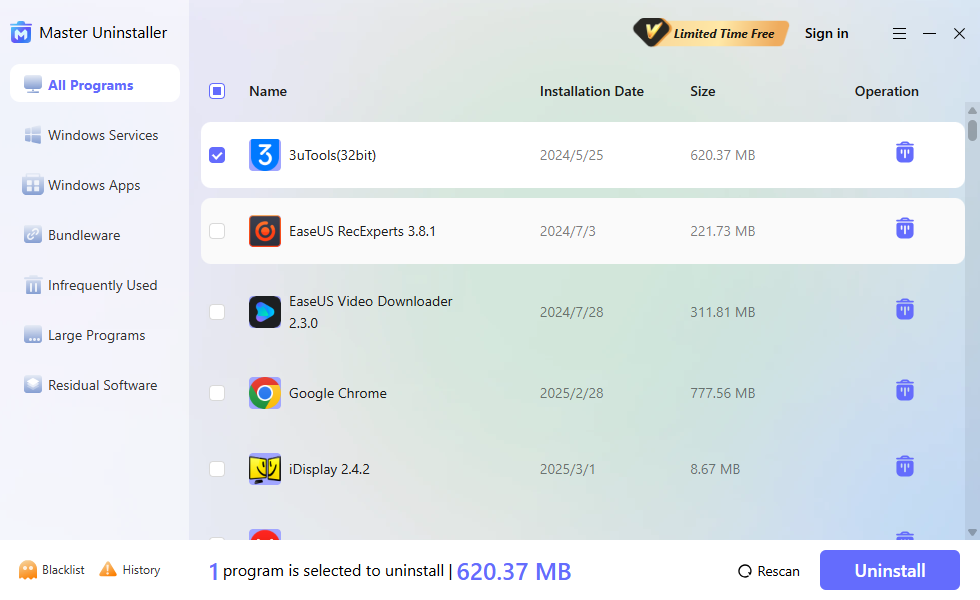
Step 3. Wait for the Process
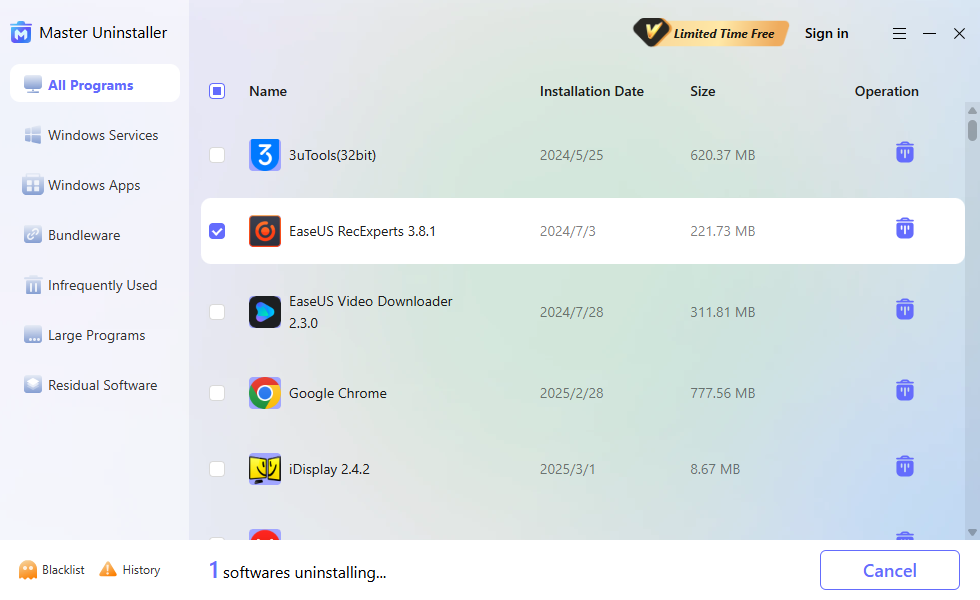
Once done, wait for the process to be completed.
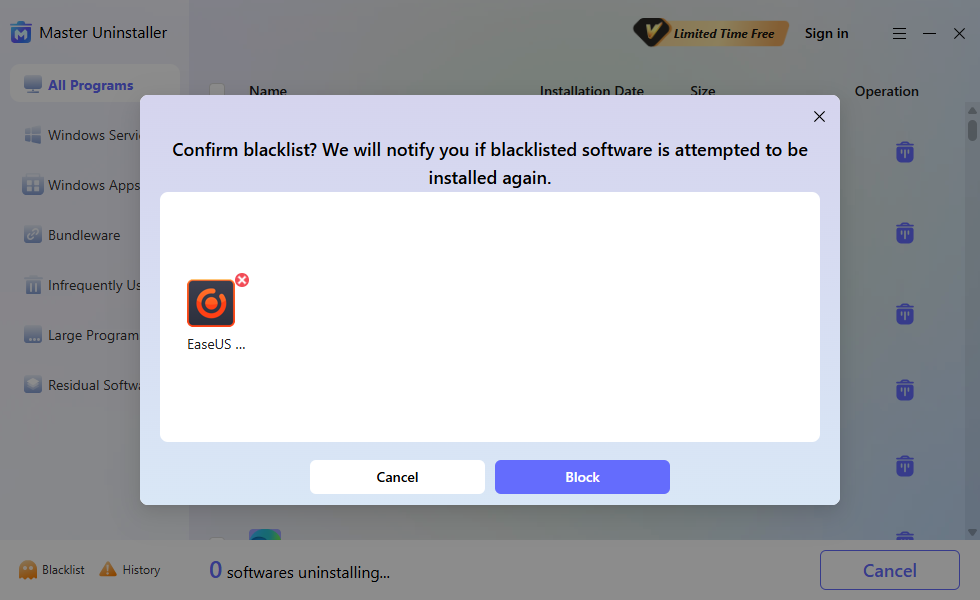
Once the software is uninstalled, you’ll be prompted with an option to block the software. Click on “Block,” and the Master Uninstaller will notify you if the program is attempted to be installed again.
Additional Options
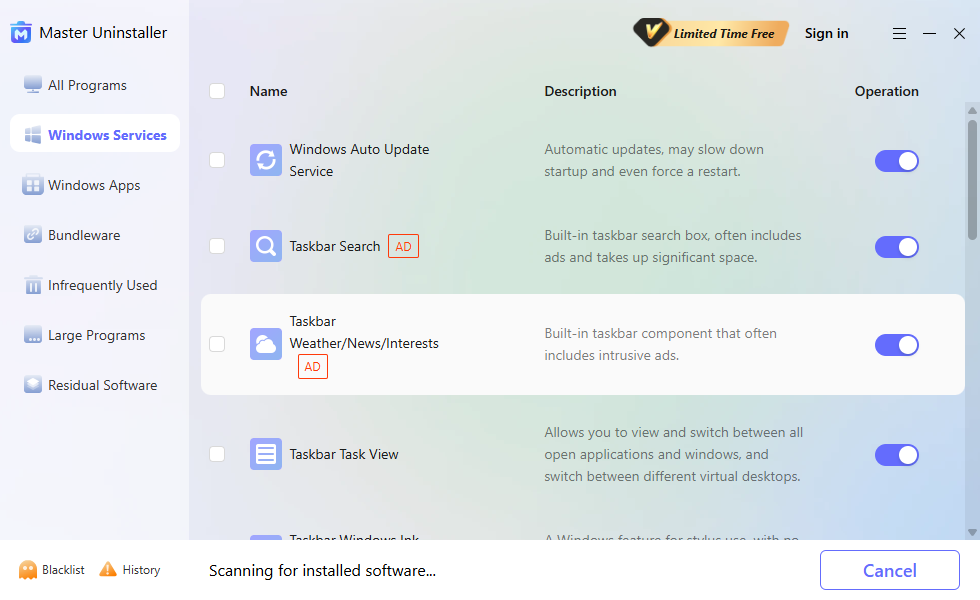
Turn off Windows Services
Click on “Windows Services” from the left menu. You can toggle to turn off the services’ operations. You can also choose a service and click on “Uninstall” to get rid of it.
Remove Windows Built-in Applications
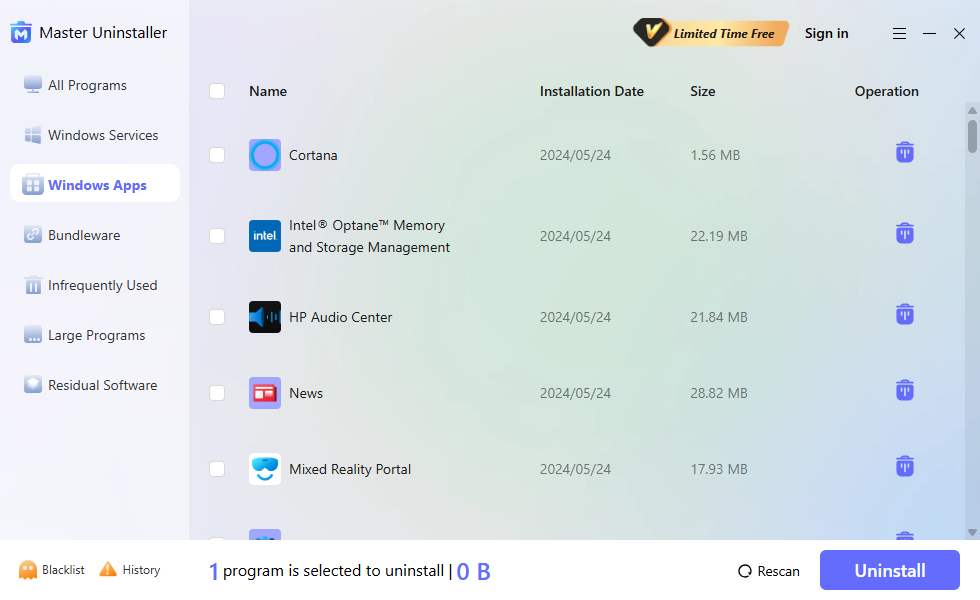
You can also choose to force uninstall a built-in Windows application. Click on “Windows Apps” from the options. Choose any service and click on the “Uninstall” button.
Remove Bundleware
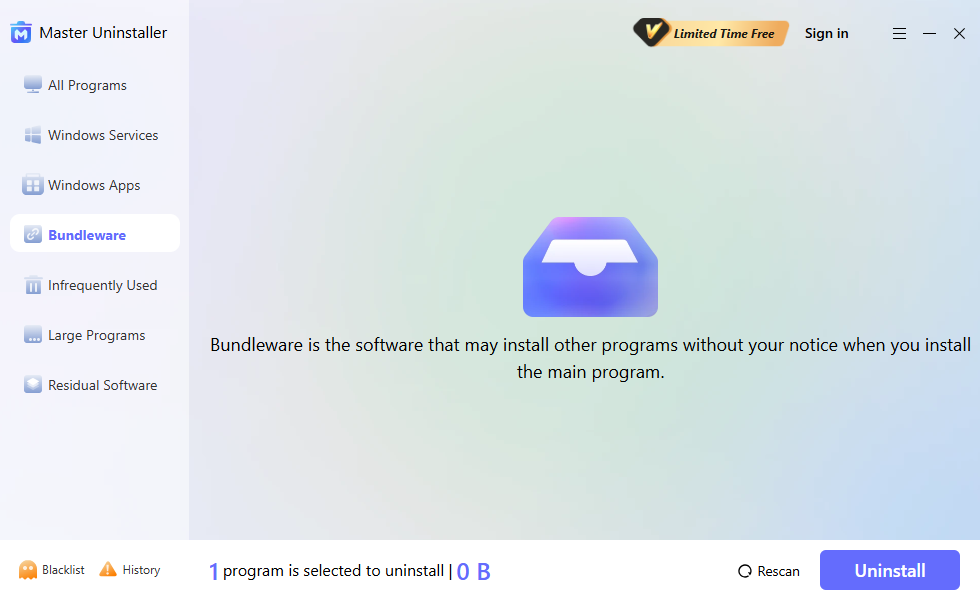
Click on “Bundleware” to find software installed in bundles. Identify unnecessary programs that may have been installed together. Select them and click “Uninstall” to remove them.
Get Rid of Infrequently Used
Click “Infrequently Used” to check programs that haven’t been used for a long time. Review the list and decide which apps you no longer need. Select the unwanted app(s) and click “Uninstall“.

Manual methods: how to uninstall a program that refuses to uninstall
If you don’t want to install additional software to get rid of your stubborn applications, manual methods can help. You can manually uninstall software using Settings and Control Panel in two common ways. Let’s explore how to do it seamlessly! Let’s find out how to force uninstall a program on Windows 11!
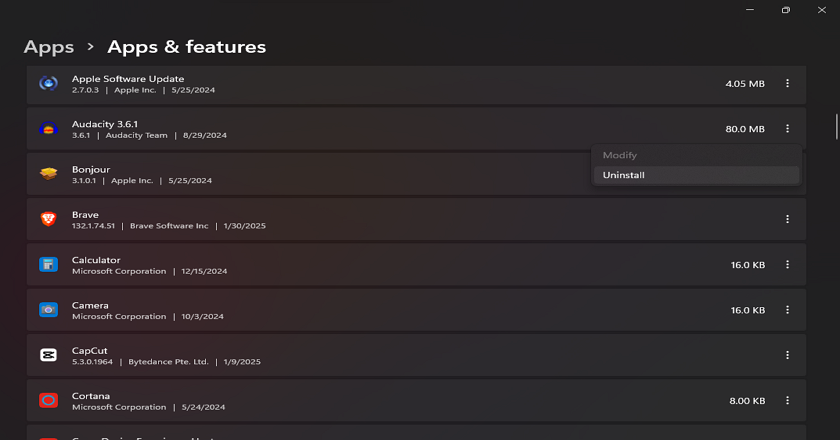
Method 1: Using Settings
- Step 1: Open “Settings” by pressing Windows + I.
- Step 2: Navigate to “Apps > Apps & Features”.

- Step 3: Find the program you want to remove and click the three-dot menu (…) next to it.
- Step 4: Select “Uninstall,” then confirm to complete the process.

Method 2: Using Control Panel
Step 1. On your Windows 11 PC, press and hold the “Windows” and “R” keys. Type Control Panel and hit the Enter button.
Step 2. Click on “Programs” and then “Programs and Features”.
Step 3. Find the software from the list that you wish to remove. Right-click on that software and click on “Uninstall”.
Using Safe Mode: A Reliable Method to Uninstall Stubborn Programs
If none of the above methods work for you, safe mode can be a life savior. Safe Mode in Windows 11 refers to a boot system that only loads critical drivers and services. This way, you can easily eliminate stubborn programs that are persistent or not ready to go away from the system even after giving uninstallation commands.
You must be wondering how safe mode can help force the removal of applications. Here is the answer! Safe mode offers a cleaner and less complicated environment where program handling becomes easier. Malware and corrupt software also become easier to manage in safe mode.
Tired of stubborn software on Windows 11? Let’s uninstall from safe mode!
Step by Step guide to uninstall stubborn programs in Safe Mode
Step 1. Press and hold the “Windows + R” keys on your keyboard. Type misconfig and click “System Configuration” and “Boot” tab.
Step 2. Once you’re in the Boot tab, checkmark the “Safe boot” and select “Minimal” from the options mentioned below.
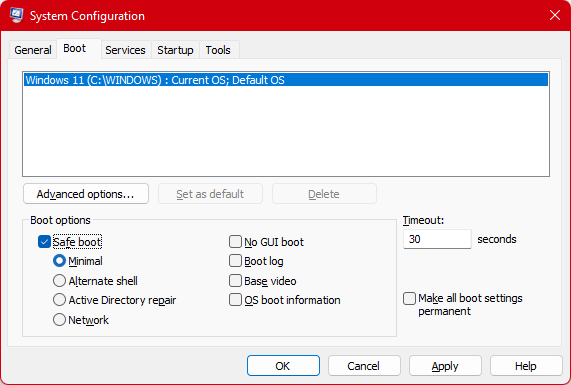
Step 3. Navigate to “Settings > Apps > Apps & Features.” Find the program and click “Uninstall.” Confirm any prompts to complete the process.
Step 4. Then, go back to the normal boot by following the same steps.
Command Line Techniques: Force Remove Software with Precision
The command line is another advanced-level procedure in that you eliminate stubborn applications. This technique helps you bypass the limitations and block the errors that hinder the uninstallation process. Wondering how to force uninstall a program on Windows 11 using the command line? Here’s a simple guide!
Step-by-Step Guide to Force Remove Software Using Command Prompt
Step 1: Press Windows + S, type cmd, right-click on “Command Prompt,” and select “Run as Administrator.”
Step 2: Type the following and press Enter:
“wmic product get name”
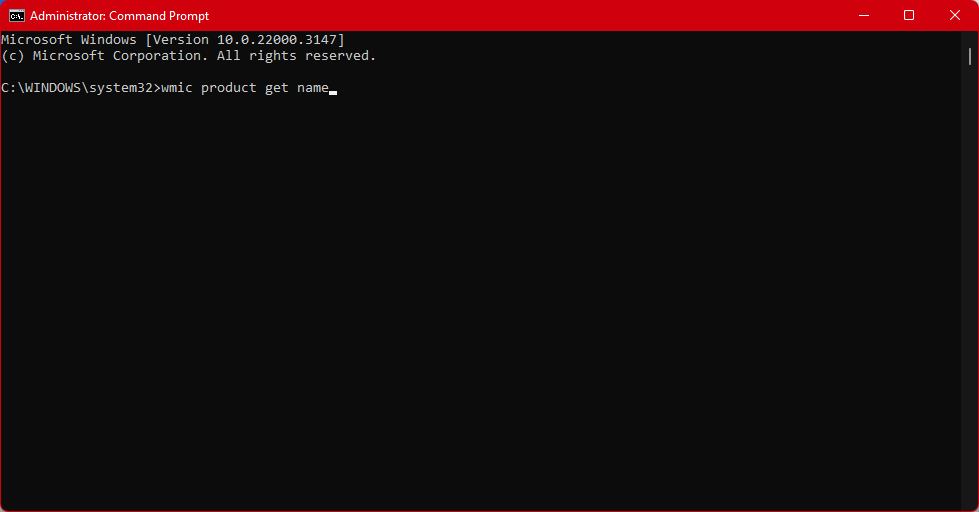
Step 3: Type the following command and press Enter, replacing Program Name with the exact name of the application:
“wmic product where name=”Sample App” call uninstall”
Step 4: Run the “wmic product get name” command again to check if the application has been successfully removed.
Comparing Windows 10 and Windows 11: Force Remove Program Techniques
Similarities
Windows 10 and 11 have similar force removal application techniques; no major difference has been found between them. Both operating systems can force uninstall application via the Control Panel, Settings, Command Line, and more. Moreover, you can also utilize a third-party uninstaller on both operating systems to remove stubborn software.
Differences
Regarding differences, the only distinguishing part is the interface of Windows 11, which is smoother and cleaner than Windows 10. Moreover, the installed apps section in settings is also more simplified as compared to Windows 10.
Part 4: Troubleshooting: Overcoming common uninstallation obstacles
When trying to uninstall a program on Windows 11, you might encounter a few problems. Worry not! We have stated all the common challenges and the solutions alongside. Let’s explore!
- Background Running— Sometimes, the program might run in the background and hinder the uninstallation process. Open Task Manager and force-close the software first.
- Access Denial— Run the uninstaller with the administrator settings to avoid access denial issues.
- Leftover Registry— Most of the time, the registry leftovers can irritate even after uninstalling the software. Use the registry cleaners to avoid any future issues.
Bonus Tips: Maintaining a Clean and Efficient System
Here are a few bonus tips to maintain a clean and healthy system:
- Remove the stubborn applications and software to keep the system clutter-free.
- Always update the software and applications to avoid corruption.
- Utilize the Task Manager to force close the program and related processes.
- You can also disable the startup program to avoid heavy processing loads and keep the system fast.
- Utilize the antivirus software to keep the system virus-free.
Frequently Asked Questions (FAQs)
Q:
What are the risks of using third-party uninstaller tools?
Third-party software is usually safe and poses no risk to the system. However, downloading the software from an unreliable source can damage your system due to malware, data breaches, and more.
Q:
How can I safely force the removal of software using the Registry Editor?
Hold and press the Windows + R buttons on the keyboard. Type regedit and then find “HKEY_LOCAL_MACHINE\SOFTWARE\Microsoft\Windows\CurrentVersion\Uninstall”. Find the program entry, right-click, and delete it.
Q:
Are there any free tools available to help force uninstall applications?
Several free tools are available to force uninstall applications, and one reliable choice is IObit Uninstaller. Apart from this, you can go for Ashampoo Uninstaller and Revo Uninstaller.
Final Words
This guide has answered the most asked question, “How to force uninstall a program on Windows 11?” in a detailed manner. You can go for third-party uninstallers or built-in Control Panel and Settings. You can also choose from uninstallation via safe mode and command line if other methods don’t work. Once you find the right method to remove stubborn applications, you’ll be able to keep your system clutter-free.
Master Uninstaller
-
Simple and Practical: Easily uninstall unwanted software.
-
Thorough Cleanup: Completely remove residual files.
-
Blacklist Protection: Identify and block malware and adware.
How to Uninstall Valorant Efficiently: 3 Easy Methods
Is your system running slowly? Valorant might be the reason. Due to its large storage and resources, it potentially slows down your PC. Many players uninstall it to free up space, improve performance, or make room for new games.
Uninstalling Valorant isn’t just about hitting delete. If you don’t follow the right steps, you risk leaving behind files, errors, or Riot Vanguard still running in the background. Skipping these steps can lead to uninstallation errors.
So why wait? This article will explain how to completely remove Valorant from your PCthe process using three different methods. Whether you use the Riot Client, Windows settings, or a trusted third-party tool, we’ll walk you through how to uninstall Valorant completely from your PC.
How to Delete VALORANT via Master Uninstaller
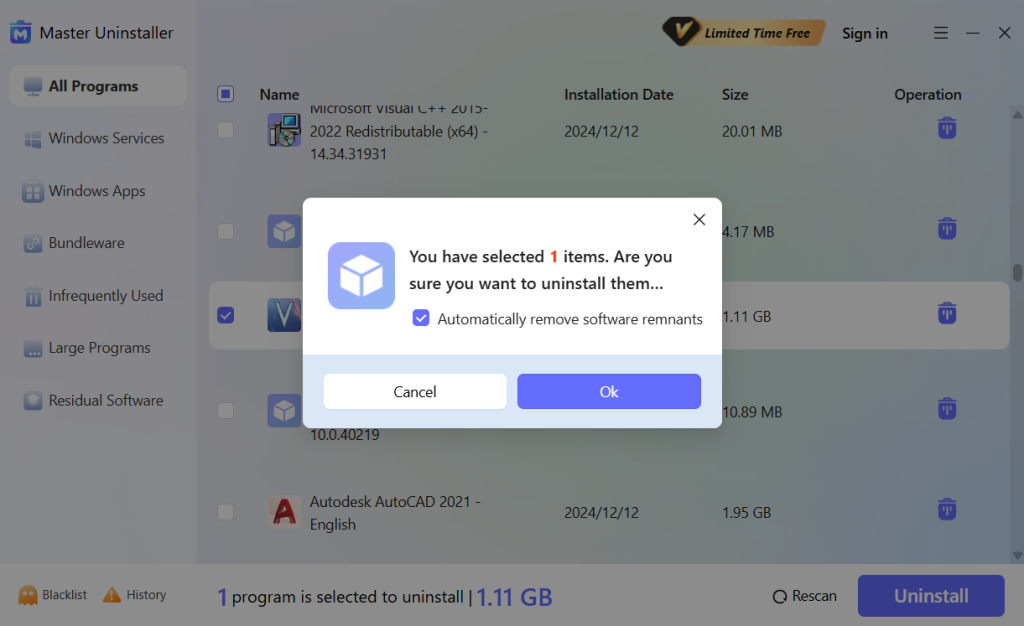
Tired of following multiple steps just to uninstall a single program, only to find leftover files still cluttering your system? Master Uninstaller is here to solve your problem. It is a powerful tool designed to remove unwanted apps, stubborn programs, and hidden residual files, ensuring a cleaner and faster PC with just one click. You don’t have to search for leftover Riot Client or VALORANT files manually; Master Uninstaller takes care of everything automatically.
Steps to Uninstall VALORANT Using Master Uninstaller
Step 1: Access Master Uninstaller
- Launch Master Uninstaller from your desktop or Start menu.
Step 2: Find VALORANT in the List
- Once inside the Master Uninstaller, scroll through the list of installed applications to locate VALORANT. Click the Bin icon or select Uninstall to begin.
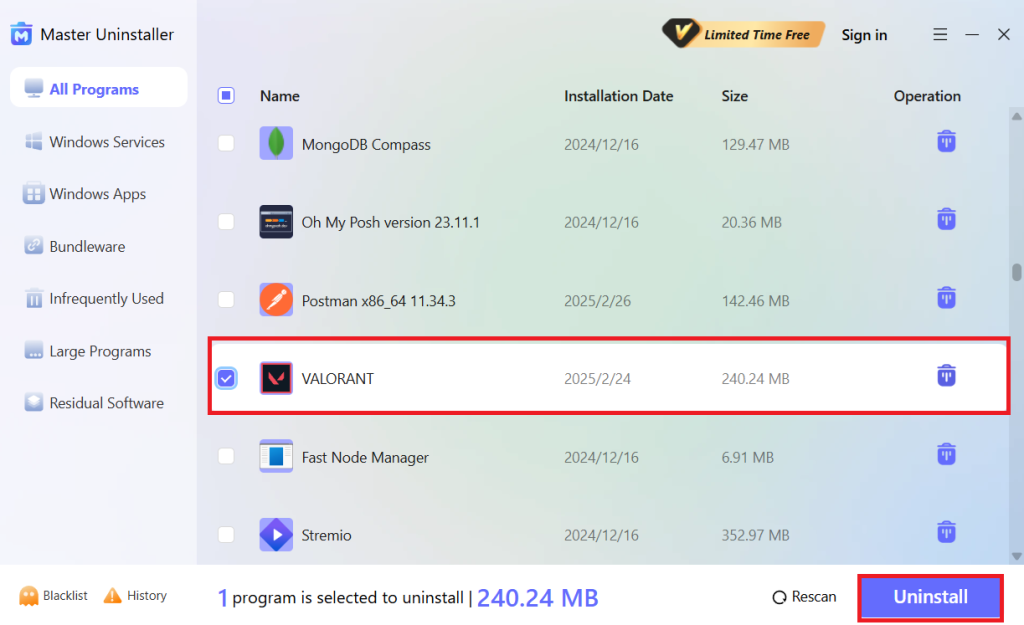
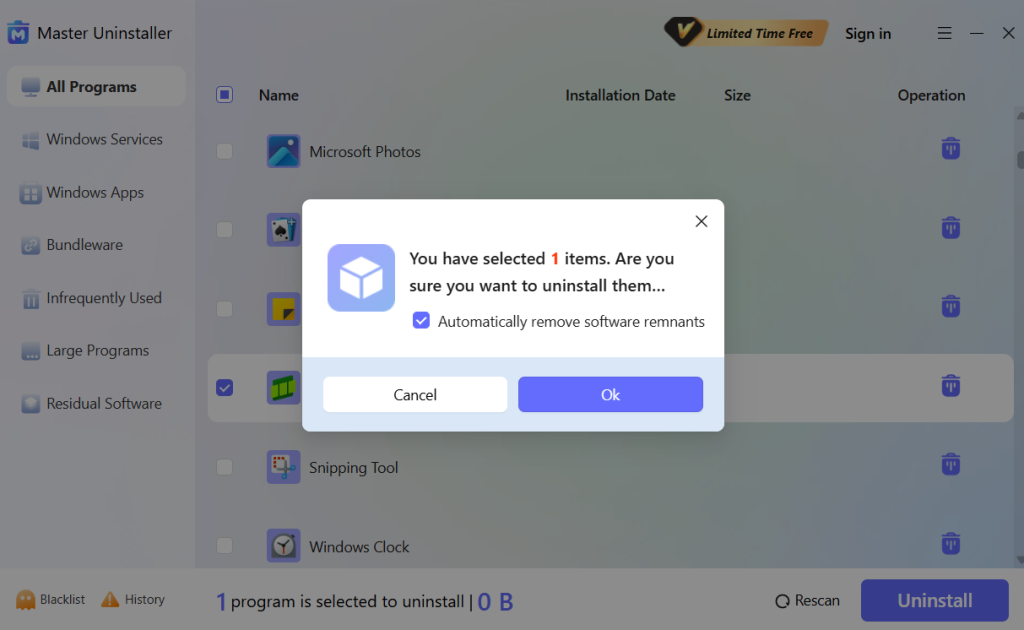
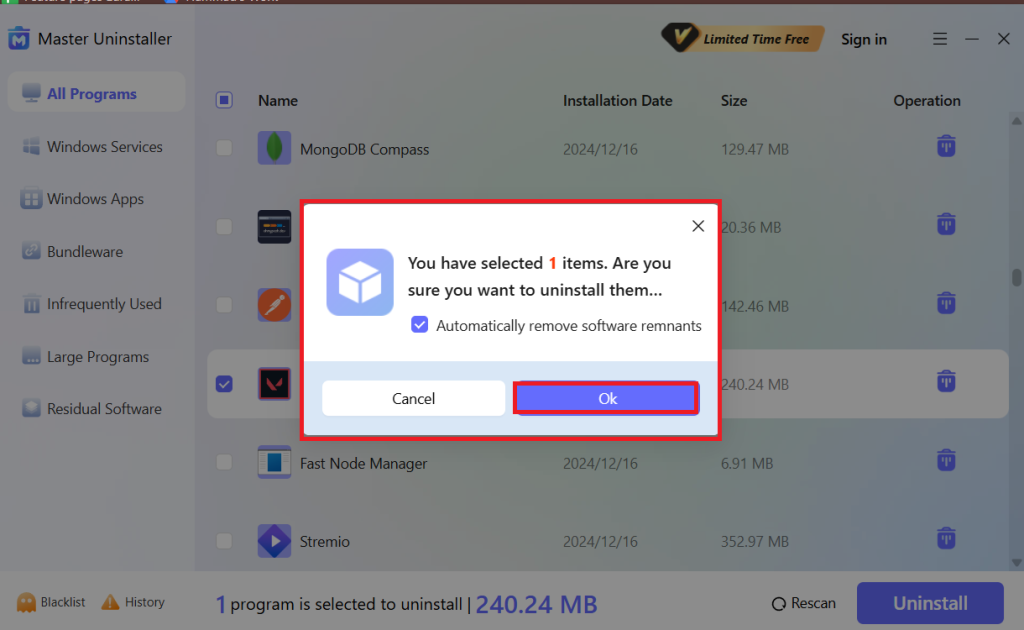
Step 3: Uninstall the Program
- After clicking Uninstall, a confirmation pop-up will appear. To ensure a complete cleanup, check the option to remove software remnants, then hit OK to proceed automatically.
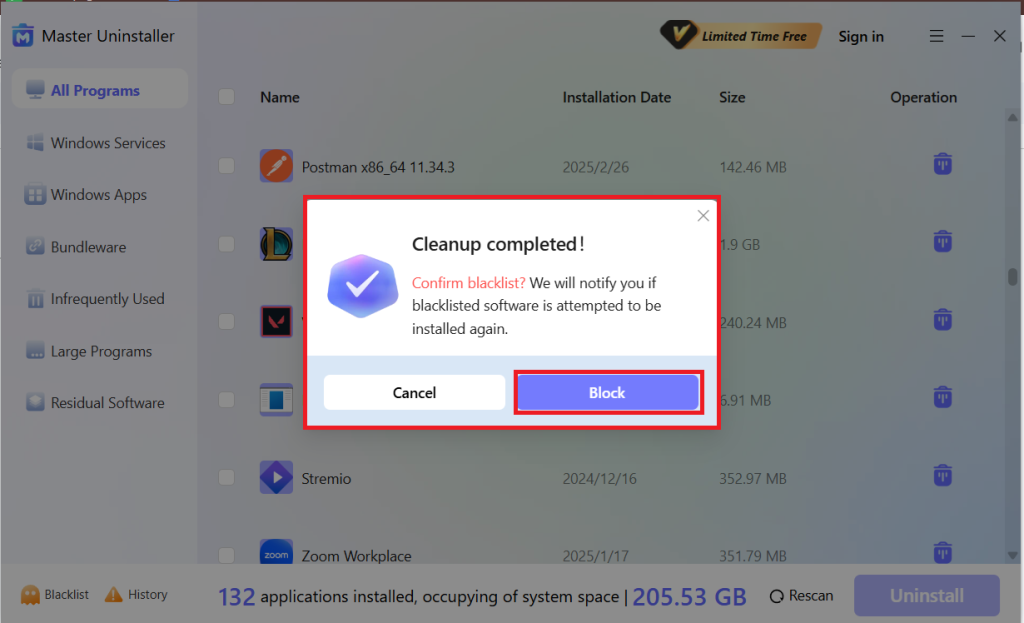
Step 4: Permanently Block It (Optional)
- Before completing the process, you’ll get an option to block VALORANT permanently. If you don’t want it reinstalling without permission, hit Block, and it will be sent to the Blacklist folder.
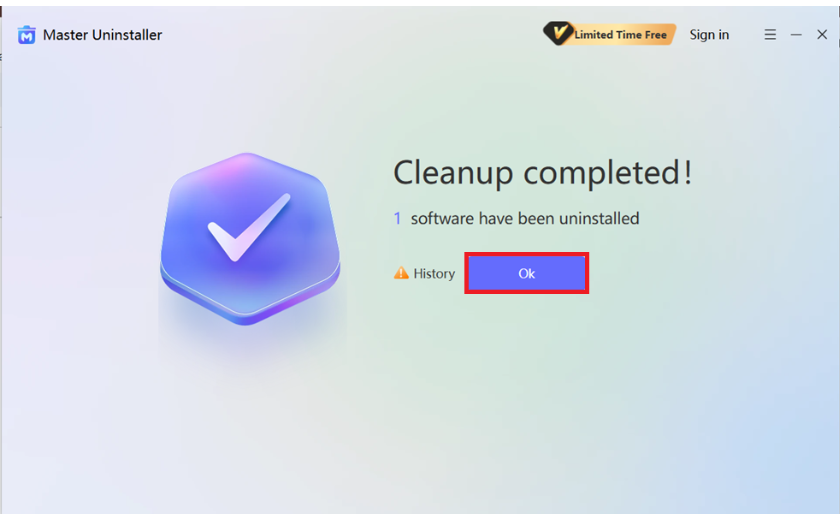
Finally, hit OK, and VALORANT is completely removed—no leftover files, no extra steps needed!
2 Proven Methods to Uninstall Valorant from Your PC
Uninstalling Valorant may seem simple, but improper removal can leave behind unwanted files or cause errors. To make your process easier, we have two different methods to answer your question about how to uninstall Valorant from your PC easily.
1. Uninstallation of Valorant on Windows 11
If you prefer a straightforward way to remove Valorant, Windows 11’s built-in settings provide a quick solution. However, there may be leftover files, so you must follow additional steps to complete the uninstallation. Follow these simple steps to know how to uninstall Valorant on Windows 11.
Step 1: Open the Settings App
- Press Win + i to open Settings instantly. Alternatively, you can type Settings into the Windows search bar and open it there.
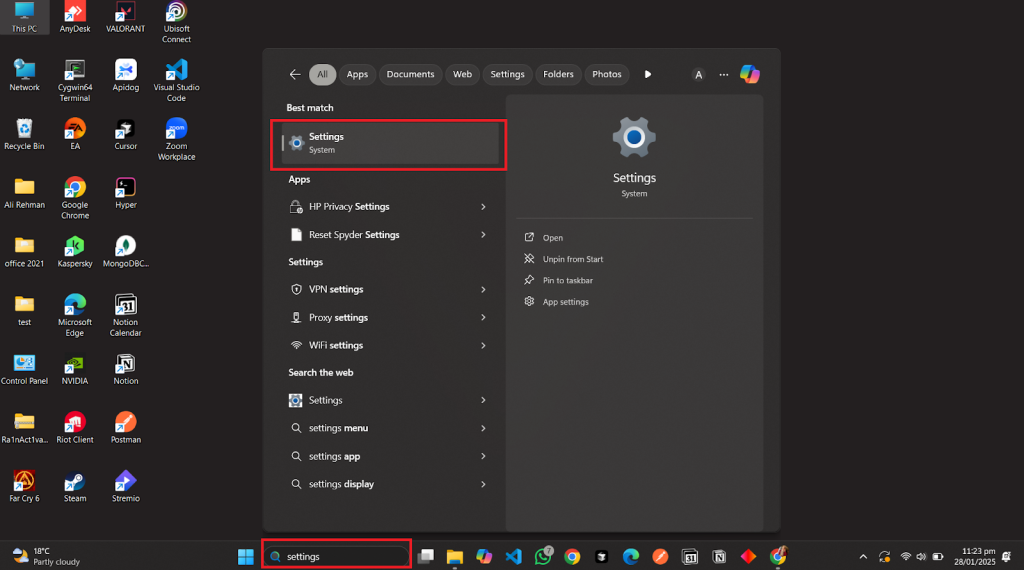
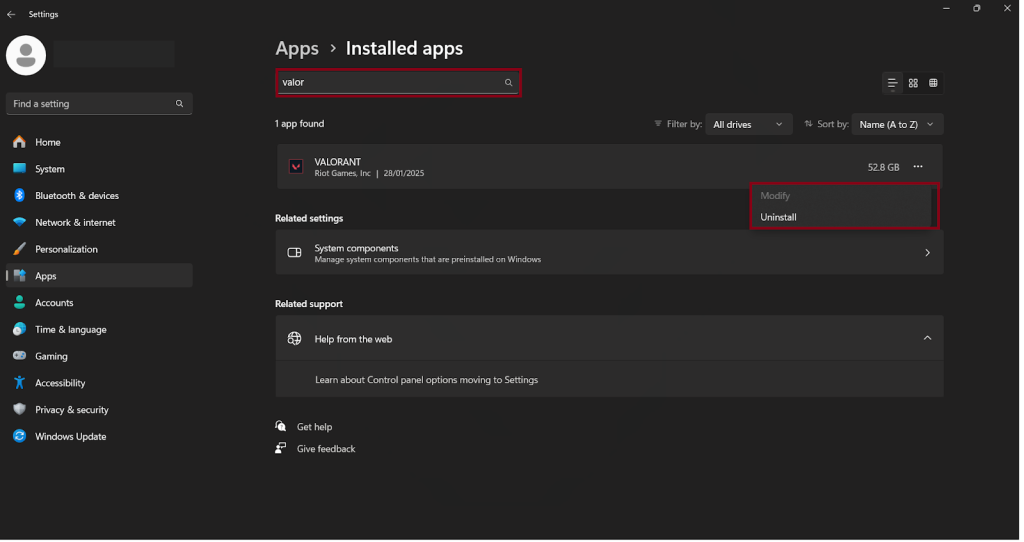
Step 2: Navigate to Installed Apps
- In Settings, navigate to Apps > Installed Apps.
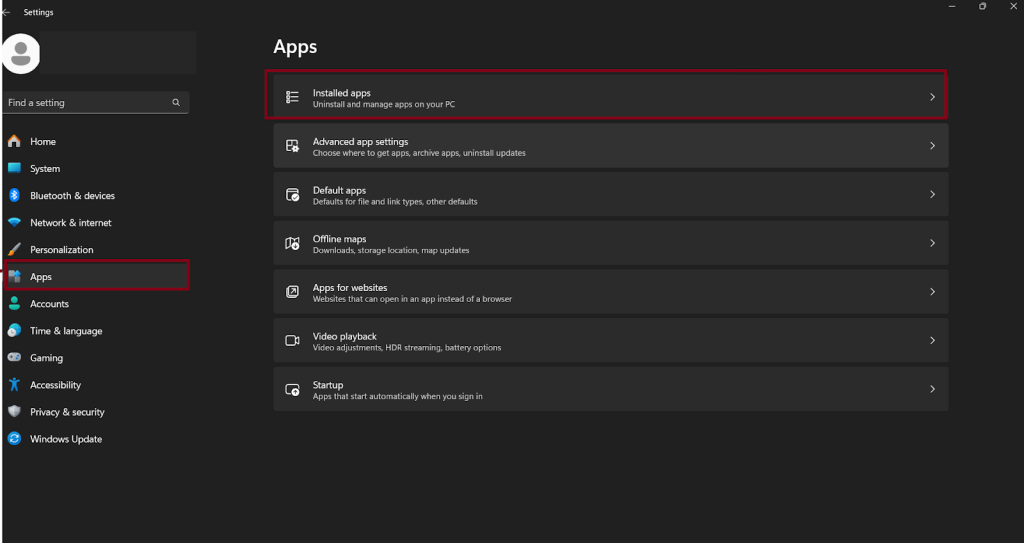
Step 3: Uninstall Valorant
- Search for Valorant in the list, click the three-dot menu on the right, and select Uninstall. And just like that, Valorant is gone!
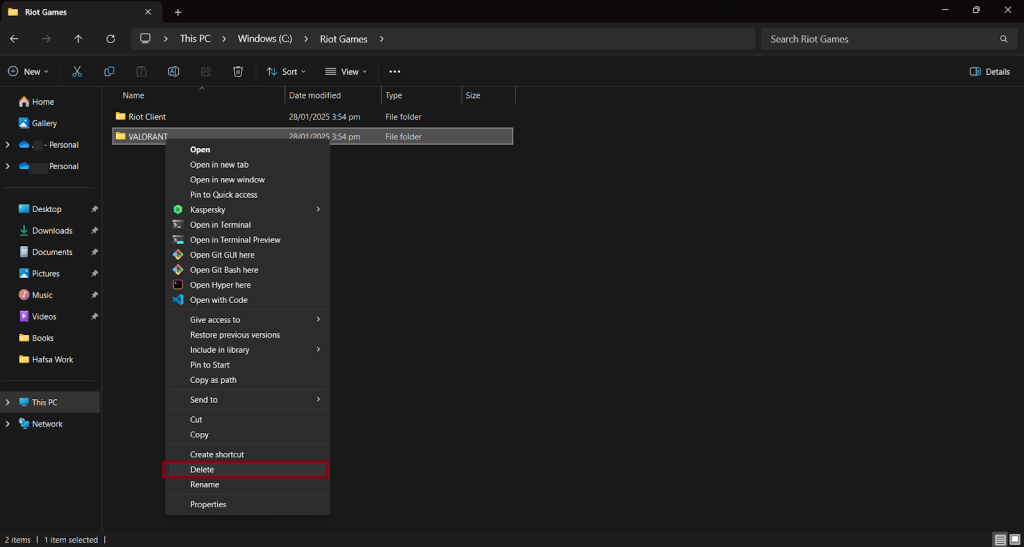
Step 4: Delete Leftover Files
- We’re not quite done yet! Open File Explorer and go to your C: drive. Find the Riot Games folder and delete the Valorant folder, ensuring proper cleanup.
Once these steps are completed, Valorant should be fully removed from your system. If issues persist, try an alternative method for deeper cleanup.
2. Uninstallation of Valorant through Riot Client
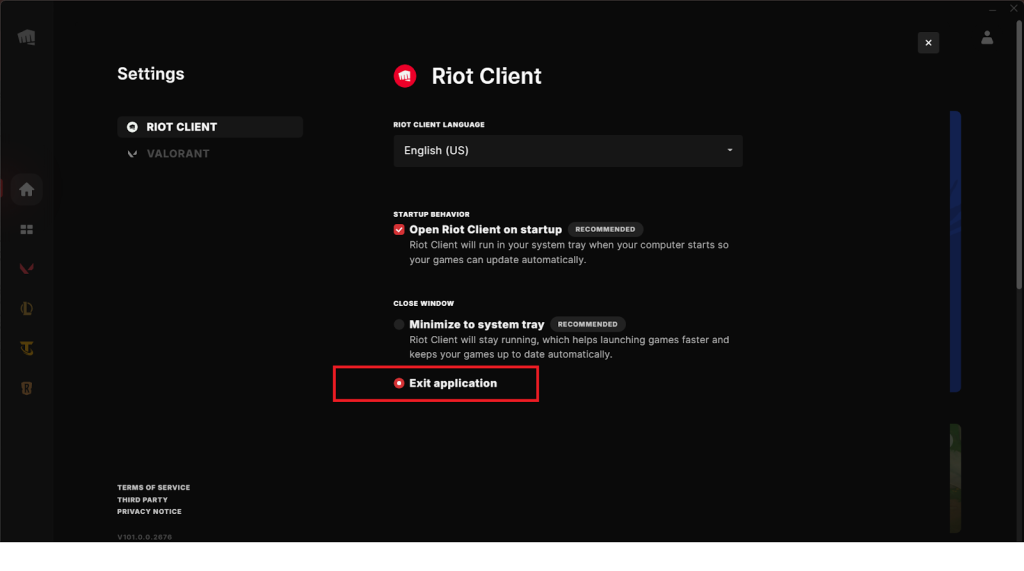
Suppose Riot Client prevents the uninstallation of Valorant by popping up an error that Riot Client is still running. Worry not; we are here to solve this error of how to close riot clients to uninstall Valorant.

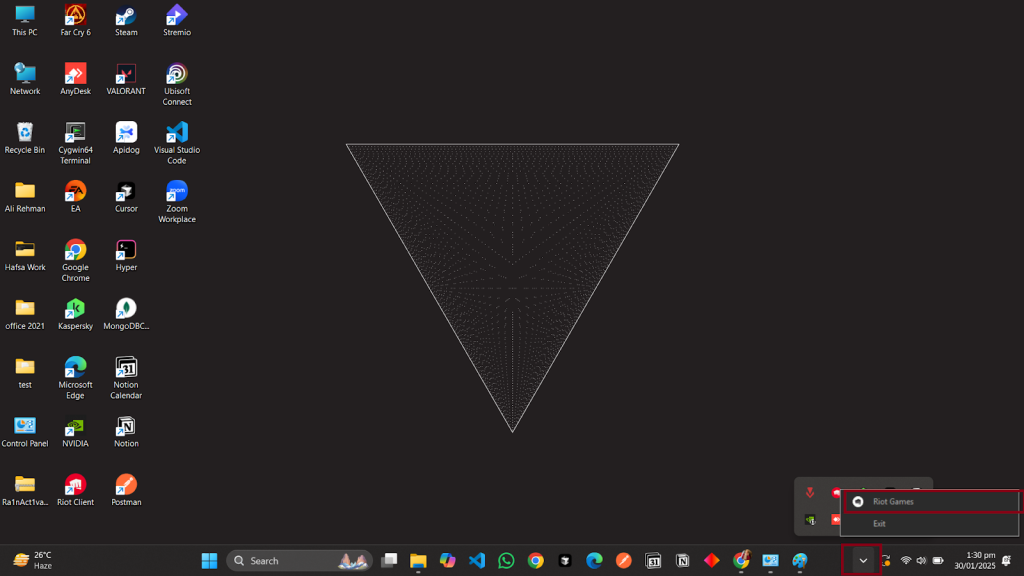
Step 1: Exit Riot Client Properly
- Go to the System Tray at the bottom right of your screen, right-click the Riot Client icon, and select Exit.
Step 2: Open the Control Panel
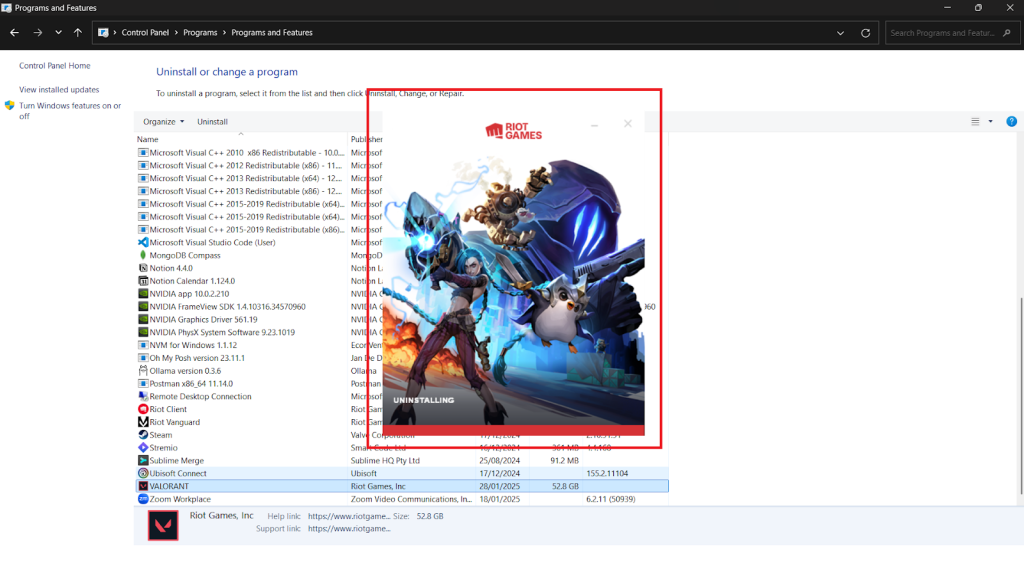
- Now press Win+R, type Control Panel, and hit Enter. You’ll be redirected to the Control Panel; navigate to Programs > Uninstall a Program.
Step 3: Uninstall Valorant
- Find Valorant in the list, right-click, and select Uninstall. Follow the on-screen instructions to remove it. And Voila, you are done uninstalling the Valorant.
Your concerns about how to uninstall Valorant on the Riot Client end are here!
If following various steps isn’t your go-to preference, the next method is for you. A faster method to remove the Valorant and left overfiles with just one click.
Step-by-Step Guide to Complete Software Removal
If you have opted to uninstall directly from Windows or manually via Riot Client, leftover files and registry entries may remain. Following these steps will resolve your curiosity about how to uninstall Valorant completely.
Check for Leftover Files Using File Explorer
- Open File Explorer and go to the following locations:
- C:\Program Files\Riot Games
- C:\ProgramData\Riot Games
- C:\Users\YourUsername\AppData\Local\Riot Games
- Delete any folders related to Valorant or Riot Games
Remove Registry Entries Using Registry Editor
- Press win + r, type regedit, and hit Enter.
- In the Registry Editor, navigate to:
- HKEY_LOCAL_MACHINE\SOFTWARE\Riot Games
- HKEY_CURRENT_USER\Software\Riot Games
- Right-click on any Riot Games or Valorant folders and select Delete.
How to Verify Uninstallation of the Valorant?
After uninstallation, how would you know whether Valorant is completely removed from your system?
Let’s look at the methods and tools to verify the complete uninstallation of the Valorant.
Methods to Confirm Valorant is Fully Uninstalled
- Check Installed Programs: Open Control Panel > Programs & Features and ensure Valorant is not listed. If it appears, uninstall it again.
- Verify in Task Manager: Press Ctrl + Shift + Esc, go to Processes, and confirm no Valorant or Riot Client tasks are running.
- Inspect File Explorer: Delete any remaining Valorant or Riot Games folders from C:\Program Files, C:\ProgramData, and AppData\Local.
Tools to Ensure No Remnants Are Left
- Disk Cleanup: Open Disk Cleanup, select your primary drive (C:), and remove temporary files related to Valorant.
- Registry Editor: Press win + r, type regedit, and delete Valorant or Riot Games entries under:
- HKEY_LOCAL_MACHINE\SOFTWARE
- HKEY_CURRENT_USER\Software
- Third-Party Uninstallers: IObit Uninstaller or Revo Uninstaller can scan and delete leftover files.
5 Bonus Tips for a Smooth Process
Uninstalling a program like Valorant can be frustrating when residual files slow down your PC. And if you’re wondering how to uninstall Valorant smoothly, here are five tips to help you with Valorant complete removal.
- Close Valorant Completely: To prevent uninstallation errors, end all Valorant-related processes in Task Manager before starting the removal process.
- Restart Before and After Uninstallation: A fresh reboot helps clear background processes and applies all system changes correctly.
- Check Antivirus Settings: Some antivirus software blocks uninstallation. Turn If something goes wrong, temporarily turn off your antivirus, but remember to turn it back on afterward.
- Manually Remove Excess Files: Once uninstalled, go to %appdata% and delete all remaining Valorant folders to clear up space and prevent clashes.
- Use a Third-Party Uninstaller: Tools like IObit Uninstaller help remove hidden files and registry entries with just one click and error-free uninstallation. Sounds like a relief.
Frequently Asks Questions
Q:
1. What if Valorant doesn’t appear in the uninstall list?
If Valorant does not appear in the uninstall list, go to Windows Settings (win+i) and select Apps > Installed Apps. If you cannot find it, you can use a third-party uninstaller such as IObit Uninstaller or manually uninstall Valorant and Riot Games files.
Q:
2. Can I reinstall Valorant after uninstalling it?
Yes, you can reinstall Valorant at any time. Download the latest version from Riot Games’ official website and follow the installation steps. If you encounter errors during reinstallation, clear extra files and restart your PC before trying again to ensure a clean setup.
Q:
3. Does uninstalling Valorant affect other Riot games?
Removing Valorant won’t delete other Riot games like League of Legends or Teamfight Tactics. However, uninstalling the Riot Client might affect them. If you plan to keep other Riot games, avoid removing the launcher and only uninstall Valorant itself.
Q:
4. How do you resolve errors during uninstallation?
If you encounter errors, restart your PC and try again. If that doesn’t work, turn off your antivirus software, use Riot’s uninstaller, or run Microsoft’s Install and Uninstall Troubleshooter. Delete Valorant’s files manually and clean the Windows Registry to remove remaining entries for stubborn cases.
Final Words
Knowing how to uninstall Valorant correctly ensures a smooth and error-free process. Whether you use Windows settings, Riot Client, or a third-party tool, each method guarantees complete removal.
Third-party uninstallers are the best choice for a hassle-free cleanup. They eliminate hidden files and optimize system performance. Keeping your PC clean frees up space and prevents future errors. Follow these steps, and you’ll quickly have Valorant completely removed.
Master Uninstaller
-
Simple and Practical: Easily uninstall unwanted software.
-
Thorough Cleanup: Completely remove residual files.
-
Blacklist Protection: Identify and block malware and adware.